
This guide has two parts. Part 1 shows you around the Voice Agents workspace — where your agents live, and where you see how they’re performing. Part 2 walks you through creating an agent from scratch, which takes about 10–15 minutes and needs no technical knowledge.
ContentsPart 1 — Your Voice Agents workspace
- Finding Voice Agents
- The Agents tab — your list of agents
- The Analytics tab — how your agents are performing
- The Reports tab — detailed reporting and exports
Part 2 — Creating a voice agent
- Step 1 — Start a new agent
- Step 2 — Enter your website
- Step 3 — Choose how you want to set up
- Step 4 — Analyze phase
- Step 5 — Confirm phase — the ten settings tabs
- Step 6 — Test & Launch
Reference
Part 1 — Your Voice Agents workspaceFinding Voice AgentsLog in to the Convirza portal. In the left-hand sidebar, under INSIGHTS, click Voice Agents.
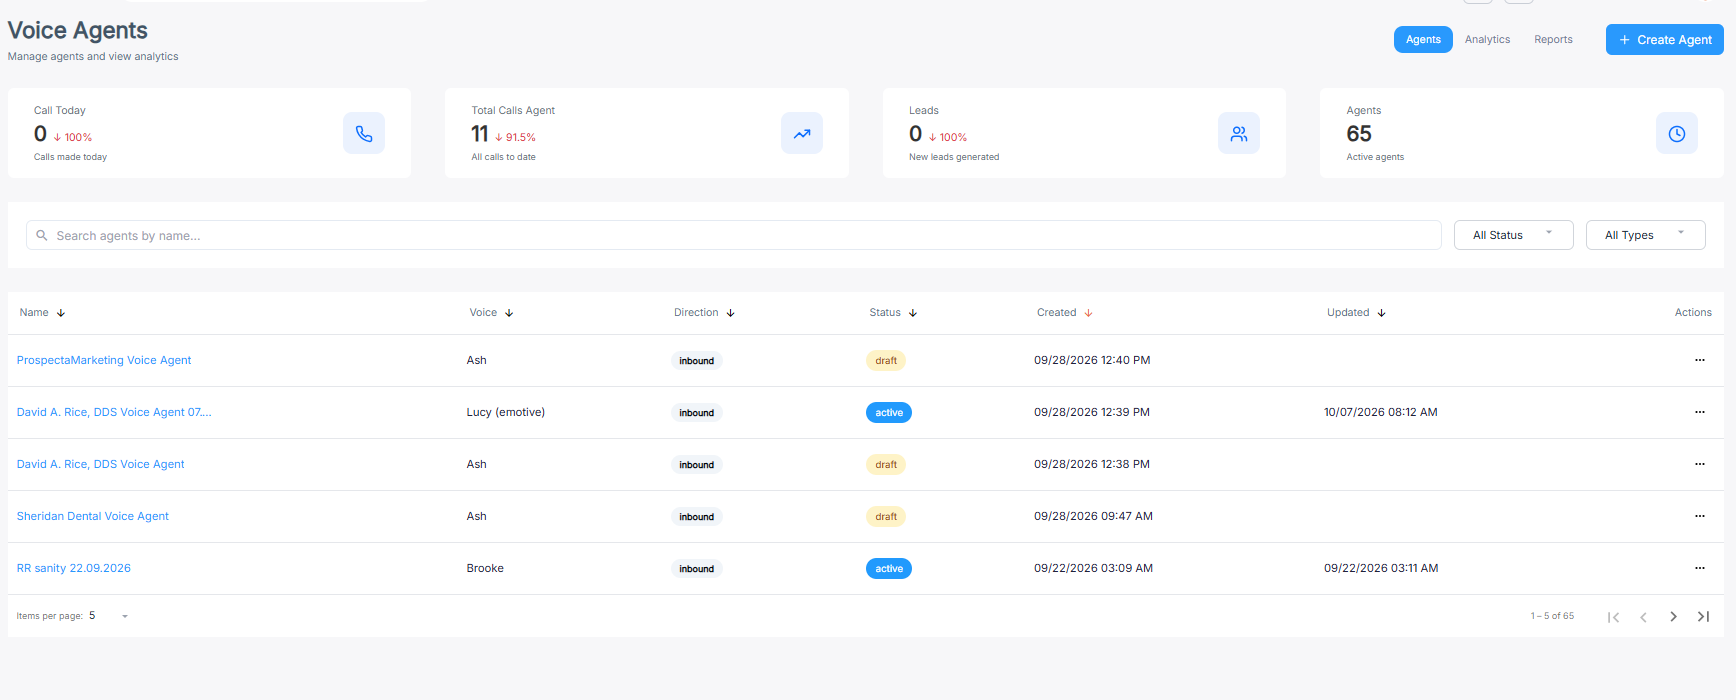
The Voice Agents workspace. Four tabs sit at the top right: Agents, Analytics, Reports, and Create Agent.
At the very top of the screen you’ll see which account and group you’re working in — for example Convirza-Live > Groups > Subgroups. Everything on these pages relates to the group selected there, so check it’s the right one before you read the numbers.
Four controls sit at the top right of every page in this section:
|
Control |
What it does |
|---|---|
|
Agents |
Your list of voice agents — see The Agents tab |
|
Analytics |
Performance insights and call analytics — see The Analytics tab |
|
Reports |
Detailed reporting and exports — see The Reports tab |
|
+ Create Agent |
Builds a new voice agent — see Part 2 |
They stay in the same place on all three tabs, so you can move between them at any time.
The Agents tabThis is the home page of the section, and where you land by default. It shows every voice agent in the selected group.
The summary cards
Four cards run across the top:
|
Card |
What it shows |
|---|---|
|
Call Today |
Calls handled today, with the change against the previous day |
|
Total Calls Agent |
All calls handled to date |
|
Leads |
New leads generated |
|
Agents |
How many agents are currently active |
The small percentage next to each number is the trend — green for up, red for down. A red ↓100% on Call Today simply means no calls yet today; it isn’t a fault.
Finding an agent
Under the cards are three tools:
- Search agents by name — type any part of the name
- All Status — filter by active, draft, or inactive
- All Types — filter by agent type
The agent list
Each agent is one row. The columns are:
|
Column |
What it shows |
|---|---|
|
Name |
The agent’s name — click it to open the agent |
|
Voice |
The voice it speaks in, e.g. Brooke, Ash |
|
Direction |
inbound (answers calls) or outbound (places them) |
|
Status |
active, draft, or inactive |
|
Created |
When the agent was first made |
|
Updated |
When it was last changed |
|
Actions |
The ⋯ menu — edit, duplicate, or delete |
Click any column heading to sort by it. Sorting by Updated is the quickest way to find what you were last working on.
About the status:
- active — live and answering calls
- draft — setup was started but never finished. The agent is not answering calls. Open it to carry on where you left off.
- inactive — fully configured but paused
Paging through the list
At the bottom left, Items per page sets how many rows you see at once. The counter at the bottom right (1 – 5 of 64) shows where you are, with arrows to move between pages.
If you have a lot of agents, raise the items per page rather than clicking through — it makes scanning much faster.
The Analytics tabPerformance insights and call analytics for your voice agents. This is the day-to-day view: what happened on your calls.
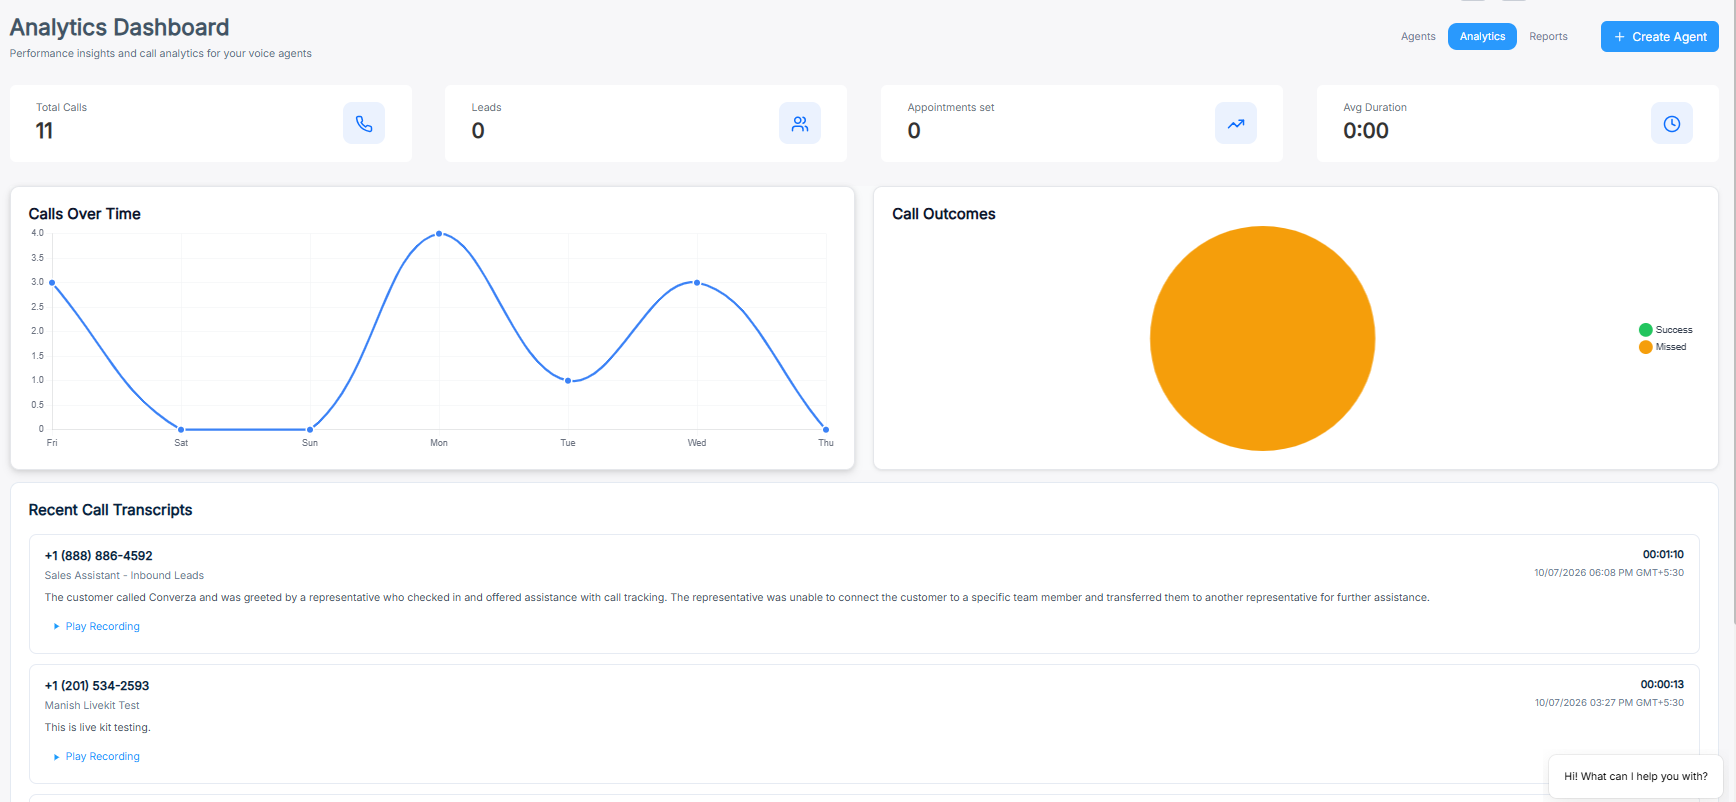
The Analytics dashboard.
The summary cards
|
Card |
What it shows |
|---|---|
|
Total Calls |
All calls handled |
|
Leads |
New leads generated |
|
Appointments set |
Appointments booked by the agent |
|
Avg Duration |
Average length of a call |
Avg Duration is worth watching. Very short average calls usually mean people are hanging up early — often because the greeting is too long or the voice sounds robotic. See Troubleshooting.
Calls Over Time
A line chart of call volume across the period. Use it to spot your busy days and to confirm the agent is picking up when you expect it to.
Call Outcomes
A pie chart splitting calls into Success and Missed. A large missed slice is the single most useful early warning you have — it means callers are reaching the agent but not getting what they came for.
Recent Call Transcripts
Below the charts is a list of recent calls. Each entry shows:
- The caller’s phone number
- Which agent took the call
- A written summary of what was discussed
- Play Recording — listen to the call itself
This is the most valuable part of the whole dashboard. Read a few transcripts each day in your first week. They tell you exactly what callers ask for and where the agent falls short, which is what you feed back into the settings tabs.
The Reports tabComprehensive analytics and reporting for your AI voice agents. Where Analytics shows you what happened, Reports lets you compare periods, filter by agent, and export the data.
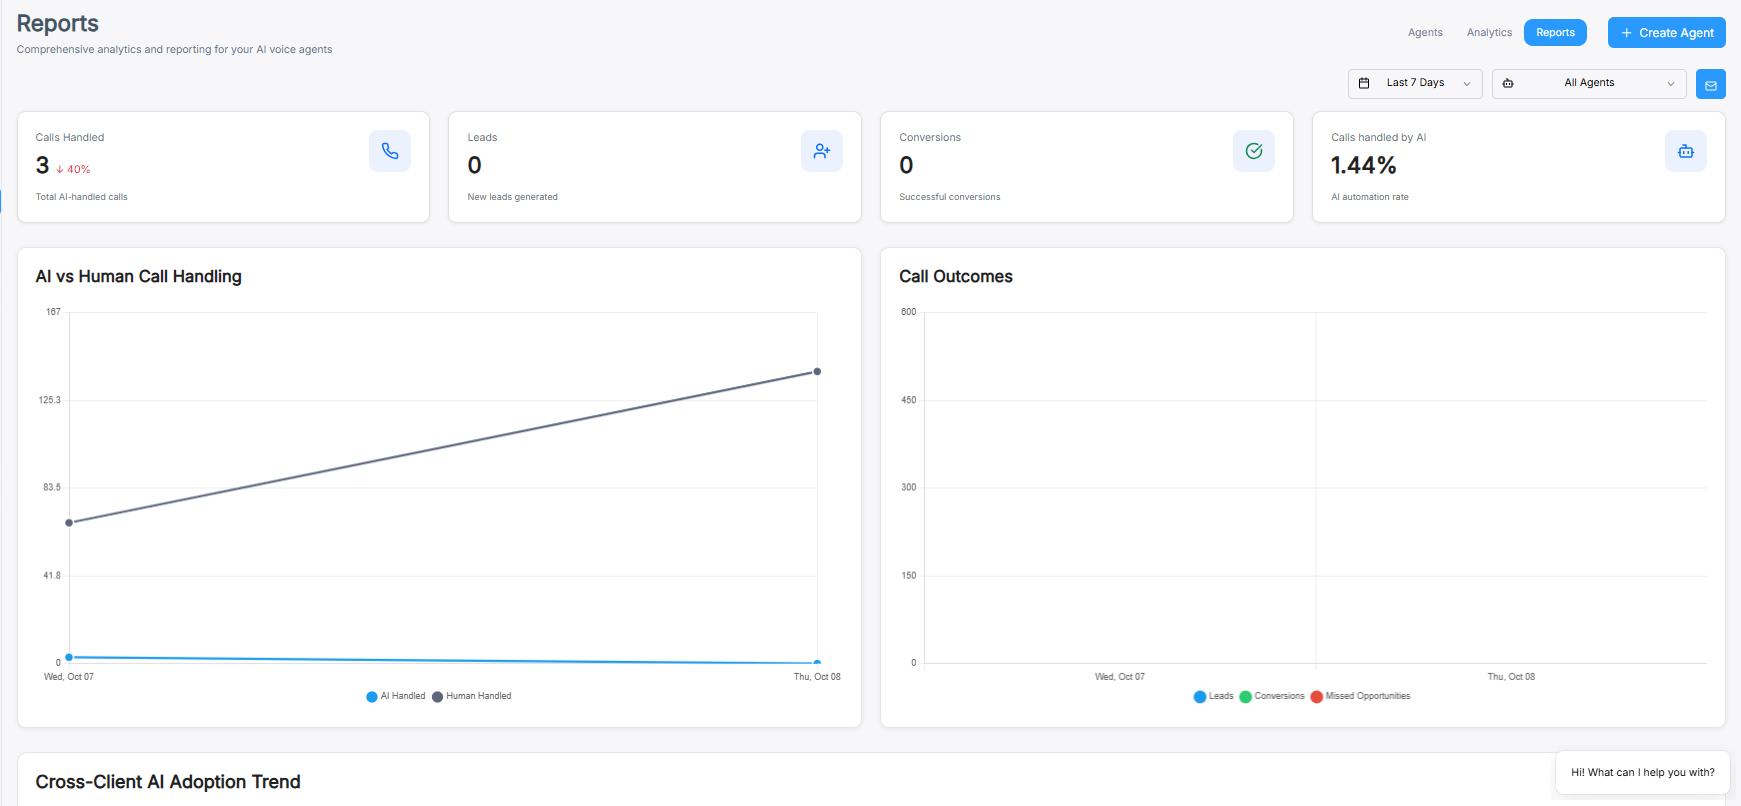
The Reports page, with filters at the top right.
Filters
Three controls sit at the top right, above the cards:
|
Control |
What it does |
|---|---|
|
Date range |
The period the whole page covers |
|
All Agents |
Narrow the page to one agent |
|
Email button |
Send the report by email |
Everything on the page responds to these, so set them first.
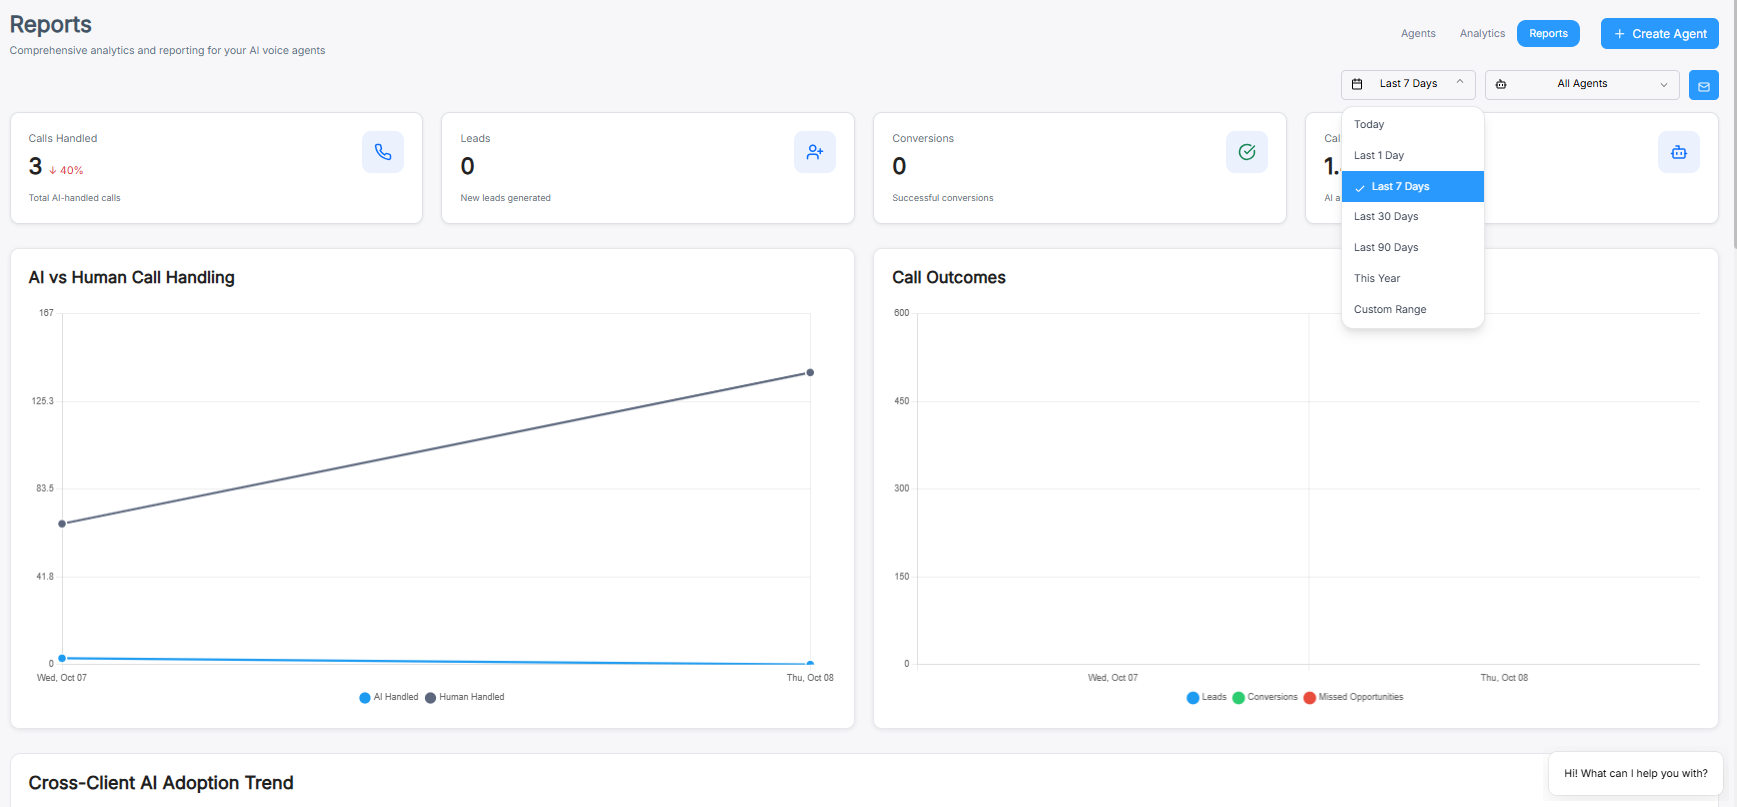
The date range options.
The date range offers Today, Last 1 Day, Last 7 Days, Last 30 Days, Last 90 Days, This Year, and Custom Range. Use Custom Range for a specific window, such as a campaign period or a single month.
The summary cards
|
Card |
What it shows |
|---|---|
|
Calls Handled |
Total AI-handled calls |
|
Leads |
New leads generated |
|
Conversions |
Successful conversions |
|
Calls handled by AI |
Your AI automation rate, as a percentage |
Calls handled by AI is the headline number for measuring value — it’s the share of calls your team didn’t have to take.
AI vs Human Call Handling
A line chart comparing calls answered by the agent against calls answered by a person. Over time you should see the AI line rise and the human line fall as the agent gets better at handling common requests.
Call Outcomes
A bar chart splitting results into Leads, Conversions, and Missed Opportunities. Missed Opportunities is the number to drive down.
Cross-Client AI Adoption Trend
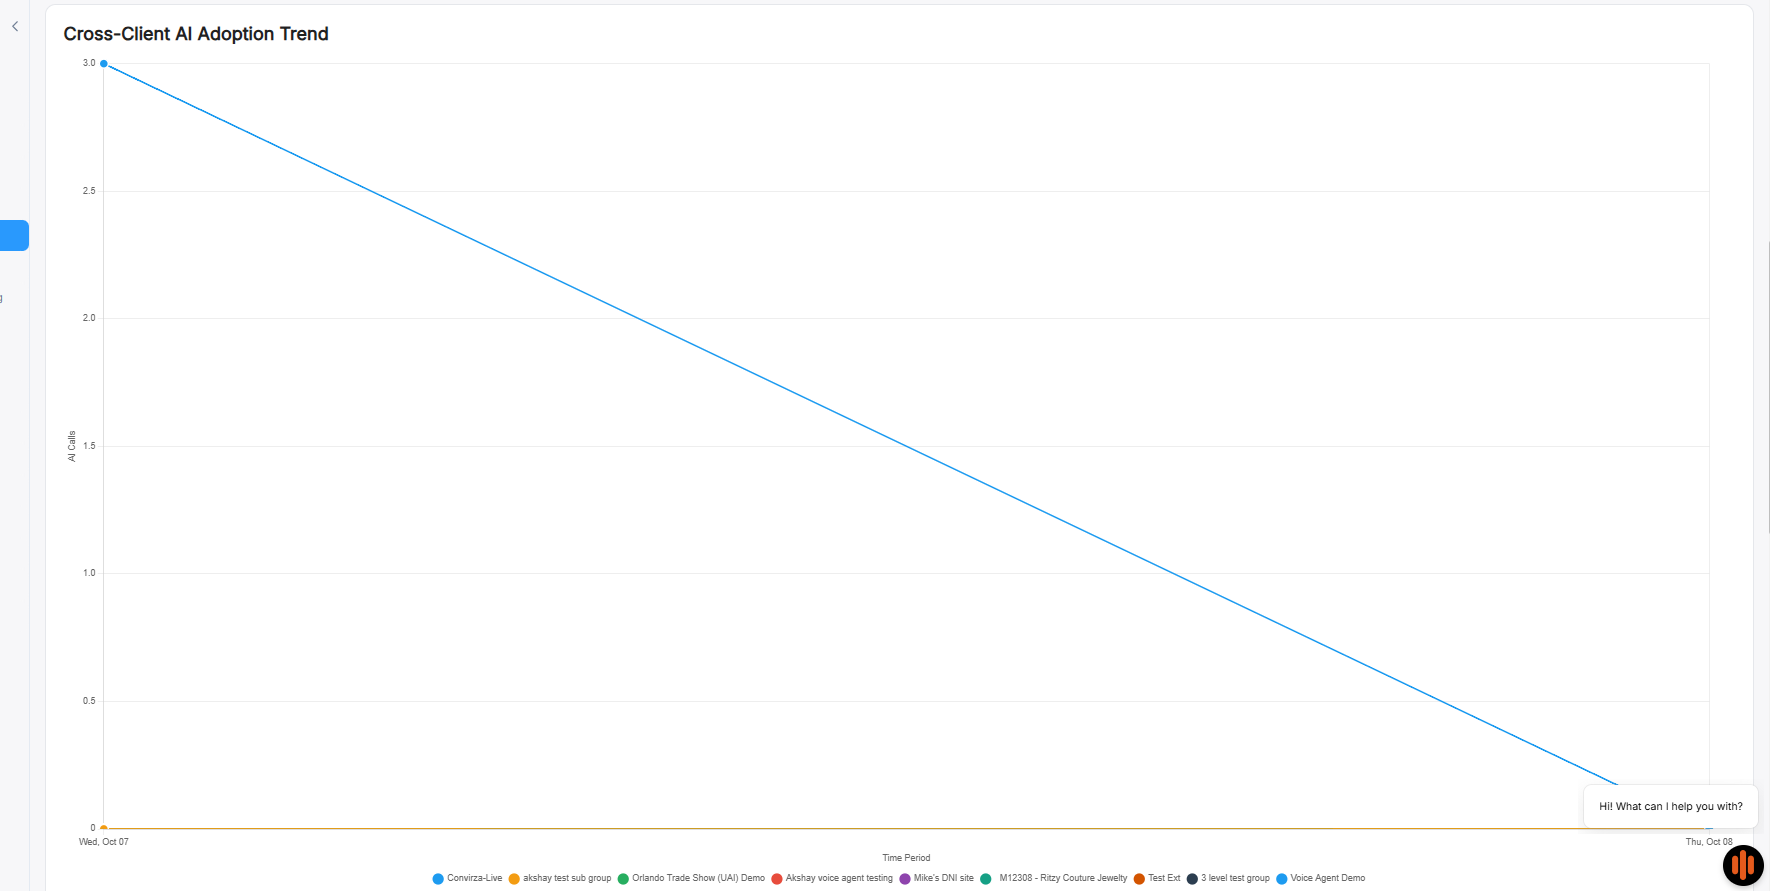
AI adoption compared across groups.
A line per group, showing AI calls over the period. This is for accounts managing several businesses or locations — it shows at a glance which are using the agent and which have gone quiet.
Conversion Funnel
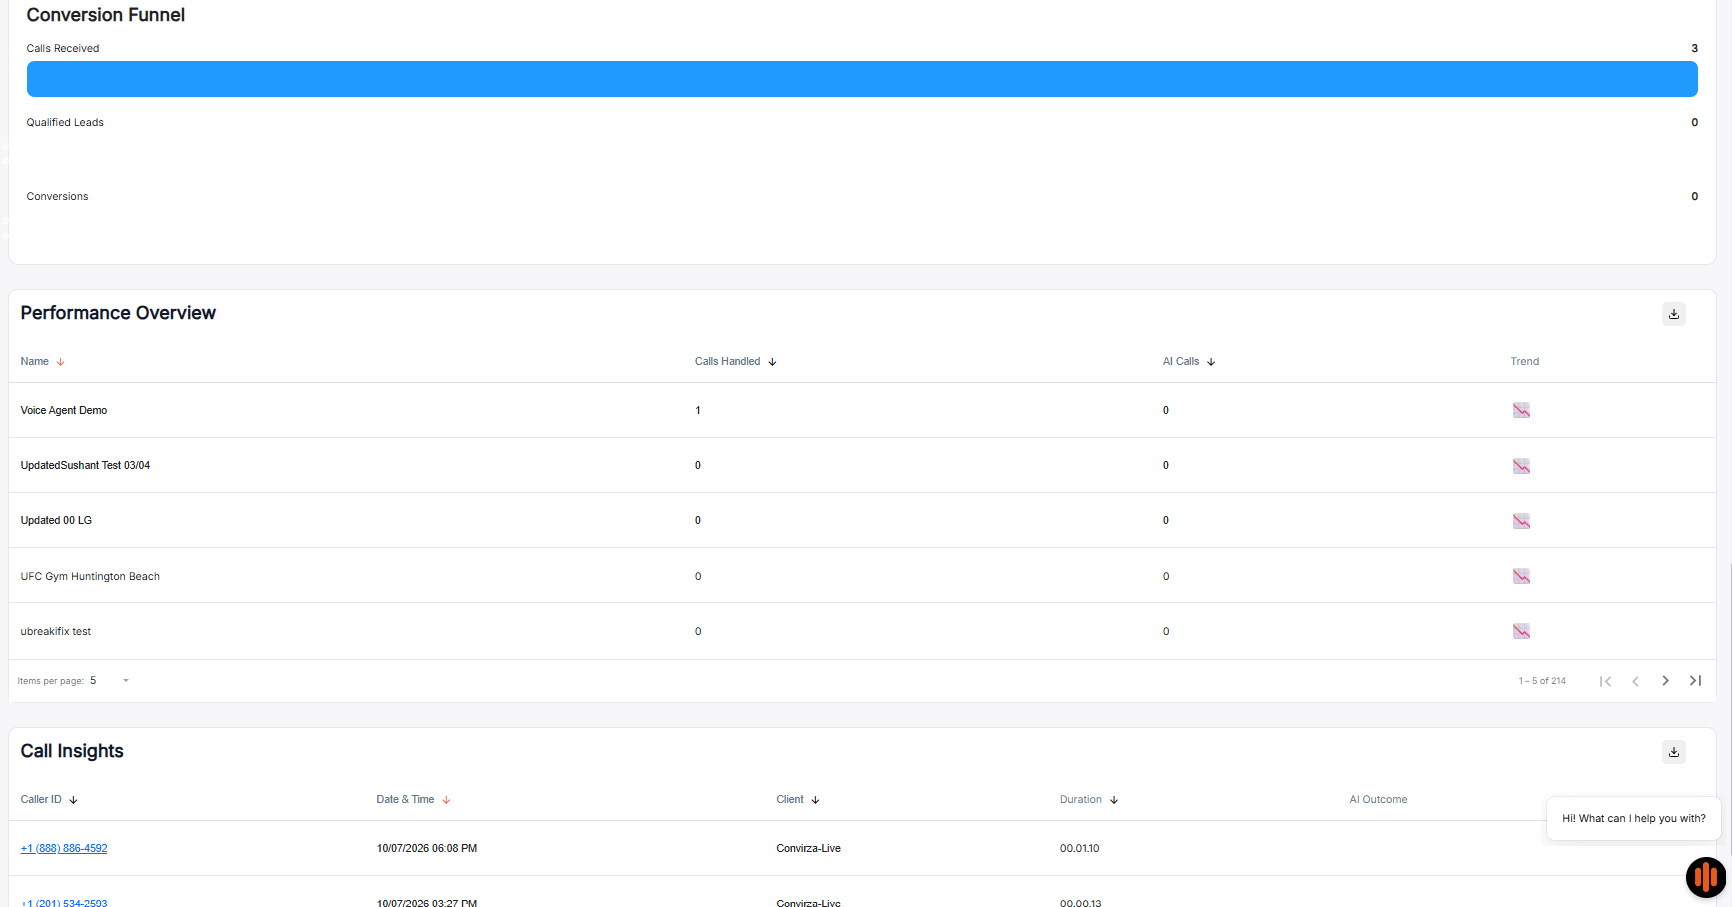
The conversion funnel and per-agent performance.
Three stages, each with its own bar:
Calls Received → Qualified Leads → Conversions
The funnel shows where callers drop out. A wide top and a narrow middle means calls are coming in but not qualifying — usually a sign the agent isn’t collecting the right information. Fix that in Role → Guidelines.
Performance Overview
A table of every agent, with:
|
Column |
What it shows |
|---|---|
|
Name |
The agent |
|
Calls Handled |
Total calls it took |
|
AI Calls |
How many it handled without a human |
|
Trend |
A small chart of its direction of travel |
Click a column heading to sort. The download icon at the top right of the panel exports the table.
Call Insights
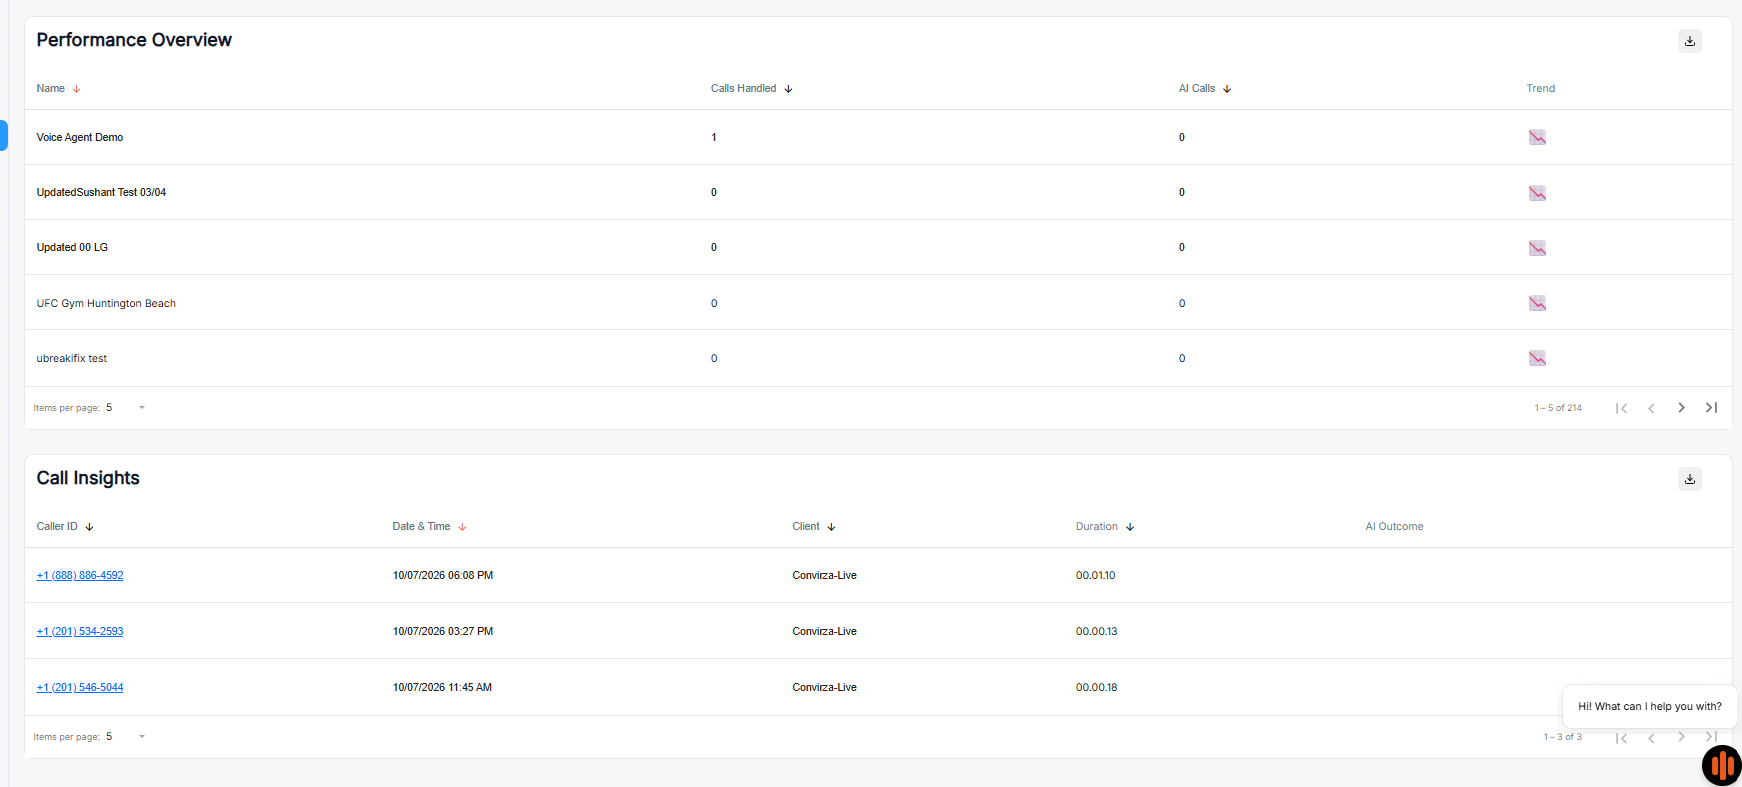
Call Insights — individual call records, with export.
A record of individual calls:
|
Column |
What it shows |
|---|---|
|
Caller ID |
The caller’s number |
|
Date & Time |
When the call happened |
|
Client |
Which account or group it belongs to |
|
Duration |
How long it lasted |
|
AI Outcome |
What the agent achieved |
This table also has a download icon for exporting.
Both tables page independently, with their own Items per page setting and counter at the bottom.
Exporting
Two ways to get the data out:
- The download icon on Performance Overview or Call Insights exports that table
- The email button at the top of the page sends the report on
Useful for monthly reporting to a client or a manager who doesn’t log in themselves.
Part 2 — Creating a voice agentBefore You Start|
What you need |
Why |
|---|---|
|
Your website URL |
The setup wizard reads it to learn your business |
|
Your business hours and timezone |
So the agent knows when you’re open |
|
Your business address |
The agent gives it to callers |
|
Your main contact phone and email |
Used for follow-ups and notifications |
|
Any documents you want the agent to know (optional) |
Price lists, FAQs, policy sheets |
|
A login with Admin or Standard role |
ReadOnly accounts can view agents but not create them |
Permission error? If you see a message saying your role can’t perform an action, your account has view-only access. Ask your account administrator to upgrade you to Admin or Standard.
Tip: Update your website before you begin — particularly your services, hours, and contact pages. The agent learns from what’s published there right now.
Setup at a GlanceCreate Agent
↓
Enter your website
↓
Choose setup method → Build it for me / Choose your setup
↓
ANALYZE — the system reads your website (10–15 seconds)
↓
CONFIRM — ten tabs, reviewed left to right
Business → Industry → Services → Hours → Greeting
→ Role → Voice → Branding → Resources → Workflow
↓
TEST & LAUNCH
From the Voice Agents workspace, click + Create Agent at the top right. It’s there on all three tabs, so you don’t need to go back to Agents first.
If you have no agents yet, the list shows “No agents found matching your filters.” with a Create Your First Agent button in the middle — that does the same thing.
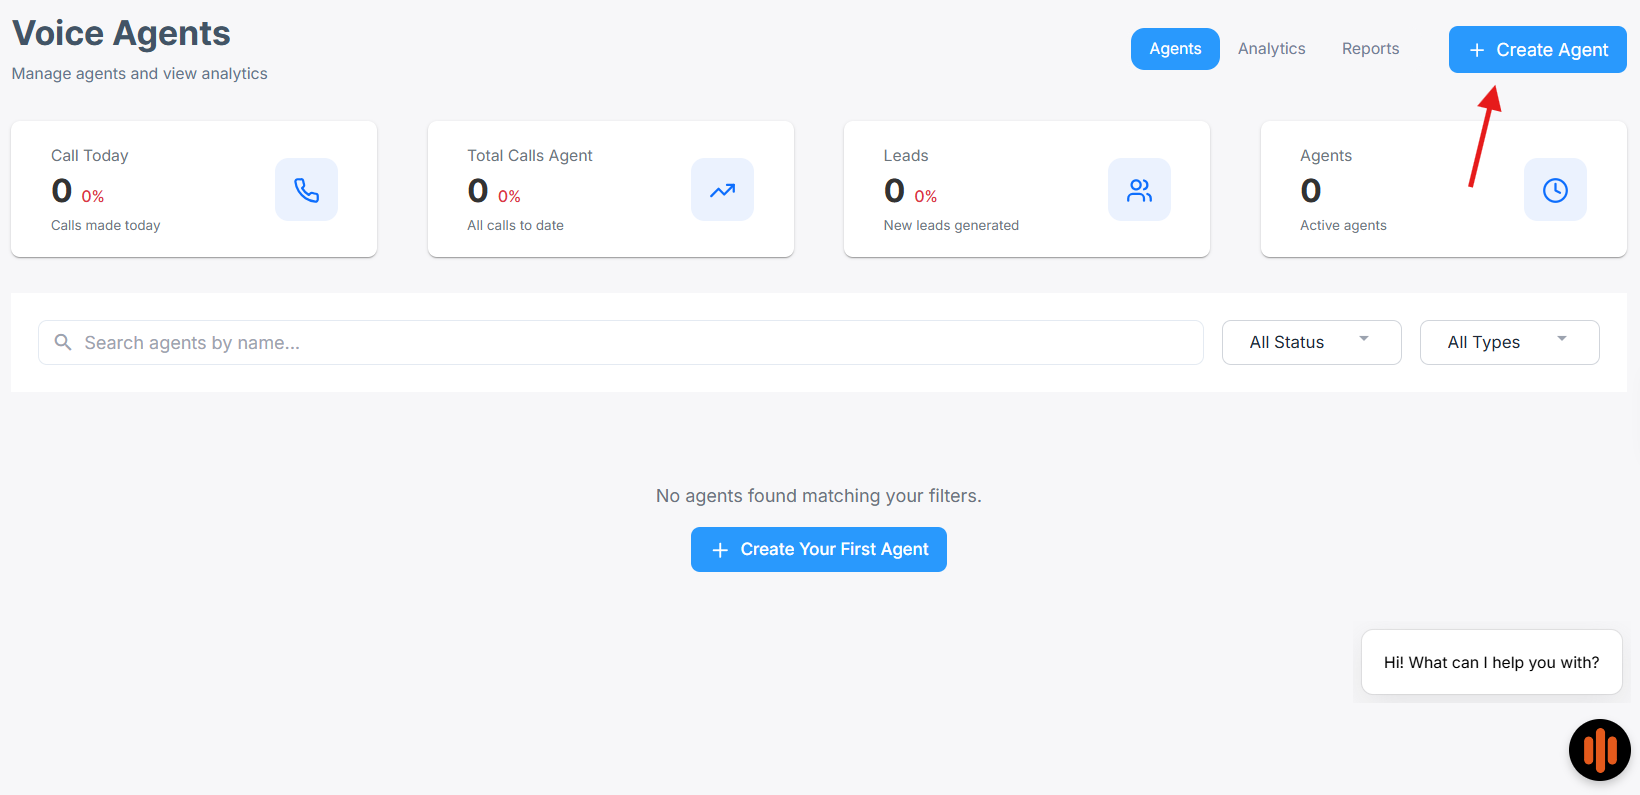
The empty state, before you have any agents.
The Voice Agent Setup window opens. The X in the top left closes it at any point.
If you close the window part-way through, the agent is saved in the list with the status draft. Open it from the Agents tab to carry on. Nothing is lost, but a draft agent does not answer calls — so finish the setup before you rely on it.
Step 2 — Enter your websiteThe first screen asks for your website address.
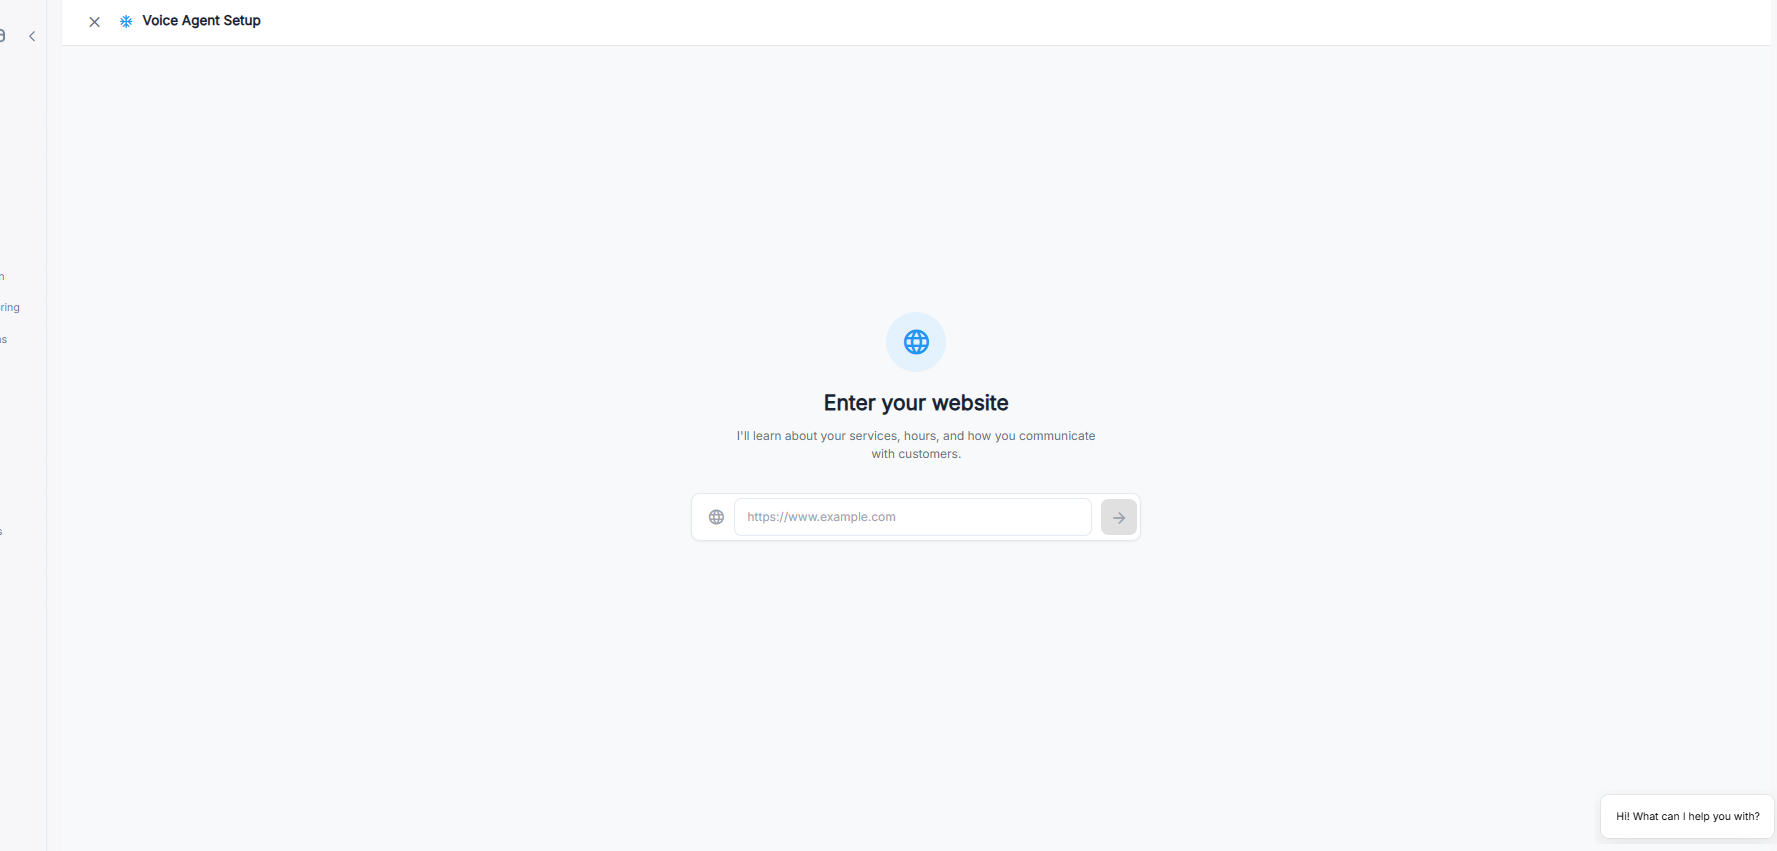
Enter your full website URL, then click the arrow button.
Type your full URL into the box, including https://, for example https://www.yourbusiness.com. Then click the arrow button to the right of the box.
Which URL to use:
- Use your main homepage. The wizard finds the rest from there.
- If you have several locations with separate sites, use the one for the location this agent will answer for.
- The site must be publicly visible. Anything behind a login or password can’t be read.
You’re asked: “How would you like to set up?” — We’ll start with smart defaults. You can change anything.
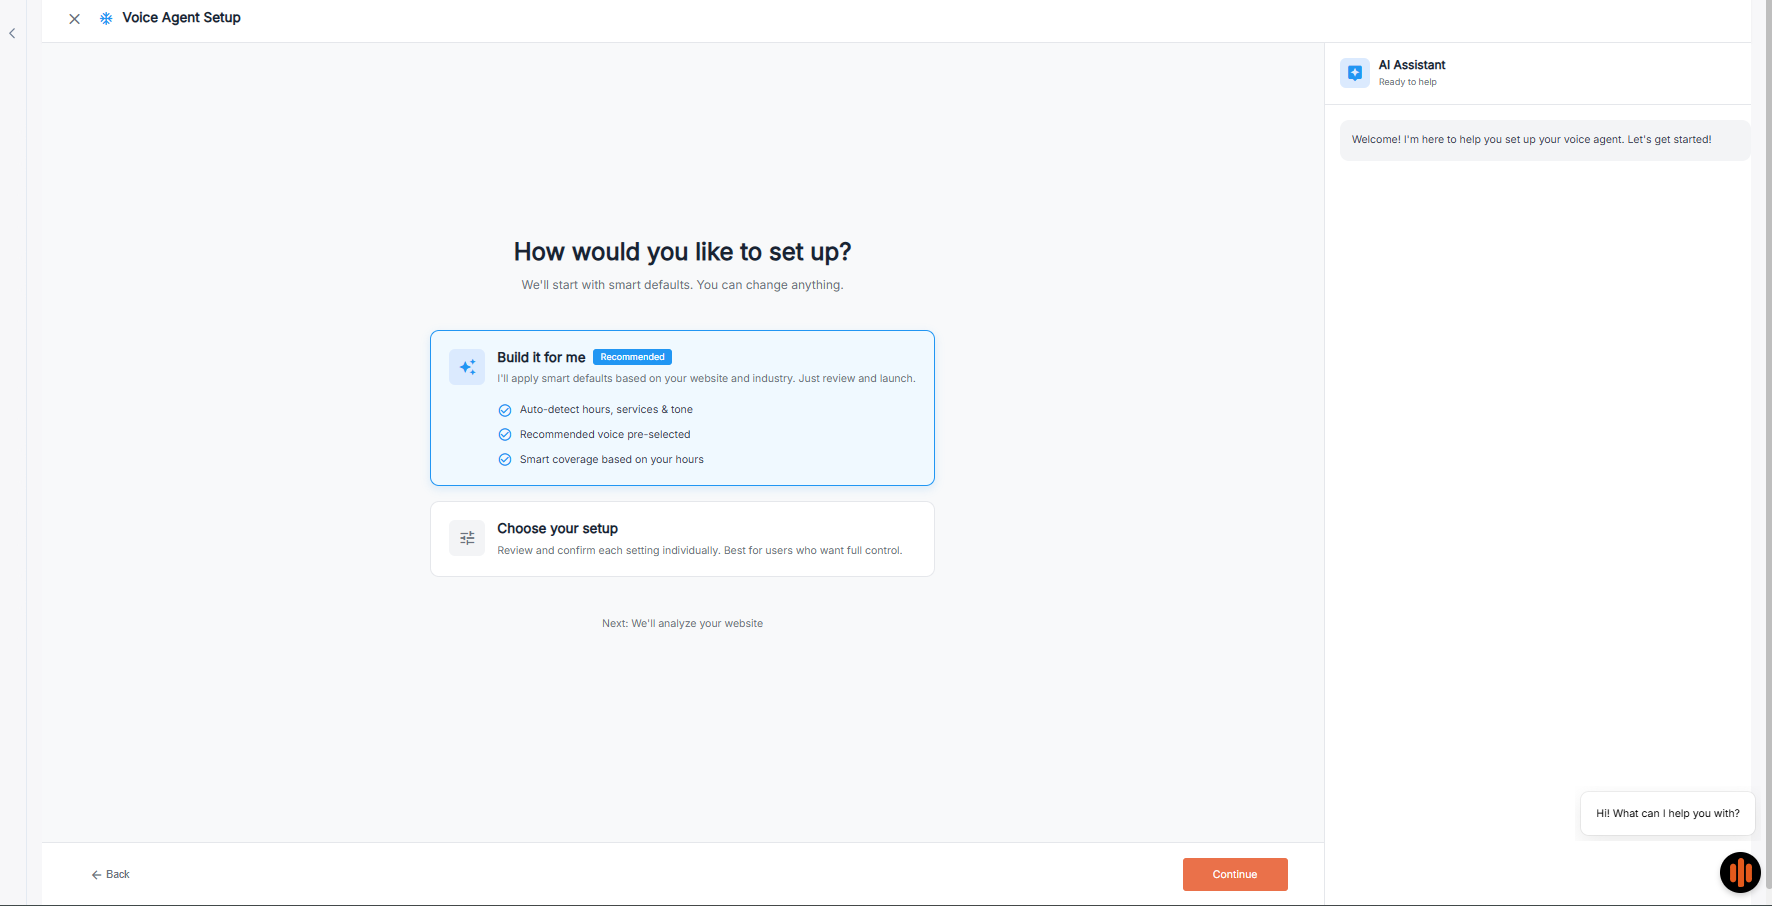
Two setup routes. Both let you review every setting afterwards.
Build it for me (Recommended)The system applies smart defaults based on your website and industry. You just review and launch.
- Auto-detect hours, services & tone
- Recommended voice pre-selected
- Smart coverage based on your hours
Review and confirm each setting individually. Best if you want full control over every detail.
Select your option and click Continue.
Our advice: start with Build it for me, even if you’re particular about detail. Either way you review and edit every setting in the Confirm phase — nothing is locked in. It’s simply faster to correct a few auto-filled fields than to type them all from scratch.
The AI Assistant panelFrom here on, an AI Assistant panel sits on the right of the screen. At each step it tells you what it found and gives you Confirm and Change buttons to respond. There’s also a message box at the bottom where you can type to it directly.
Use it. If something it detected is wrong, say so in plain English rather than hunting for the right field.
Two tabs — Hours and Branding — are marked LIMITED AI ASSISTANT SUPPORT in the top right. On those, edit the fields yourself rather than asking the Assistant.
Step 4 — Analyze phaseThe wizard reads your website.
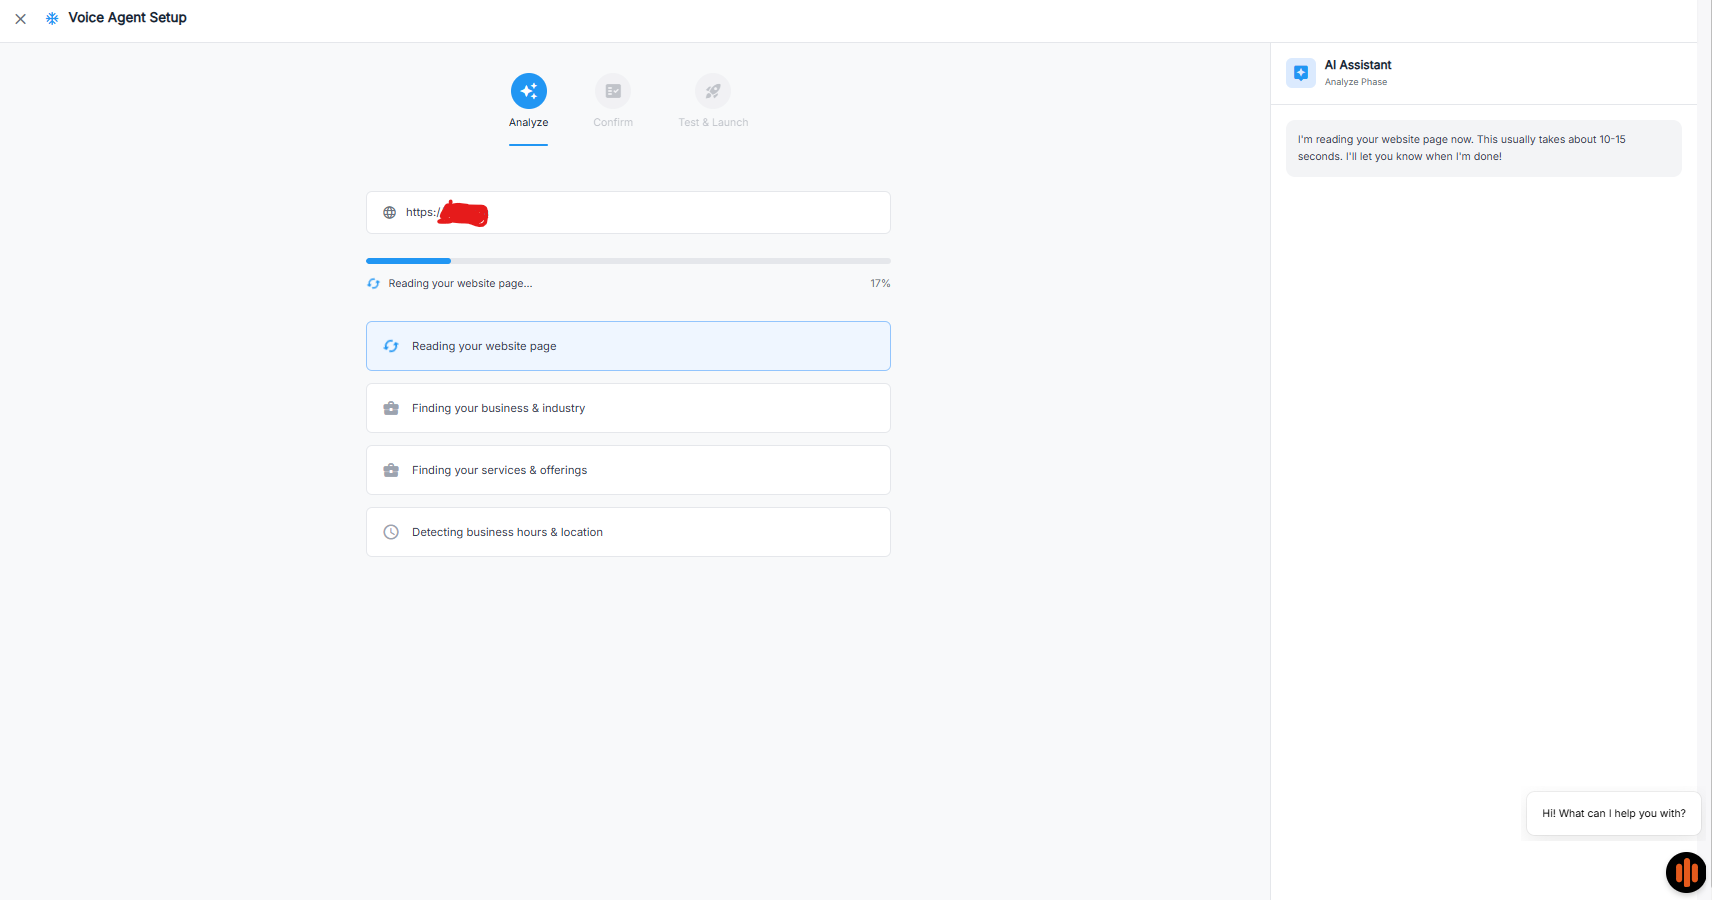
The Analyze phase. Four checkpoints tick off as the site is read.
A progress bar shows the percentage, and four checkpoints complete in order:
- Reading your website page
- Finding your business & industry
- Finding your services & offerings
- Detecting business hours & location
This takes 10–15 seconds. Don’t close the window while it runs.
The three phases of setup are shown at the top, with the current one highlighted: Analyze → Confirm → Test & Launch.
If analysis finds very little: your site may be image-heavy, behind a login, or blocking automated readers. Go back and try a specific service or about the page instead of the homepage.
Step 5 — Confirm phaseThis is the main part of the setup. Ten tabs run across the screen, and you work through them left to right. A green tick appears on each tab as you complete it, and the progress bar underneath fills up.
How each tab works: review what’s there → edit anything wrong → click the button at the bottom right to move on. On the first tab that button reads Confirm Business →; after that it reads Next →. The Back button at the bottom left returns you to the previous tab at any time.
You can also click any tab directly to jump back to it.
Agent nameAt the top of the Confirm screen is the agent’s name, with a pencil icon next to it. Click the pencil to rename it.
This name is internal — callers never hear it. Use something you’ll recognise in six months, like Main Line – Downtown rather than Agent 1.
Tab 1 — Business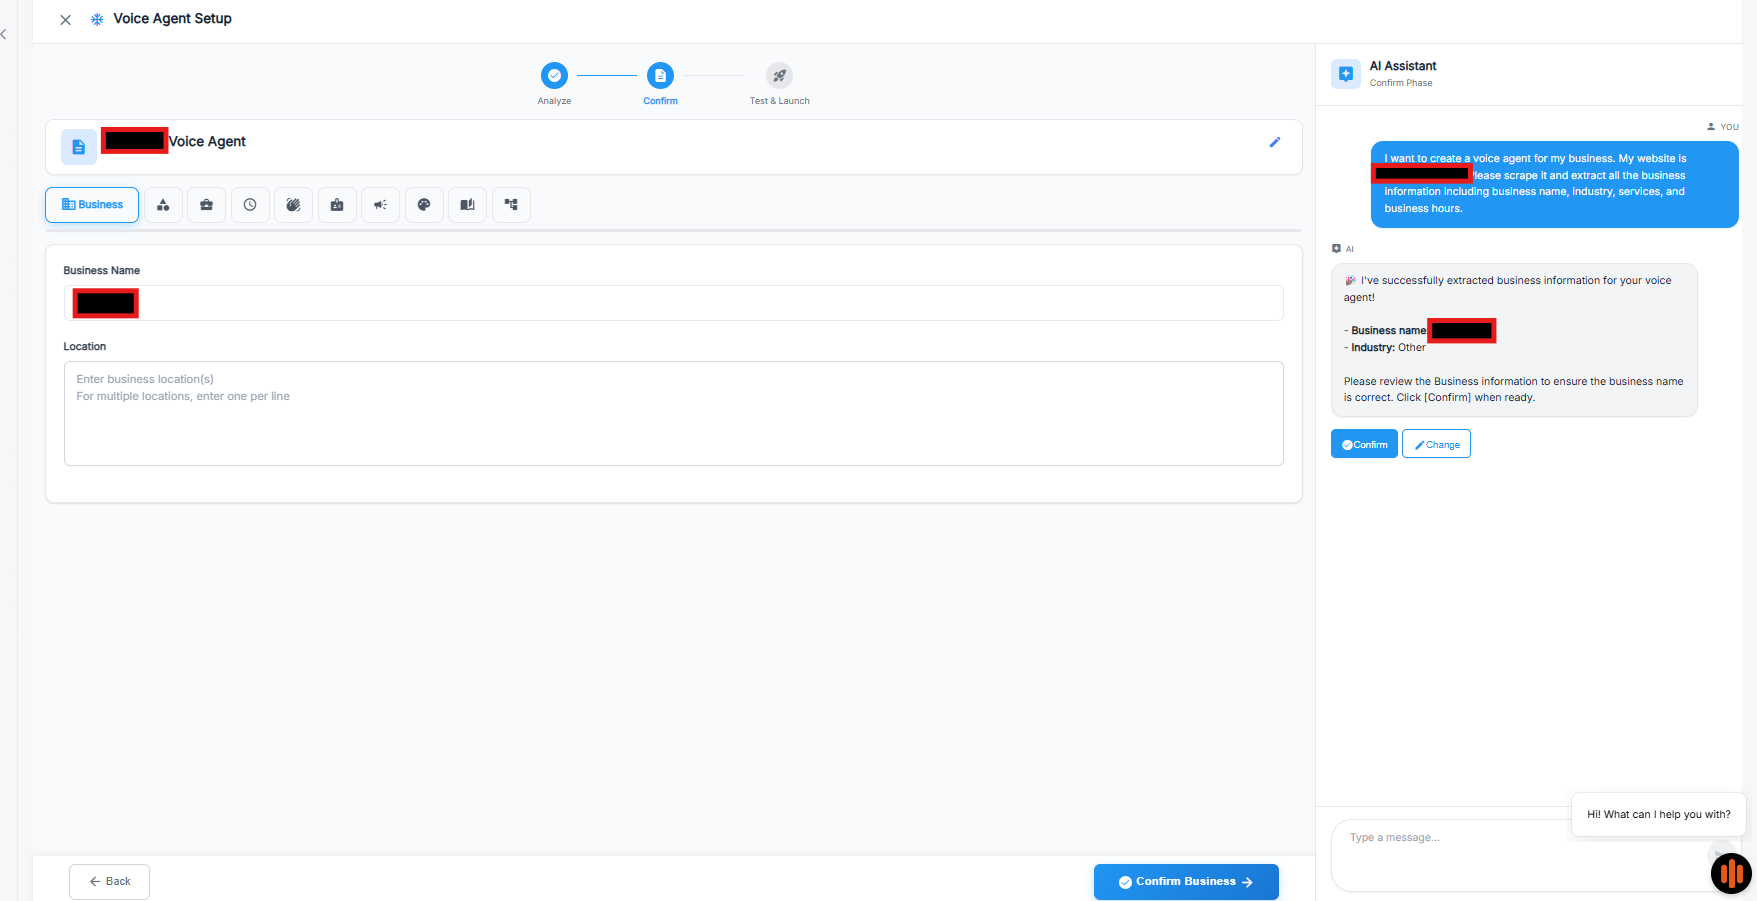
The Business tab, with the AI Assistant showing what it extracted.
|
Field |
What to enter |
|---|---|
|
Business Name |
Your name exactly as callers would recognise it |
|
Location |
Your business address. For multiple locations, enter one per line |
The AI Assistant shows what it extracted — business name, industry, services, contact phone, contact email.
Check the business name closely. The agent says it out loud, so an abbreviation or a legal suffix that reads fine on paper may sound wrong on a call.
Click Confirm Business →.
Tab 2 — Industry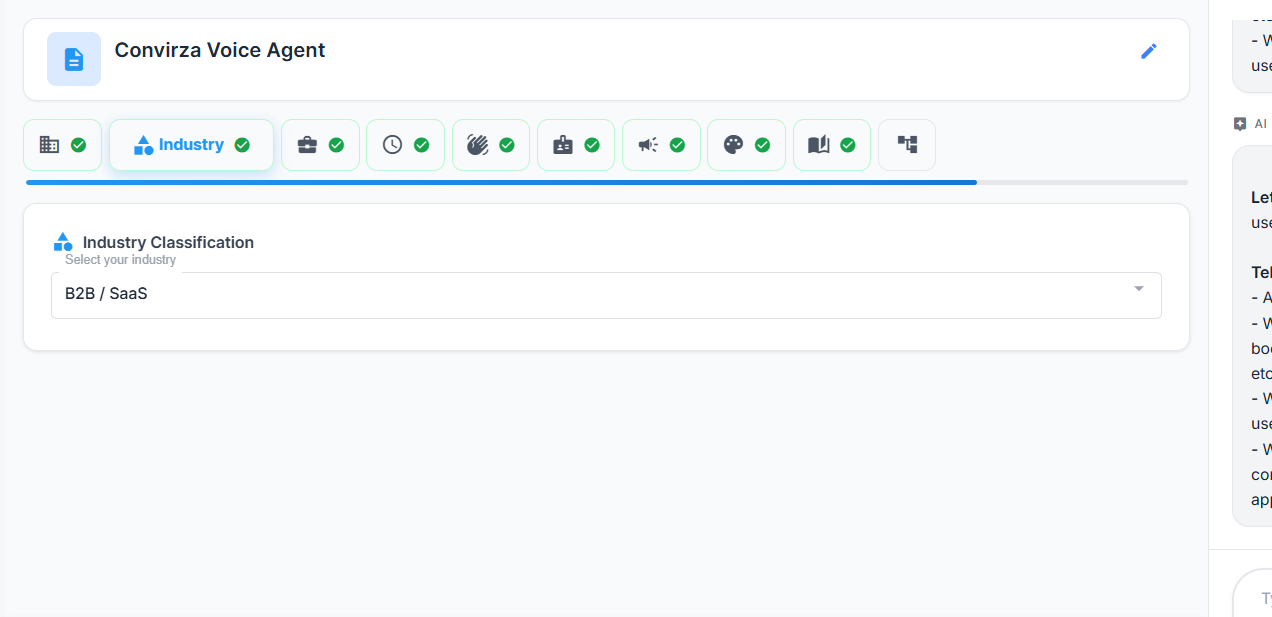
The Industry tab. Completed tabs carry a green tick.
Industry Classification — a single dropdown, Select your industry. It’s filled in automatically, for example B2B / SaaS for a software company.
Review it and change it if it’s wrong. The classification influences the agent’s tone and the defaults offered later, so it’s worth getting right.
Click Next →.
Tab 3 — Services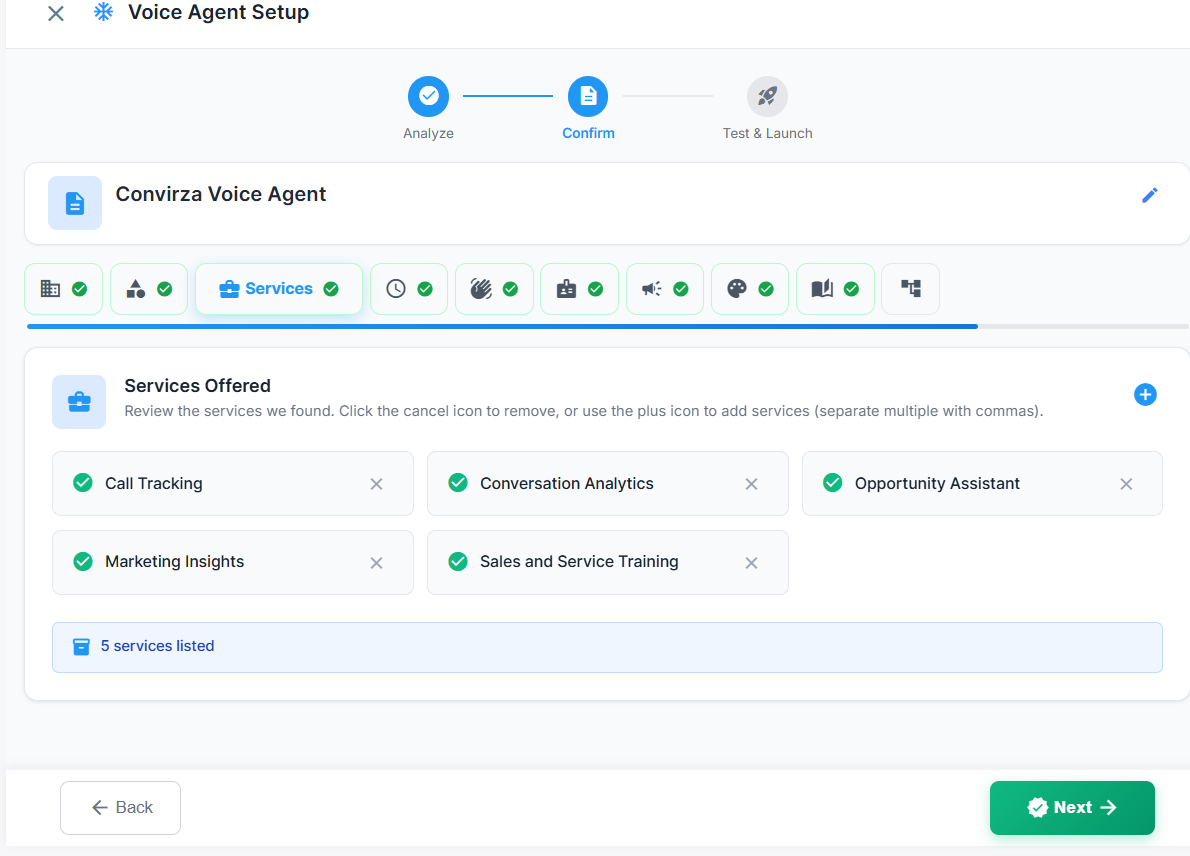
The Services tab. Remove with the X, add with the + icon.
Services Offered — the services found on your website.
Review the services we found. Click the cancel icon to remove, or use the plus icon to add services (separate multiple with commas).
Each service appears as a card with a green tick and an X to remove it. A counter at the bottom shows how many are listed (“5 services listed”).
To add services: click the + icon at the top right of the panel. You can add several at once by separating them with commas.
Write services the way customers say them, not the way your internal systems name them. If callers ask for “teeth whitening”, the list should say Teeth Whitening — not a billing code or an internal product name.
Click Next →.
Tab 4 — Hours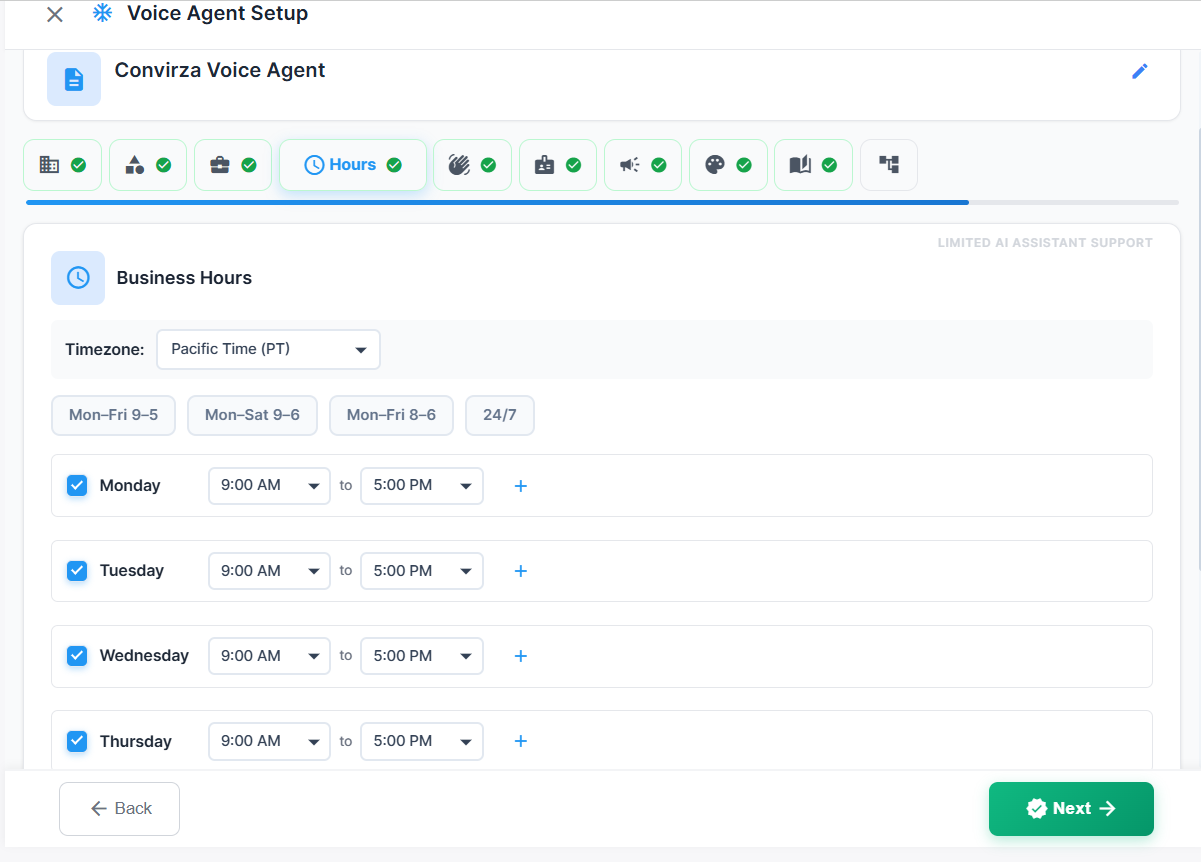
The Hours tab, with timezone, quick presets, and per-day control.
Business Hours — marked Limited AI Assistant support, so edit these yourself.
Timezone — a dropdown at the top (for example Pacific Time (PT)). This must be your office’s timezone, not the caller’s.
Quick presets — four one-click options: Mon–Fri 9–5, Mon–Sat 9–6, Mon–Fri 8–6, and 24/7. Use a preset if it matches, then adjust individual days.
Per-day settings — each day of the week has:
- A checkbox — tick for open, untick for closed
- A from and to time dropdown
- A + button to add a second time period for that day
Use the + for lunch breaks or split shifts — for example 9:00 AM–1:00 PM and 2:00 PM–6:00 PM.
Check every day, including weekends. Missed weekend hours and unrecorded lunch breaks are the two most common errors here.
Click Next →.
Tab 5 — Greeting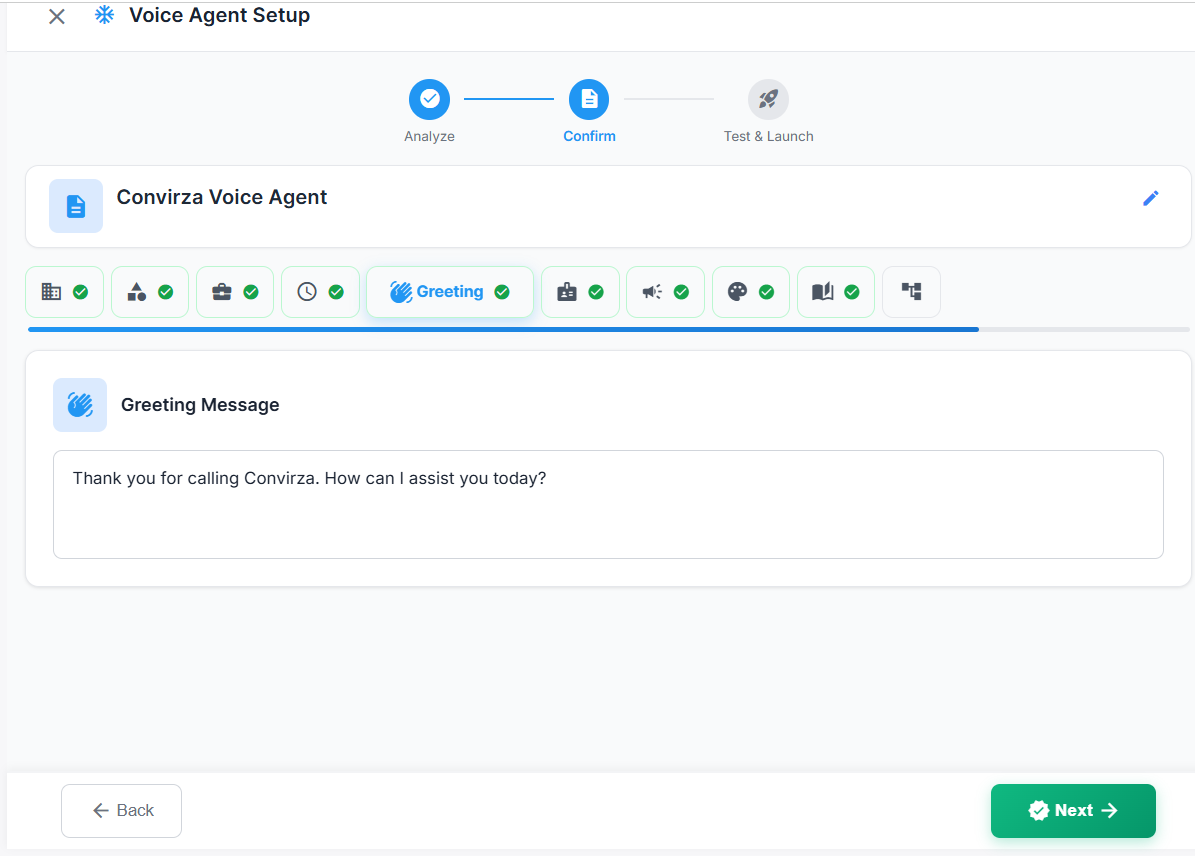
The Greeting tab. A default message is filled in for you.
Greeting Message — a text box holding the first thing callers hear. A default is filled in for you:
Thank you for calling Convirza. How can I assist you today?
Edit it, or accept it as it is.
A good greeting names the business, sounds welcoming, and invites the caller to speak — in one or two sentences.
Avoid:
- Press-1-for menus. The agent understands natural speech, so a menu throws away the main advantage.
- Anything over about 15 words — callers start talking over it.
Click Next →.
Tab 6 — Role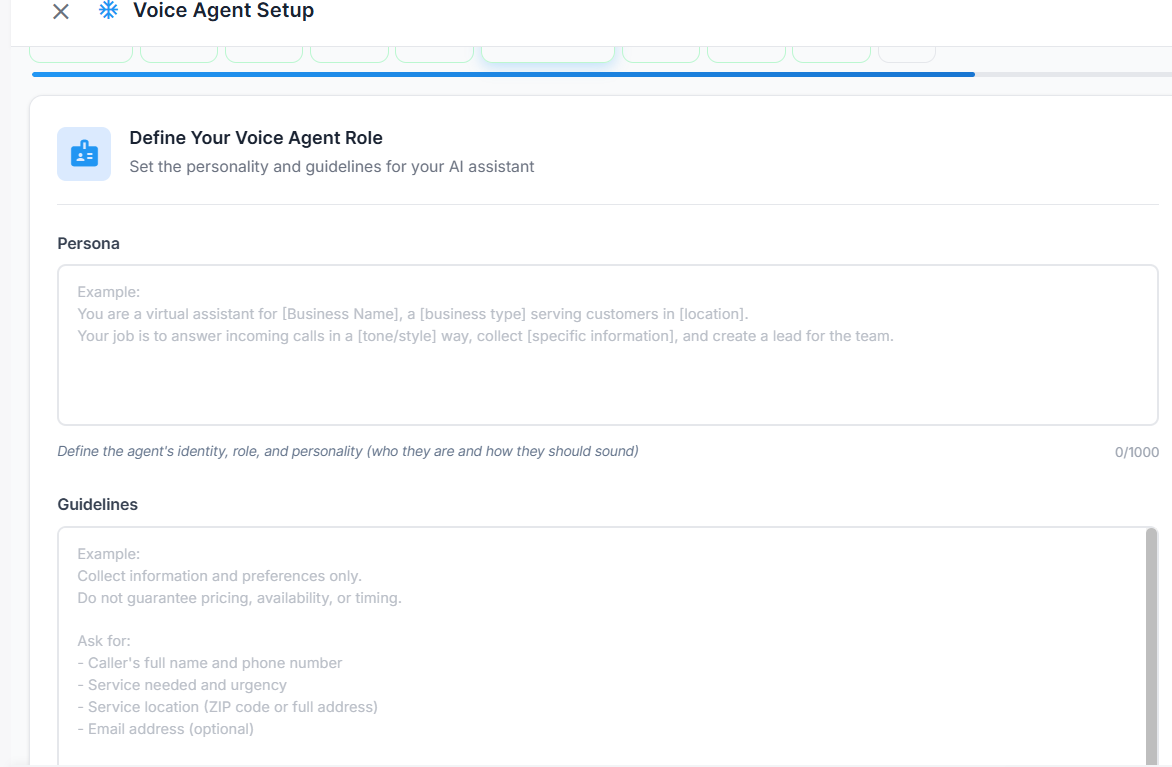
The Role tab — Persona and Guidelines, with on-screen examples.
Define Your Voice Agent Role — Set the personality and guidelines for your AI assistant.
This is the most powerful tab in the whole setup. If your agent ever behaves in a way you don’t want, this is where you fix it. Two text boxes:
Persona (1000 characters)
Define the agent’s identity, role, and personality — who they are and how they should sound.
The on-screen example follows this shape:
You are a virtual assistant for [Business Name], a [business type] serving customers in [location]. Your job is to answer incoming calls in a [tone/style] way, collect [specific information], and create a lead for the team.
Written out for a real business:
You are a virtual assistant for Riverside Dental, a family dental practice serving patients in Portland, Oregon. Your job is to answer incoming calls in a calm and reassuring way, collect the caller’s details and reason for calling, and create a lead for the team.
Guidelines
The rules the agent must follow. The on-screen example shows the pattern:
Collect information and preferences only. Do not guarantee pricing, availability, or timing.
Ask for: Caller’s full name and phone number; service needed and urgency; service location (ZIP code or full address); email address (optional).
Add your own rules for anything specific to your business:
- If the caller mentions pain or an emergency, transfer immediately
- Never discuss insurance coverage in detail — take their details for follow-up
- Always confirm the phone number back to the caller before ending
Be specific. “Never quote prices” works. “Be careful about pricing” does not.
Click Next →.
Tab 7 — Voice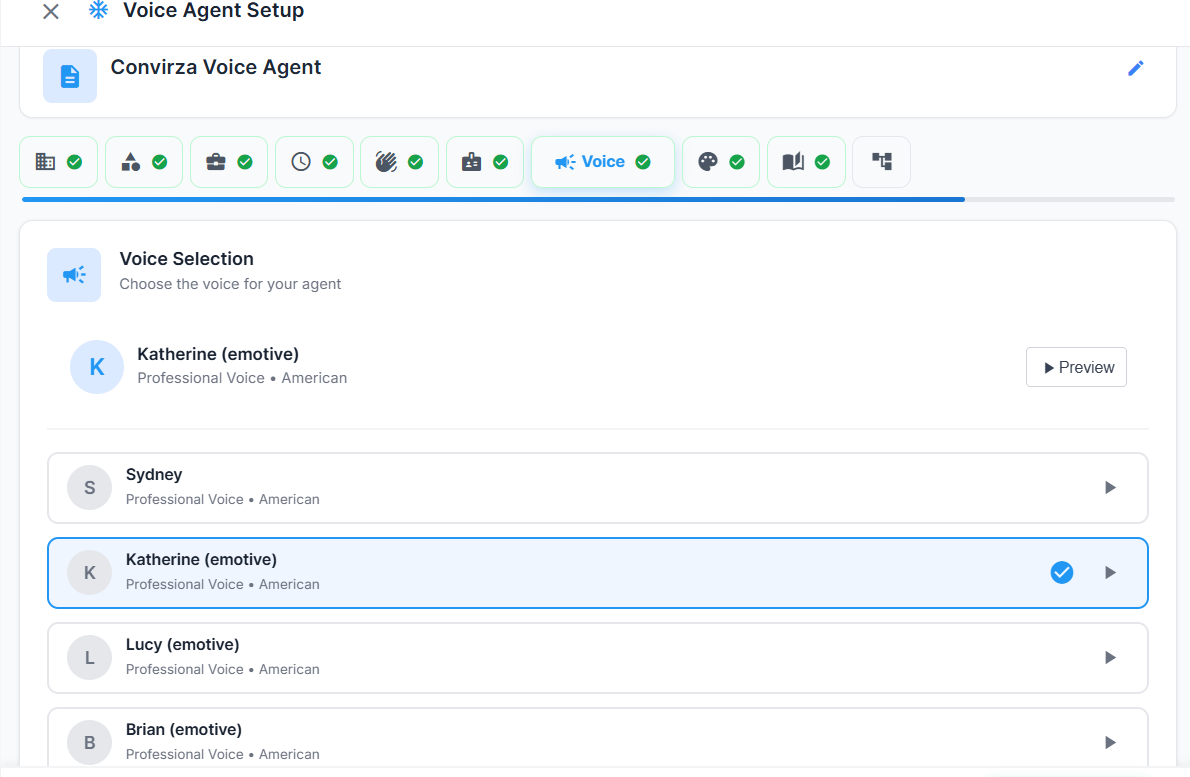
The Voice tab. Preview any voice with the play button before choosing.
Voice Selection — Choose the voice for your agent.
Your currently selected voice is shown at the top with a Preview button. Below it is the full list of available voices — for example Sydney, Katherine (emotive), Lucy (emotive), Brian (emotive) — each labelled with its type and accent (Professional Voice • American).
Click the play button on any voice to hear it. The selected voice is marked with a blue tick.
How to choose:
- Emotive voices vary their tone and sound more natural and expressive. They’re usually the better choice for customer-facing calls.
- Match the voice to your industry — a calm, warm voice suits healthcare; a brighter one suits retail or home services.
- Preview before deciding, and use the same voice across all agents for one business so callers get a consistent experience.
Click Next →.
Tab 8 — Branding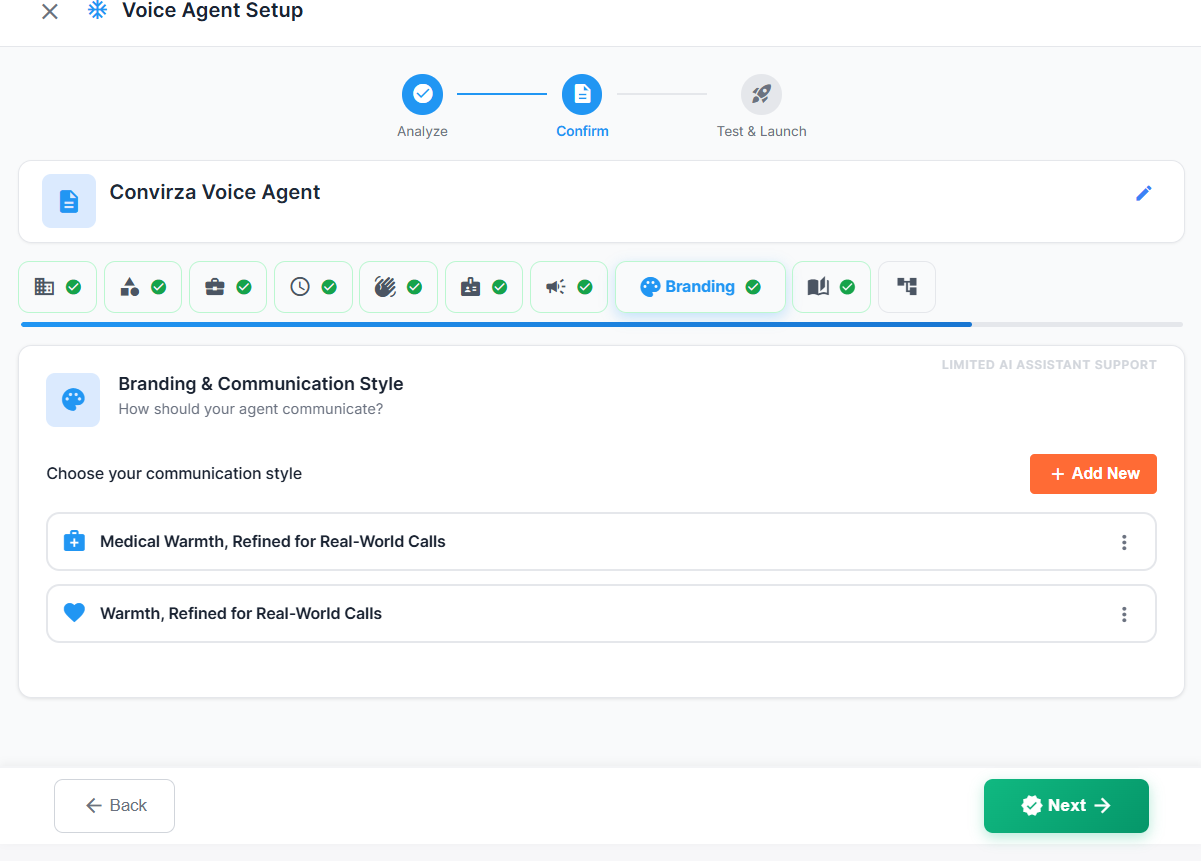
The Branding tab. Choose a ready-made style or create your own.
Branding & Communication Style — How should your agent communicate? Also marked Limited AI Assistant support.
Under Choose your communication style is a list of ready-made styles, for example Medical Warmth, Refined for Real-World Calls and Warmth, Refined for Real-World Calls. Pick the one that fits your business. Each has a ⋮ menu for further options.
To create your own: click + Add New at the top right and define a custom style.
Use a custom style when you have specific brand language, a tone-of-voice guideline, or particular phrasing your business is known for.
Click Next →.
Tab 9 — Resources (Optional)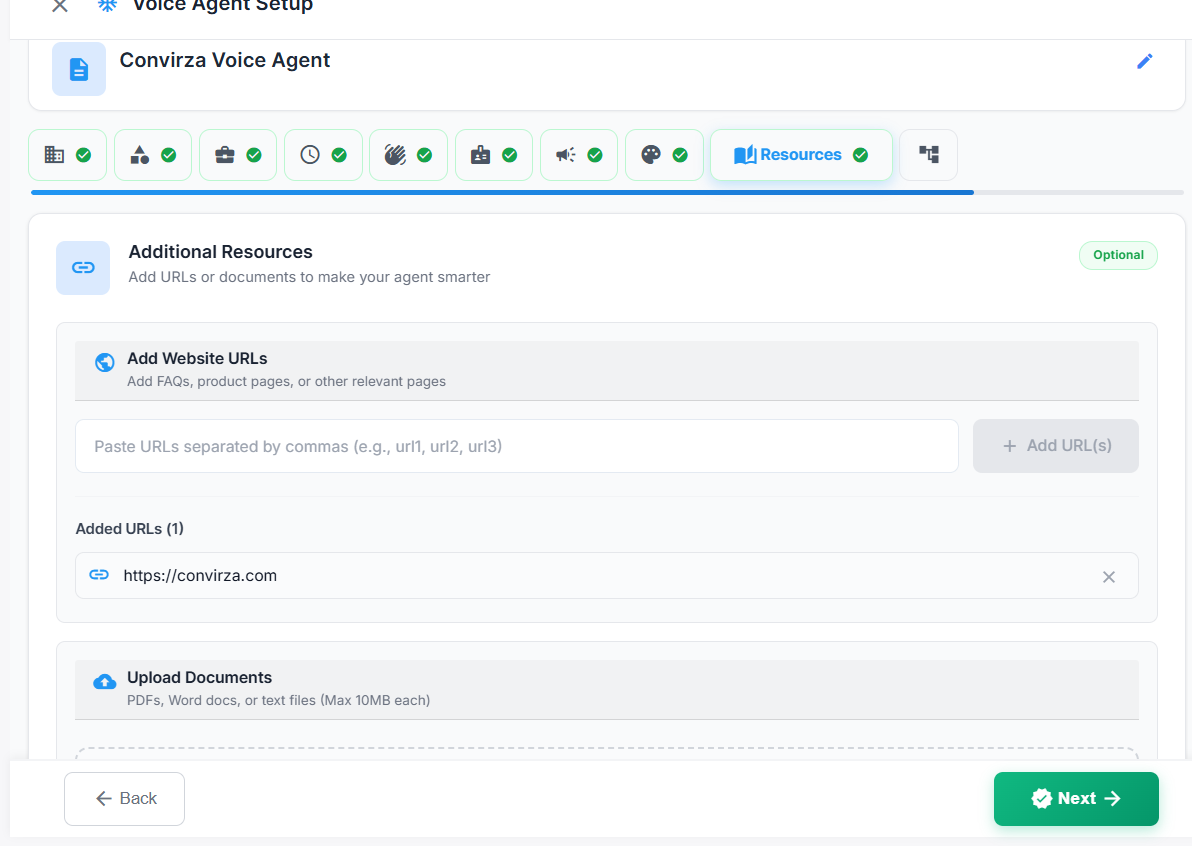
The Resources tab. Add extra pages and upload documents.
Additional Resources — Add URLs or documents to make your agent smarter. This tab is marked Optional; you can skip it.
Add Website URLs
Add FAQs, product pages, or other relevant pages.
Paste URLs into the box — separate multiple URLs with commas — then click + Add URL(s). Added URLs appear in a list below with an X to remove them. The website you entered at the start is already there.
Worth adding: your FAQ page, pricing page, individual service pages, and your about or team page.
Upload Documents
PDFs, Word docs, or text files (max 10MB each).
Drag files into the upload area or browse for them.
Worth uploading: price lists, service menus, FAQ sheets, policy documents, appointment rules.
Keep resources current. An out-of-date price list means the agent quotes out-of-date prices. Anything critical — hours, address, services — belongs in its own dedicated tab, not only in an uploaded file.
Click Next →.
Tab 10 — WorkflowWorkflow controls what happens with the information your agent collects.
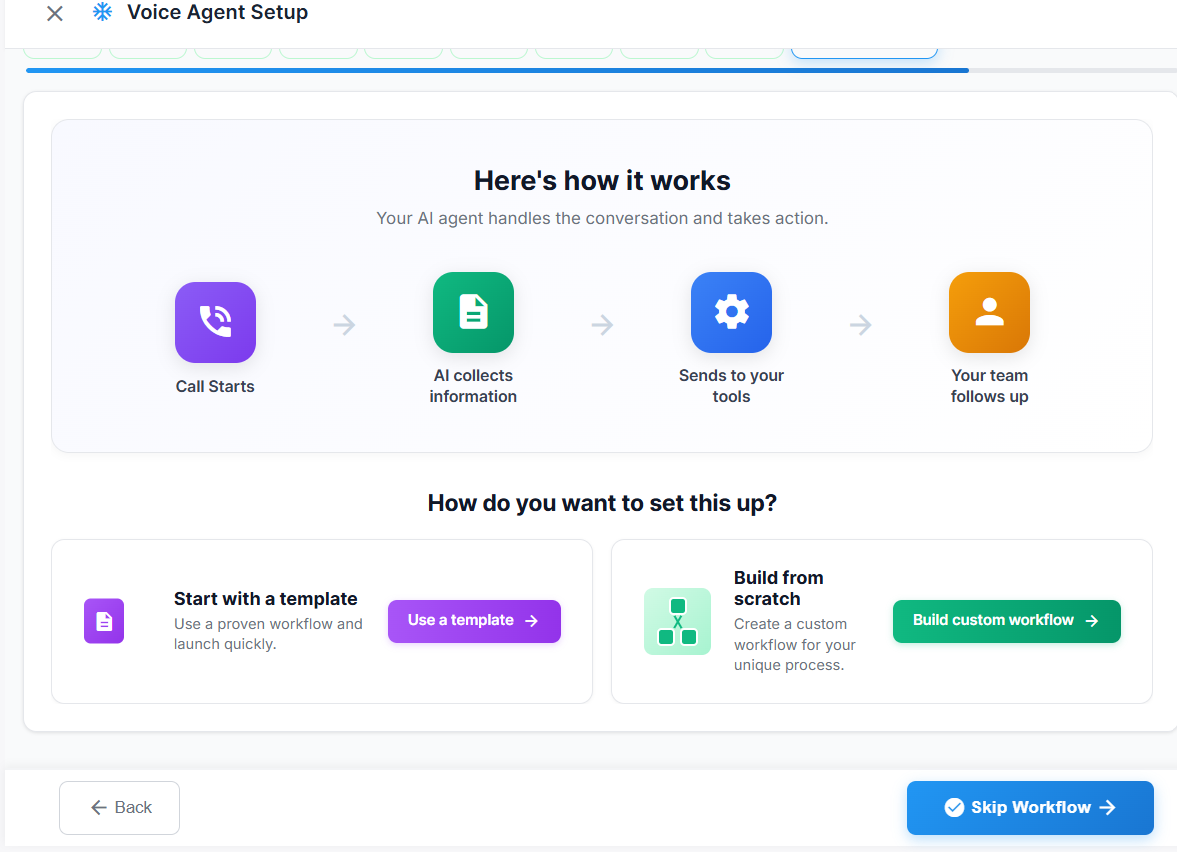
The Workflow tab. Three routes: template, from scratch, or skip.
Here’s how it works — Your AI agent handles the conversation and takes action:
Call Starts → AI collects information → Sends to your tools → Your team follows up
How do you want to set this up? Three routes:
|
Route |
Button |
Best for |
|---|---|---|
|
Start with a template |
Use a template |
Most businesses — a proven workflow, launch quickly |
|
Build from scratch |
Build custom workflow |
A unique process templates don’t cover |
|
Skip for now |
Skip Workflow |
Getting the agent live first; add the workflow later |
You can safely click Skip Workflow → and come back to it. The agent will still answer calls and collect information.
Route A — Start with a template
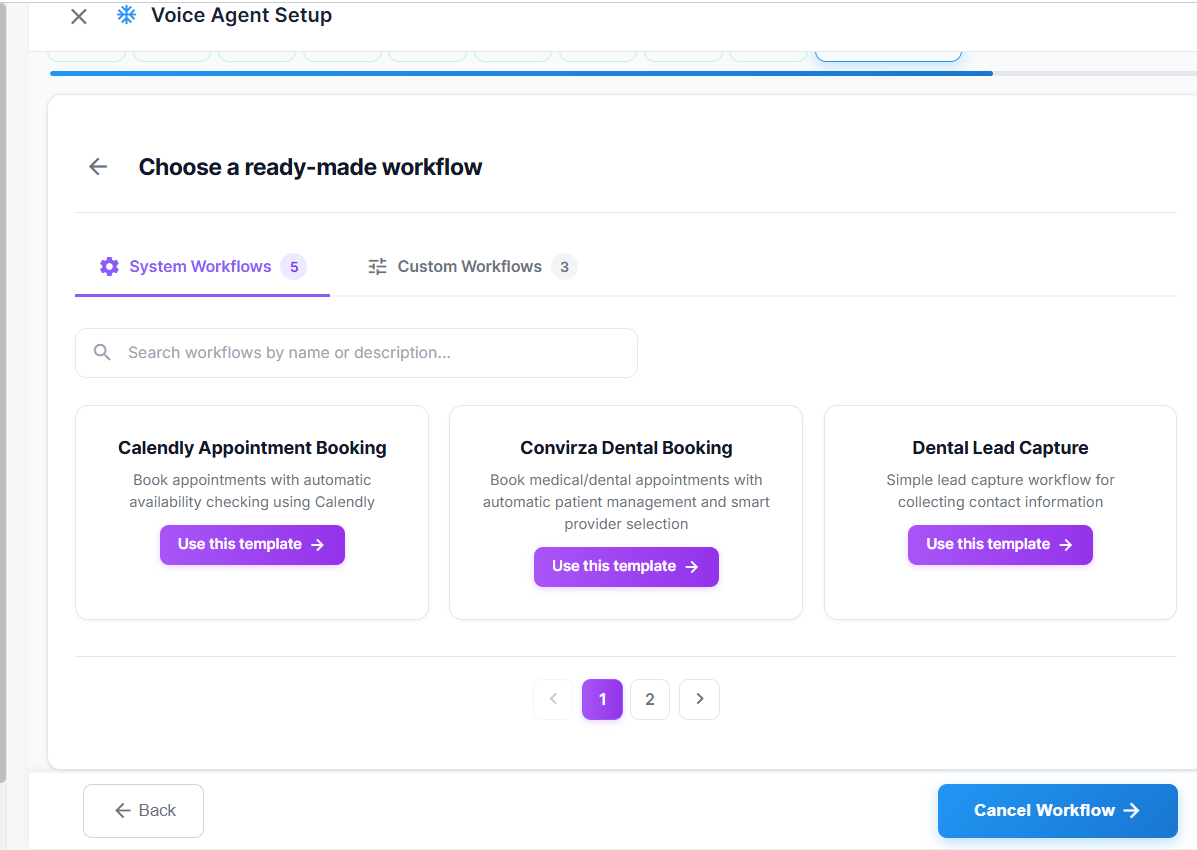
System Workflows — built-in templates provided by Convirza.
Choose a ready-made workflow. Two tabs at the top:
- System Workflows — built-in templates provided by Convirza
- Custom Workflows — templates already created in your account
There’s a search box (search workflows by name or description) and page navigation at the bottom.
Example system templates:
|
Template |
What it does |
|---|---|
|
Calendly Appointment Booking |
Books appointments with automatic availability checking using Calendly |
|
Convirza Dental Booking |
Books medical/dental appointments with automatic patient management and smart provider selection |
|
Dental Lead Capture |
Simple lead capture workflow for collecting contact information |
Click Use this template → on the one you want. Cancel Workflow → at the bottom right backs out.
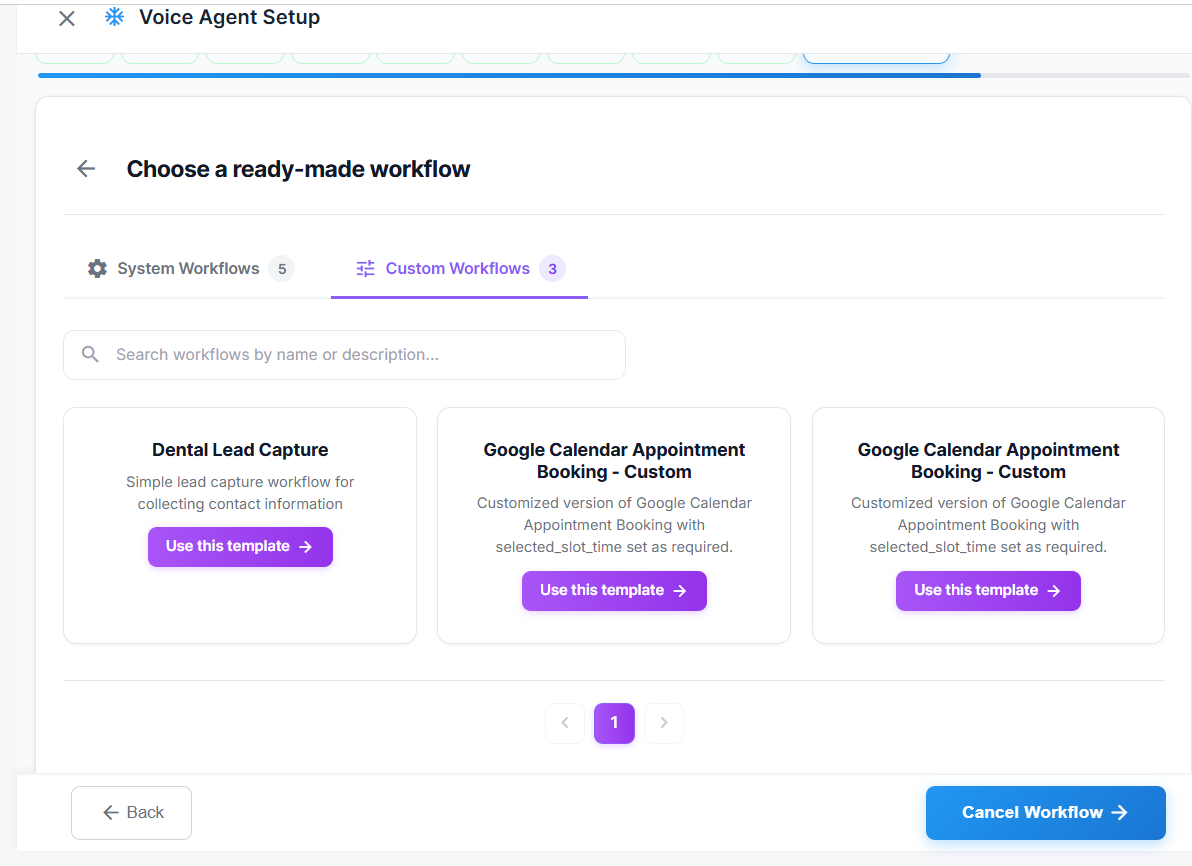
Custom Workflows — templates already created in your account.
Route B — Build from scratch
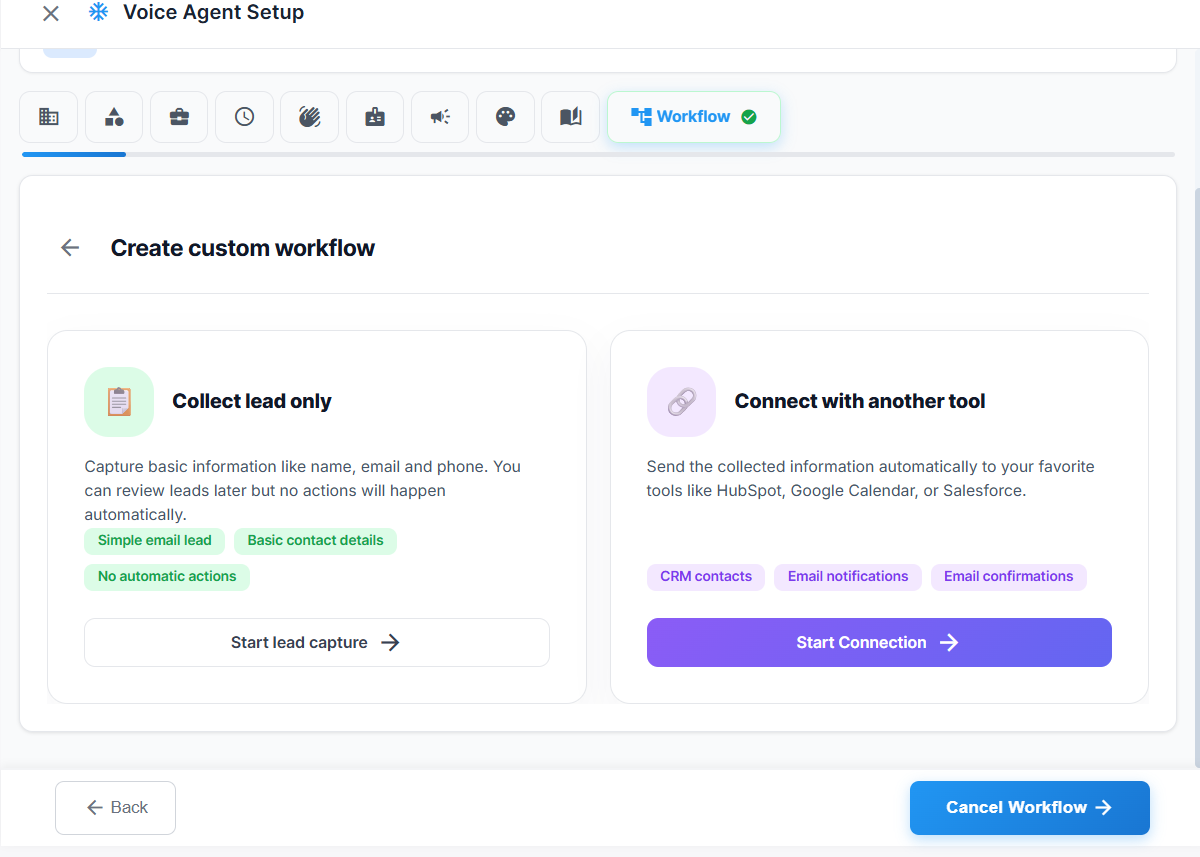
Create custom workflow — lead capture only, or connect a tool.
Click Build custom workflow → and you’ll see Create custom workflow, with two options.
Option 1 — Collect lead only
Capture basic information like name, email and phone. You can review leads later but no actions will happen automatically.
Tagged: Simple email lead · Basic contact details · No automatic actions. Button: Start lead capture →
Choose this if your team checks leads manually and you don’t need an integration. It’s the simpler of the two — you describe your use case, and the workflow is built for you.
Option 2 — Connect with another tool
Send the collected information automatically to your favorite tools like HubSpot, Google Calendar, or Salesforce.
Tagged: CRM contacts · Email notifications · Email confirmations. Button: Start Connection →
Choose this if you want leads to land in your CRM or calendar automatically. It works with the tools named above and with other third-party software you use.
Choosing your provider
After Start Connection →, you’re asked to Choose Your Provider — select which platform you want to integrate with your workflow.
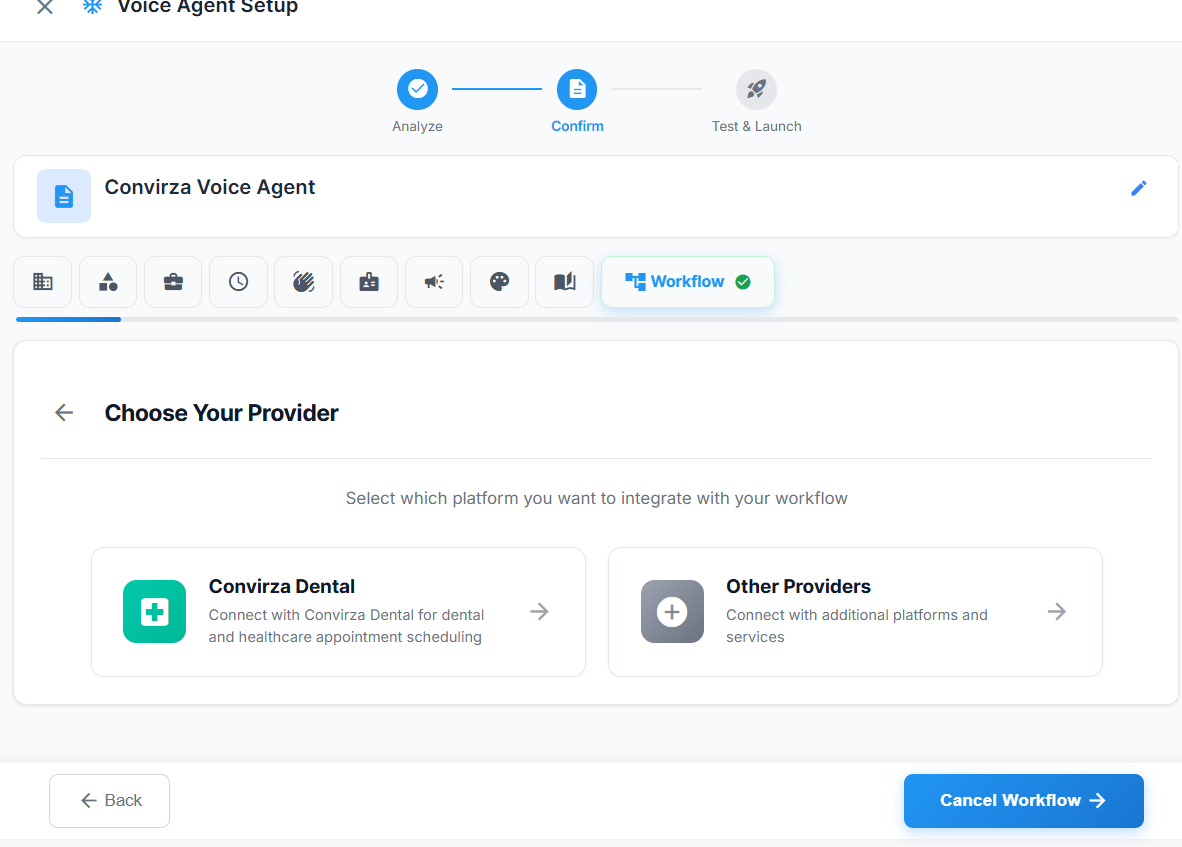
Choosing a provider to integrate with.
- Convirza Dental — connect with Convirza Dental for dental and healthcare appointment scheduling
- Other Providers — connect with additional platforms and services
Pick Other Providers for anything that isn’t Convirza Dental — your CRM, your calendar, your ticketing system.
Describing your use case
This is the part that matters most. The AI Assistant panel on the right asks you to explain what you want, and builds the whole workflow from your answer.
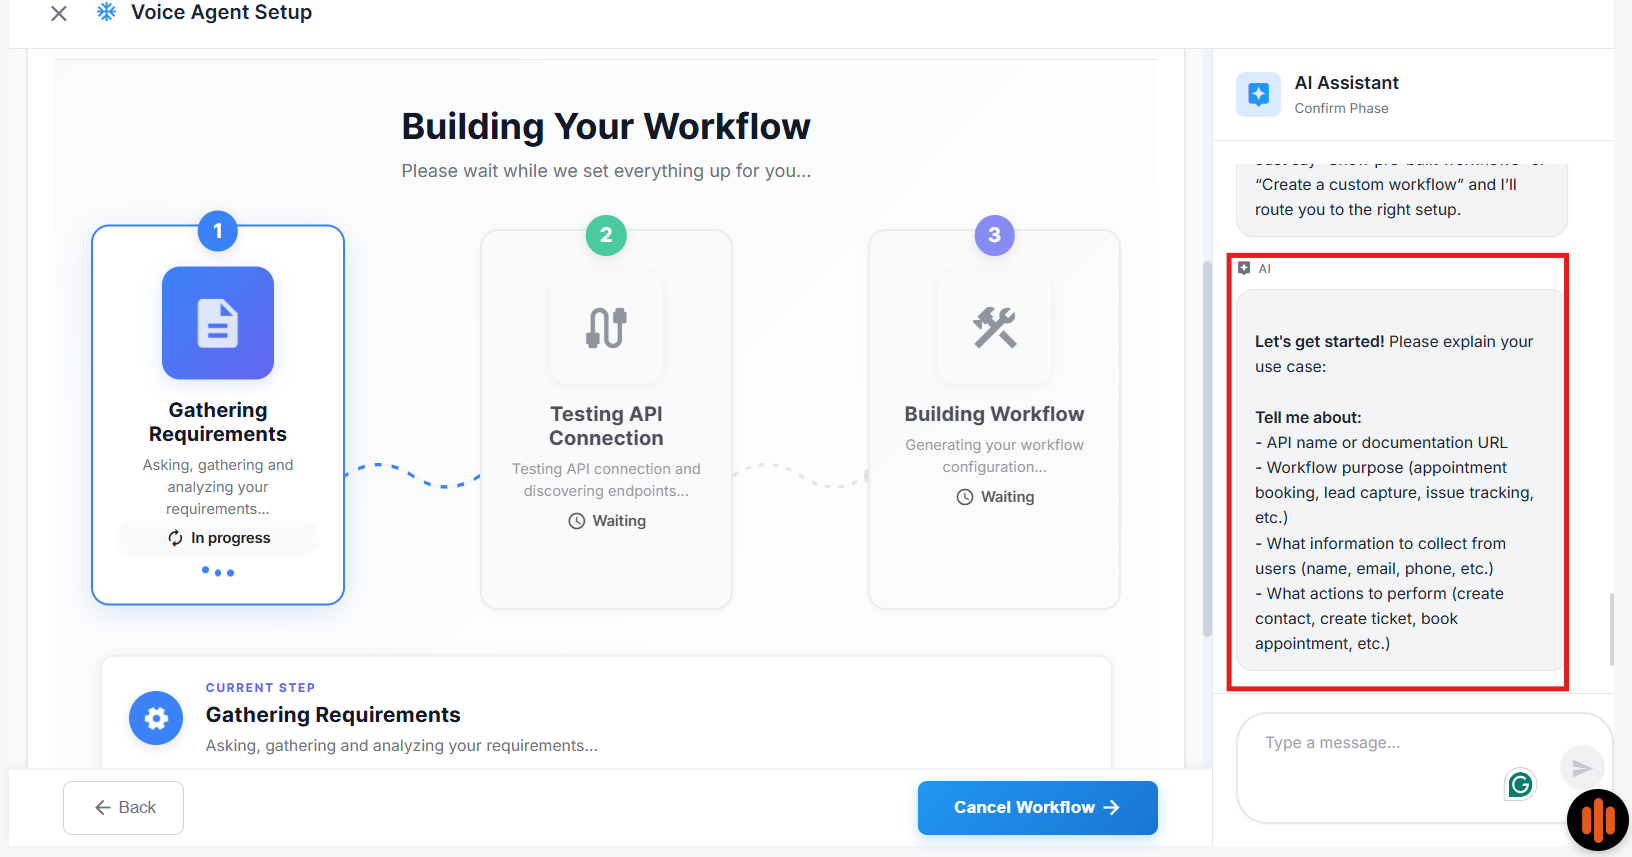
The AI Assistant asks for four things. Answer all of them in one message.
Let’s get started! Please explain your use case.
Tell me about:
- API name or documentation URL
- Workflow purpose (appointment booking, lead capture, issue tracking, etc.)
- What information to collect from users (name, email, phone, etc.)
- What actions to perform (create contact, create ticket, book appointment, etc.)
Type your answer into the message box at the bottom of the Assistant panel. Answer all four points — the more complete your answer, the better the workflow you get back.
A worked example:
We use HubSpot — the API docs are at developers.hubspot.com. The purpose is lead capture. Collect the caller’s full name, phone number, email address, and the service they’re asking about. Then create a contact in HubSpot and send an email notification to our front desk.
What happens next: the Assistant confirms everything back to you, connects to your API, reads your API documentation, and builds the workflow — the purpose, the information to collect, and the actions to perform.
This takes time. Be patient and don’t close the window.
Building Your Workflow
Once you’ve given your answers, the system builds the workflow.
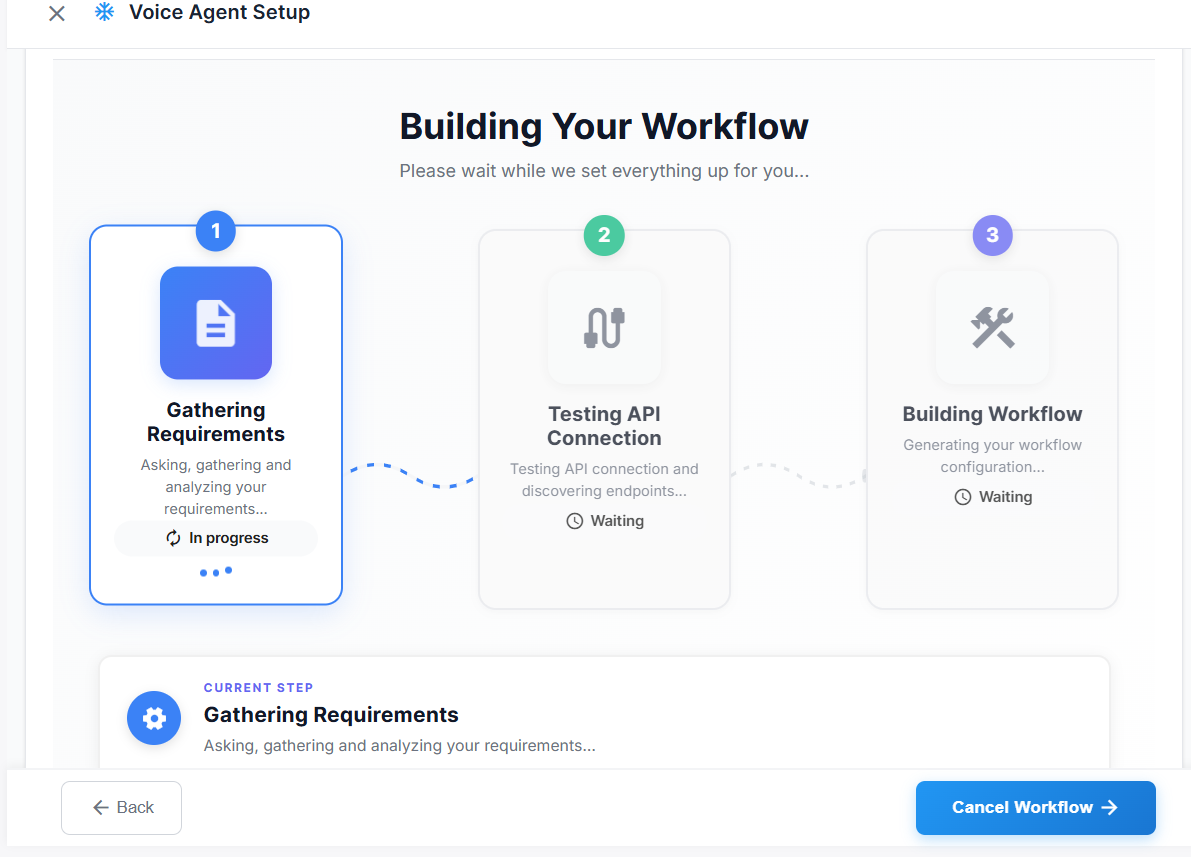
The build runs through up to three stages.
Please wait while we set everything up for you…
|
Stage |
What happens |
|---|---|
|
1. Gathering Requirements |
Asking, gathering and analyzing your requirements |
|
2. Testing API Connection |
Testing the API connection and discovering endpoints (integration workflows only) |
|
3. Building Workflow |
Generating your workflow configuration |
Each stage shows its status — In progress or Waiting. Don’t close the window while it runs. Cancel Workflow → stops the process.
When the build finishes, click Next. You’ll then be asked whether to assign the agent to a phone number, and whether you’re ready to publish it.
Step 6 — Test & LaunchThe final phase. At the end of setup you’ll be asked two things:
- Assign the agent to a phone number — the number callers will dial to reach it
- Publish your voice agent — confirming you’re ready to go live
Always test before you publish — never send real callers to an untested agent.
Run through this on your test call:
- The greeting plays and names the business correctly
- Ask “what are your hours?” — the answer matches reality
- Ask “where are you located?” — the address is correct
- Ask about three different services — all recognised
- Ask something off-topic — the agent handles it gracefully
- Check the persona comes through — does it sound like your business?
- Test a guideline — if you wrote “never quote prices”, ask for a price
- Confirm it asks for everything in your Guidelines list (name, phone, service needed)
- Interrupt mid-sentence — it stops and listens
- Speak with background noise — it still understands
- If you set up a workflow, check the lead actually arrived in your tool
- Check the call summary afterwards — the right details were captured
Fix whatever failed, then test again. Two or three rounds is normal.
When you’re satisfied, launch the agent. It’s now live and answering calls.
After LaunchWeek one — check daily|
What you see |
What it means |
Where to fix it |
|---|---|---|
|
Agent couldn’t answer a question |
Missing information |
Services tab, or Resources |
|
Agent behaved in an unwanted way |
Rules not specific enough |
Role tab → Guidelines |
|
Agent didn’t collect a needed detail |
Not listed in the rules |
Role tab → Guidelines “Ask for” list |
|
Caller repeated themselves |
Agent misheard |
Voice tab |
|
Callers hanging up early |
Greeting too long or robotic |
Greeting tab; try an emotive voice |
|
Wrong hours or address given |
Bad data in settings |
Hours / Business tab |
|
Tone doesn’t fit the brand |
Style mismatch |
Branding tab |
|
Leads not reaching your CRM |
Integration issue |
Workflow tab |
- Update hours before public holidays
- Add new services as you launch them
- Remove services you no longer offer
- Refresh uploaded documents when prices or policies change
- Review the Analytics tab for call volume and lead trends
To take an agent offline temporarily, set its status to Inactive rather than deleting it. Inactive keeps your full configuration and can be switched back on in seconds.
Deleting is permanent and cannot be undone.
Settings Reference|
Setting |
Where |
What it does |
|---|---|---|
|
Agent name |
Top of Confirm screen (pencil icon) |
Internal label, never heard by callers |
|
Business name & location |
Business tab |
Who the agent represents and where you are |
|
Industry |
Industry tab |
Drives tone and default settings |
|
Services |
Services tab |
What you offer, in customers’ words |
|
Timezone & hours |
Hours tab |
When you’re open; presets and per-day control |
|
Greeting |
Greeting tab |
The first line callers hear |
|
Persona |
Role tab |
The agent’s identity and personality (max 1000 chars) |
|
Guidelines |
Role tab |
Rules the agent must follow, and what to ask for |
|
Voice |
Voice tab |
The speaking voice; emotive options sound more natural |
|
Communication style |
Branding tab |
Tone and manner; presets or custom |
|
Website URLs |
Resources tab |
Extra pages the agent can read |
|
Documents |
Resources tab |
PDF, Word or text files, max 10 MB each |
|
Workflow |
Workflow tab |
What happens with collected information |
|
Max call duration |
Agent settings |
Hard cap on a single call — typically 900 seconds |
|
Notification time |
Agent settings |
Warning before the cap — typically 60 seconds |
|
Notification message |
Agent settings |
What the agent says at that warning |
|
Volume |
Agent settings |
Speaking level — 0.5 is the mid-point |
|
Background noise |
Agent settings |
Subtle ambient office sound so the call feels real |
|
Primary phone number |
Agent settings |
The number callers dial |
|
Status |
Agents list |
Active, Inactive, or Deleted |
The wrap-up warning exists to capture the caller’s details before the call ends. Make it useful:
Unfortunately, our call will end in 1 minute. Please let me get your information so I can follow up with our team.
Connecting Your Existing Business NumberYou don’t need to publish a new number. Keep advertising your existing business number, and set it to forward to the Convirza number assigned to the agent.
Callers dial the number they already know, and the agent answers.
Troubleshooting“You don’t have permission for this action” — your user role is view-only. Creating and editing agents requires Admin or Standard access. Contact your account administrator.
Website analysis found nothing, or very little — the site may be image-heavy, behind a login, or blocking automated readers. Try a specific services or about page instead of the homepage, or use Choose your setup and enter the details manually.
Agent doesn’t pick up calls — check that its status is Active, that a phone number is assigned, and that forwarding from your old number is set up correctly.
Agent gives the wrong hours or address — these come from the agent’s settings, not from your live website. Updating your website alone won’t fix it; correct the Hours or Business tab and save.
Agent doesn’t know about a service — add it explicitly in the Services tab using the + icon. Relying on the website or uploaded documents alone isn’t reliable enough.
Agent says something it shouldn’t — add an explicit rule in Role → Guidelines. Be specific.
Agent doesn’t ask for a detail you need — add it to the “Ask for” list in Role → Guidelines.
Voice sounds flat or robotic — switch to an emotive voice on the Voice tab and preview before confirming.
Uploaded document won’t attach — check the format (PDF, Word, or text only) and the size (10 MB maximum per file).
Workflow build gets stuck — click Cancel Workflow → and start again. If it fails at Testing API Connection, the problem is with the connected tool’s credentials, not with the agent.
Calls are cutting off too early — increase the maximum call duration.
Getting HelpFor anything this guide doesn’t cover, contact your Convirza account manager or support team.
Have your agent ID ready — it’s shown in the agents list — as it makes any issue much faster to diagnose.