Under the customization option, you can add the settings for the following pages.
Table of Contents
Click to access specific sections quickly.
- Blacklist
- Calibration
- Caller Privacy
- Click To Call
- DNI
- Georoute
- SMS
- Redaction
- Tags
- Webhooks
- Whitelabel
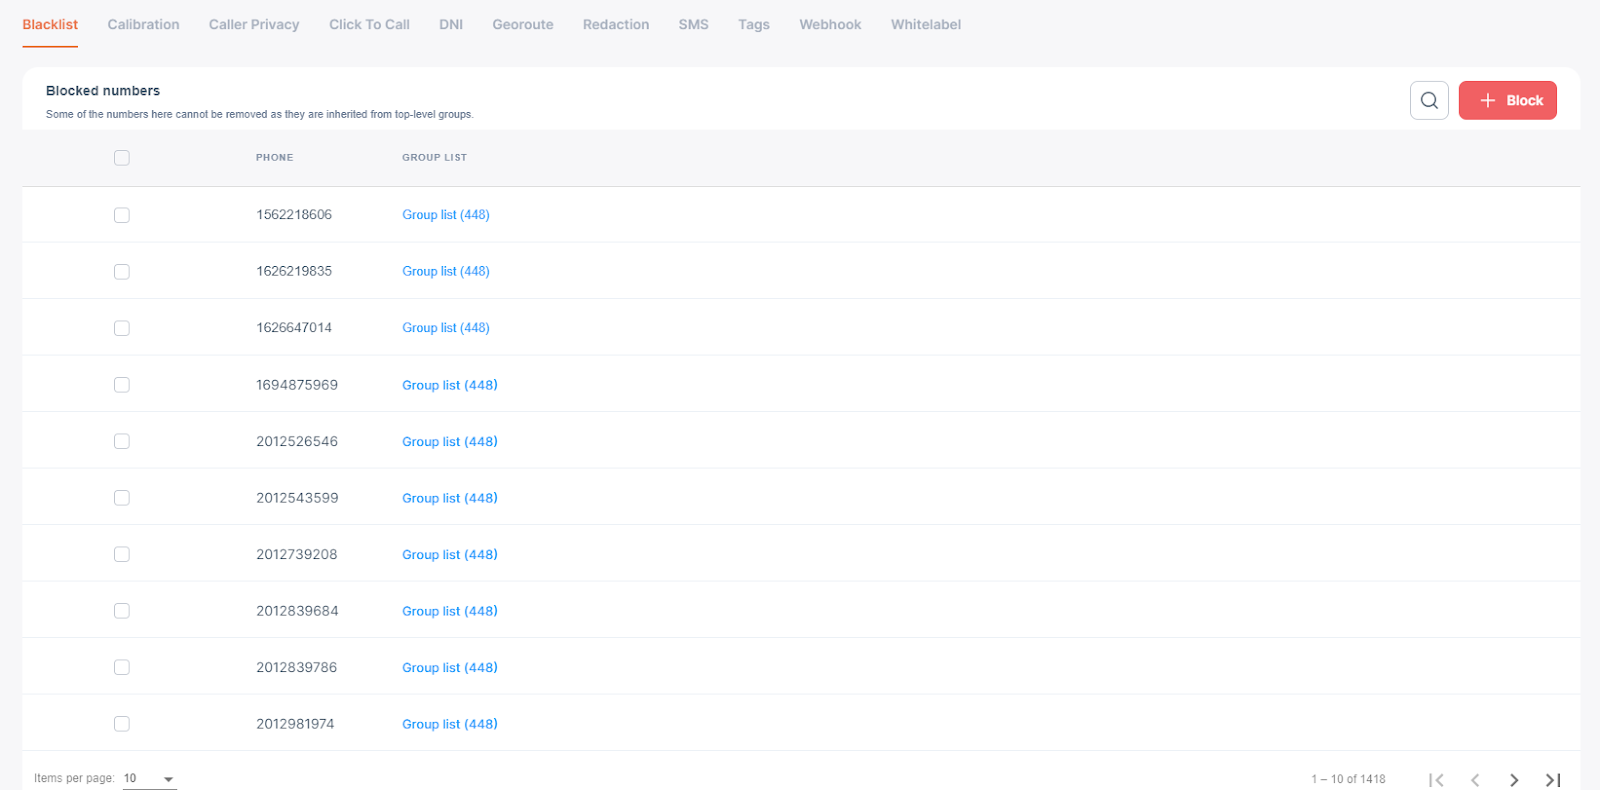
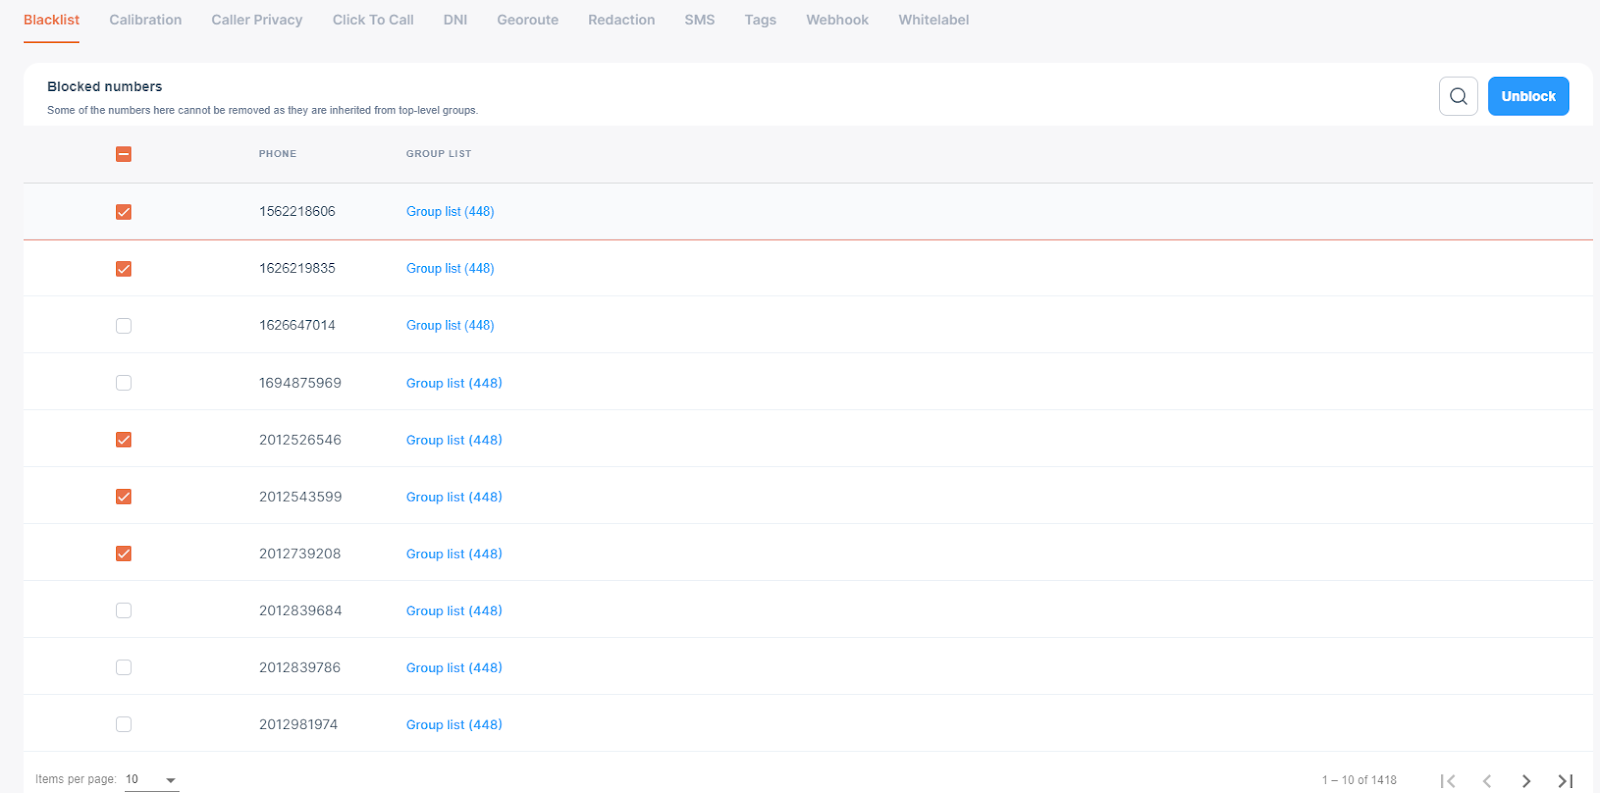
Blacklist
A blacklist blocks the numbers, avoiding calls from unwanted/spam callers.
To navigate to this page, Click on Settings→Customization→Select the Blacklist tab.
You can add or remove the numbers to the blacklist on this page.
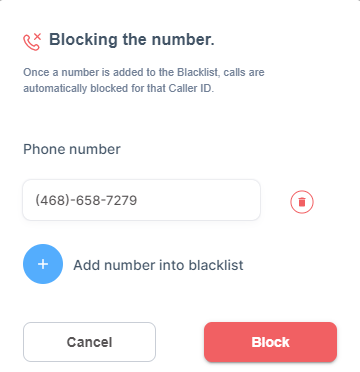
To block the numbers, click the block button and add the number.
You can add multiple numbers by clicking ‘Add number into blacklist’ and click on Block to block all the listed numbers to the blacklist. You can also delete the number by clicking on the sign next to the number.
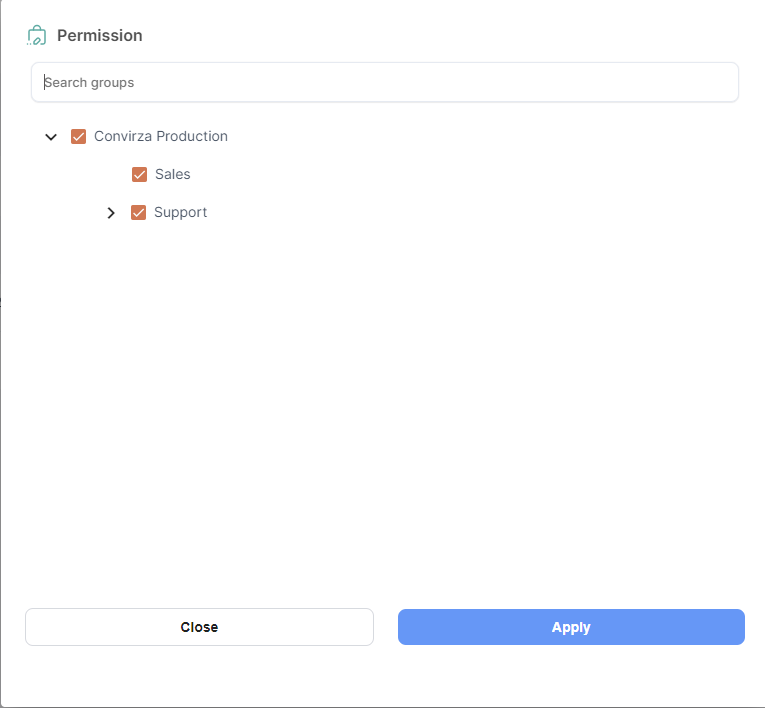
You can also select the groups you would like to block the number. Click on the Group list in front of the number, which will allow you to select the groups. Select one or multiple groups and search for the specific groups on the Permission pop-up.

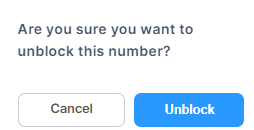
To unblock a number, select the numbers you would like to unblock from the list and click on Unblock.
This will give you a confirmation message. Click on Unblock to confirm the action.
Calibration:
Calibration is a feature that increases the accuracy of transcription for select keywords.
Calibration is added under customization.
Calibration enables the addition of up to 50 keywords, which will receive extra weight in transcription. Activating calibration will enhance accuracy by recognizing words that frequently appear in conversations.
To add your agent names and group names, check the boxes below. You can manually add keywords such as competitor names, product names, and more. The added agent and company names will appear in the transcription with the correct names.
Please ensure that you enter the correct spelling for the keywords, as AI uses that to replace similar spellings that might not be correct. For example, if we enter the word Michelin as a keyword, the AI will use that instead of other possible spellings like Michalin, Michline, etc.

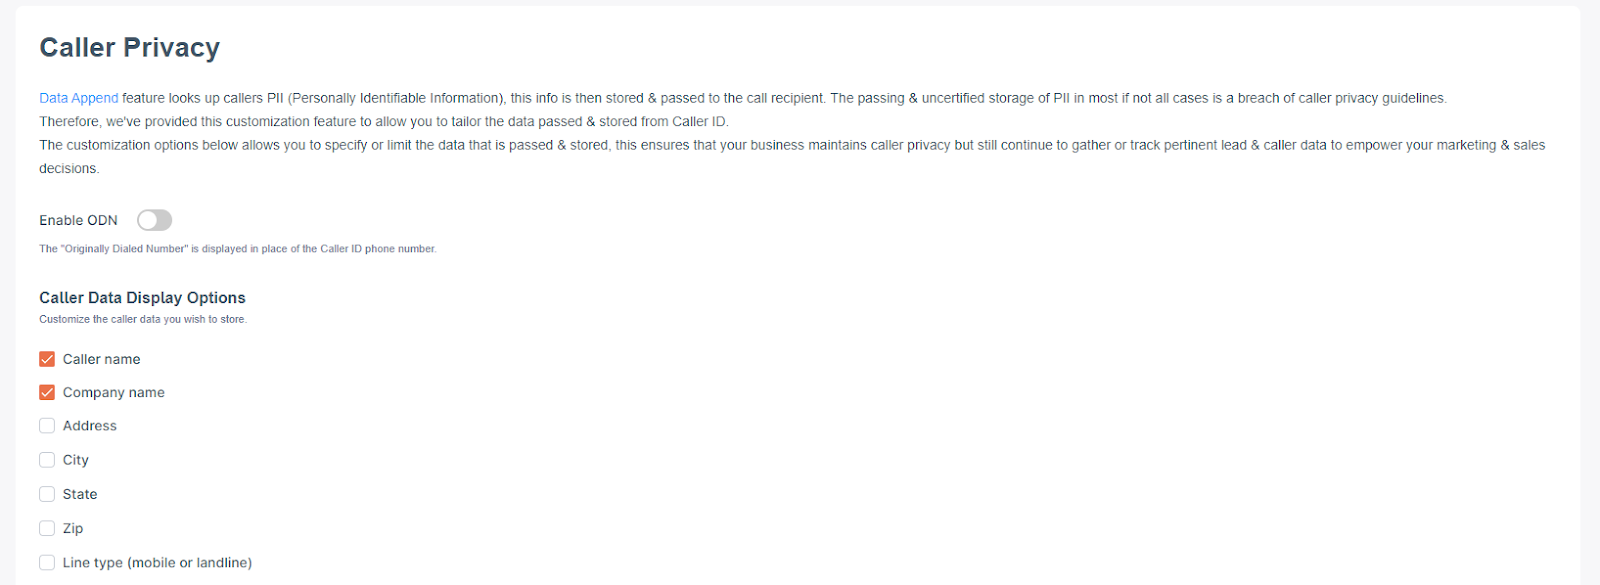
Caller Privacy
Caller Privacy helps limit the caller's data, which will be displayed in reports and saved in the app.
Maintain caller privacy - When the Data Append setting is enabled, it looks up callers' PII (Personally Identifiable Information), stores it, and passes that PII to the call recipient. This passing and uncertified storage of PII in most, if not all, cases is a breach of caller privacy guidelines. Therefore, we've developed this customization feature to allow you to tailor the data passed and stored from Data Append.
Using the settings below, you can specify and limit the data passed and stored to ensure that you and your business maintain caller privacy but still gather and track pertinent lead and caller data to empower your marketing and sales decisions.
Enable ODN - displays the "Originally Dialed Number" instead of the Caller ID phone number if enabled.
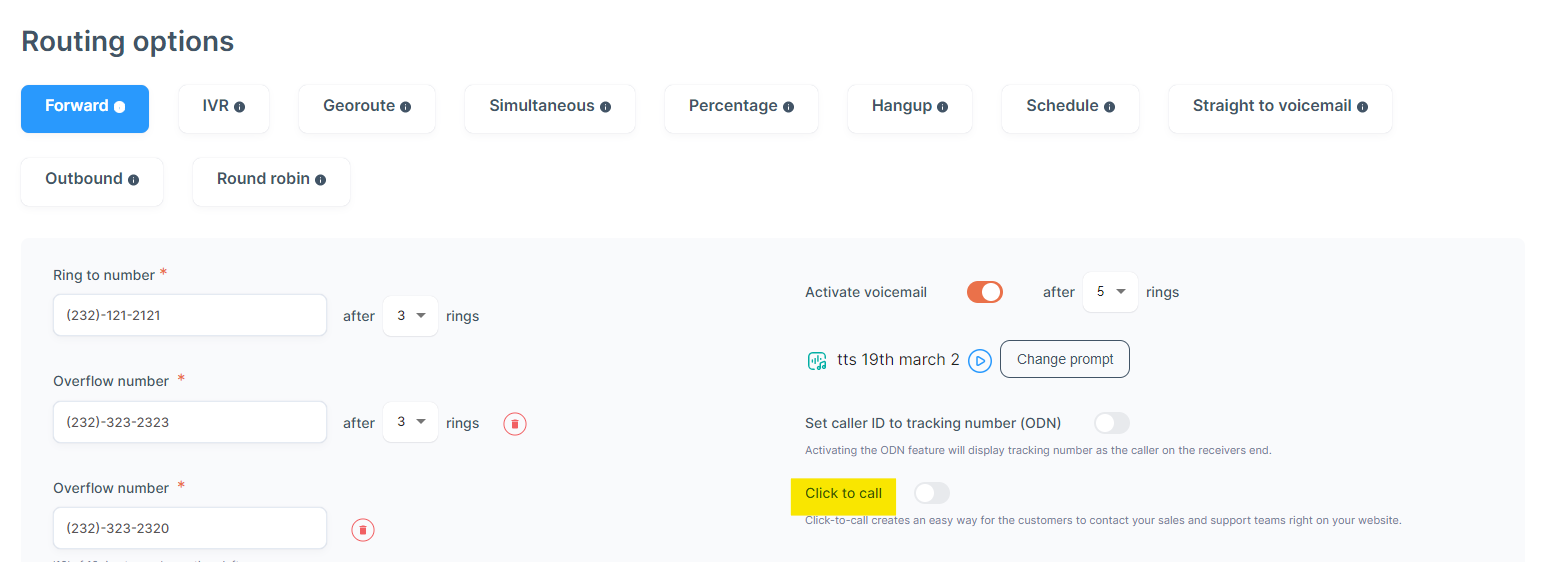
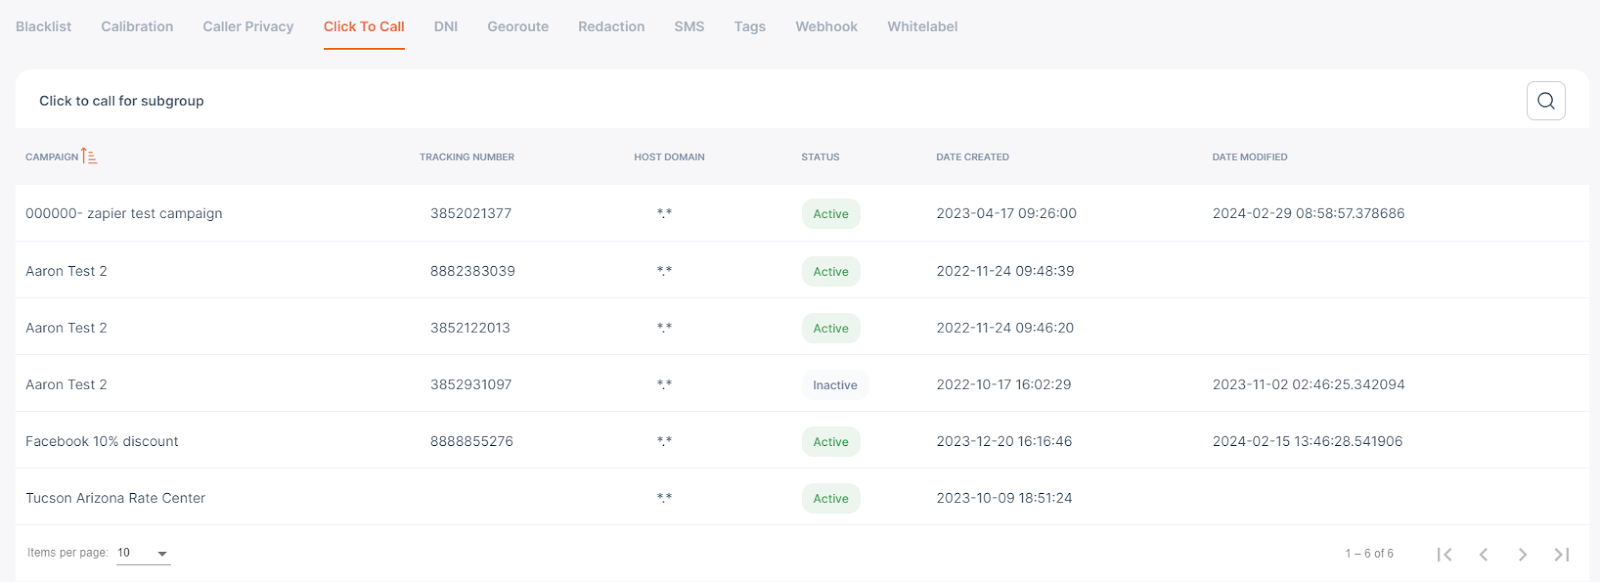
Click To Call
Click-to-call creates an easy way for customers to contact your sales and support teams on your website.
A customer may want a dynamically inserted number to be clickable. This is possible and does not require any extra work. However, the customer must code the HTML class attributes(s) correctly for this to happen.
To enable click-to-call functionality for any number in CAI, Please turn the toggle on for the Click-to-call option under Routing Options.
You can navigate to the Click to Call settings page by clicking on
Settings-->Customization-->Click to call.
This page shows the grid for all the numbers with click-to-call enabled for the selected subgroup.
Click on any row for the tracking number to which you wish to apply the click-to-call settings, and it will open the settings for that number, as shown below.
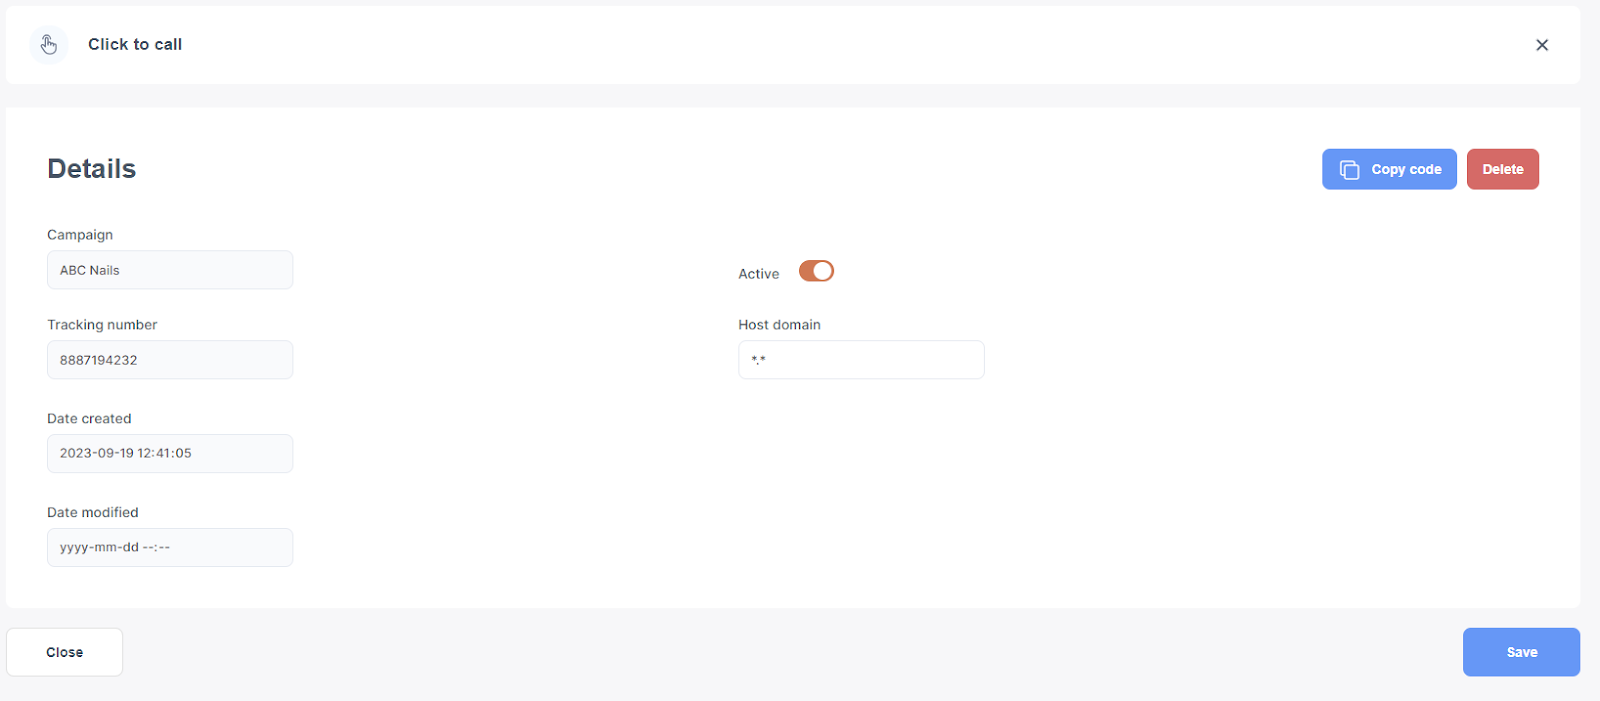
Click on copy code for the tracking number.
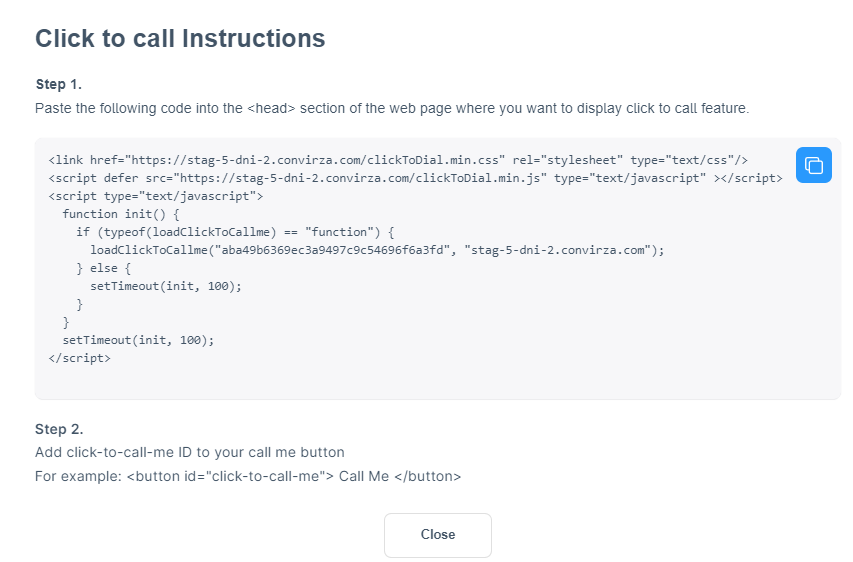
Once you add the code to the webpage and click on the ‘Call me’ button, you will be shown the option to enter the number you wish to receive the call in the pop-up.

Add the phone number and click the call button to receive the call. It may take 5 to 10 minutes to receive the call.
DNI
Dynamic Number Insertion (DNI) helps customers dynamically change the contact number on their website for each new visitor. If the DNI settings are applied at the group level, the subgroups will inherit that and the newly created tracking numbers under those groups.
Once the DNI settings are applied for any tracking numbers, You can navigate to the DNI settings page by clicking on Settings-->Customization-->DNI
This page shows the grid for all the numbers with DNI enabled for the selected subgroup.
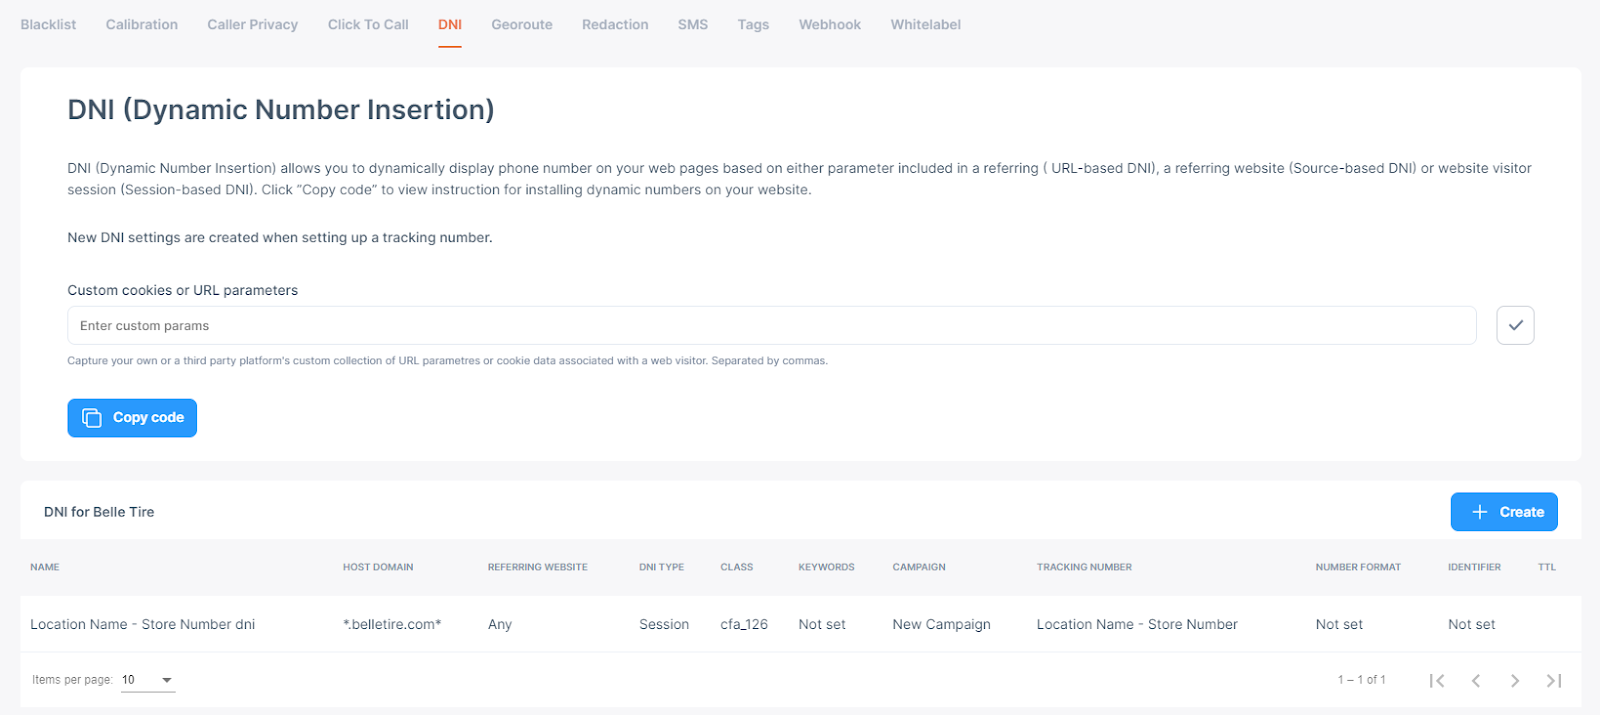
You will also get an option to copy code from here. You can edit any information related to the tracking number by clicking on the row for that tracking number.
Once you add the code to the webpage, unique numbers can be shown based on the referring source or for each individual visitor.
Georoute
This option allows you to create and manage the location lists for the Georoute tracking numbers.
The calls will be routed based on the zip code entered by the caller, if the zip code matches the claimed zip code on the location list, the call will be routed to that location. Otherwise, it will be routed to the default ring to number.
You can navigate to the Georoute page by clicking on Settings-->Customization-->Georoute.
This page shows the list of all the locations for the selected subgroup.
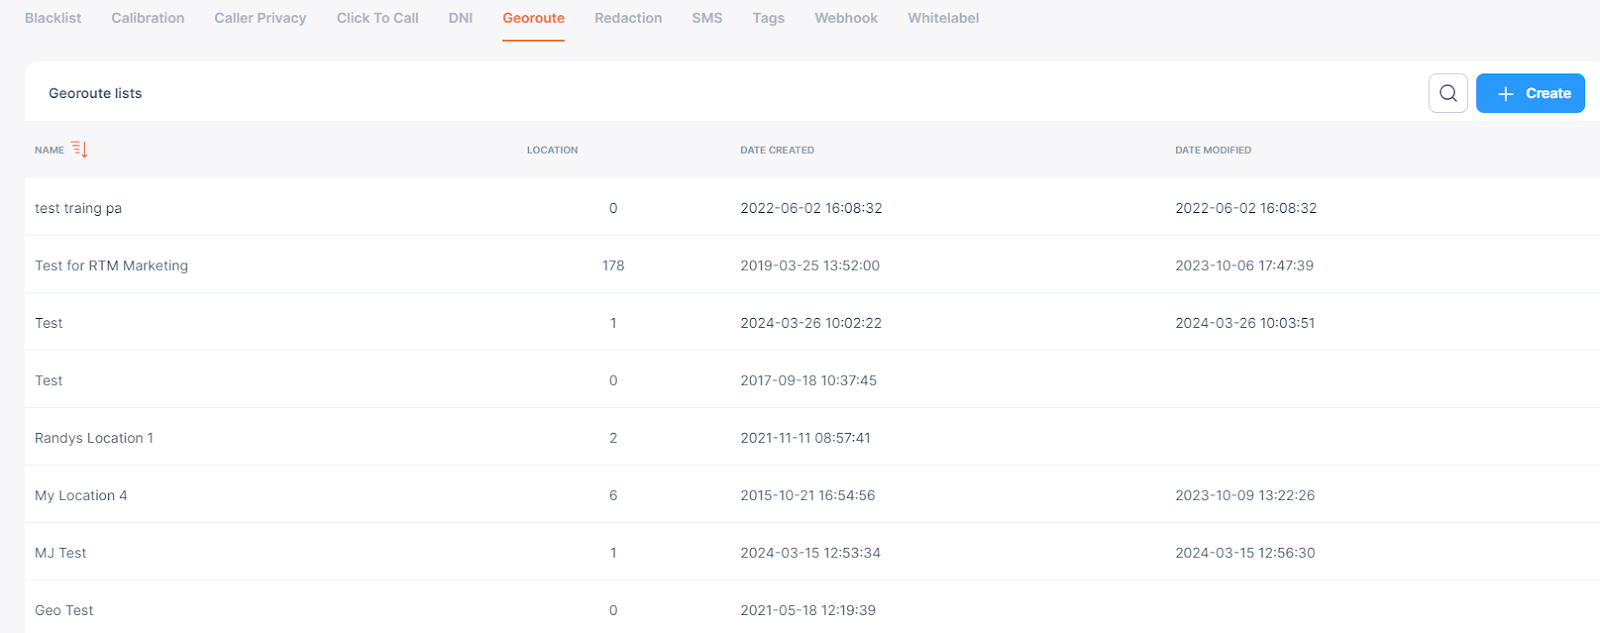
To edit the location list, click anywhere in the row of that location. When you click on a particular location, you will also have the option to add IVR and delete it.
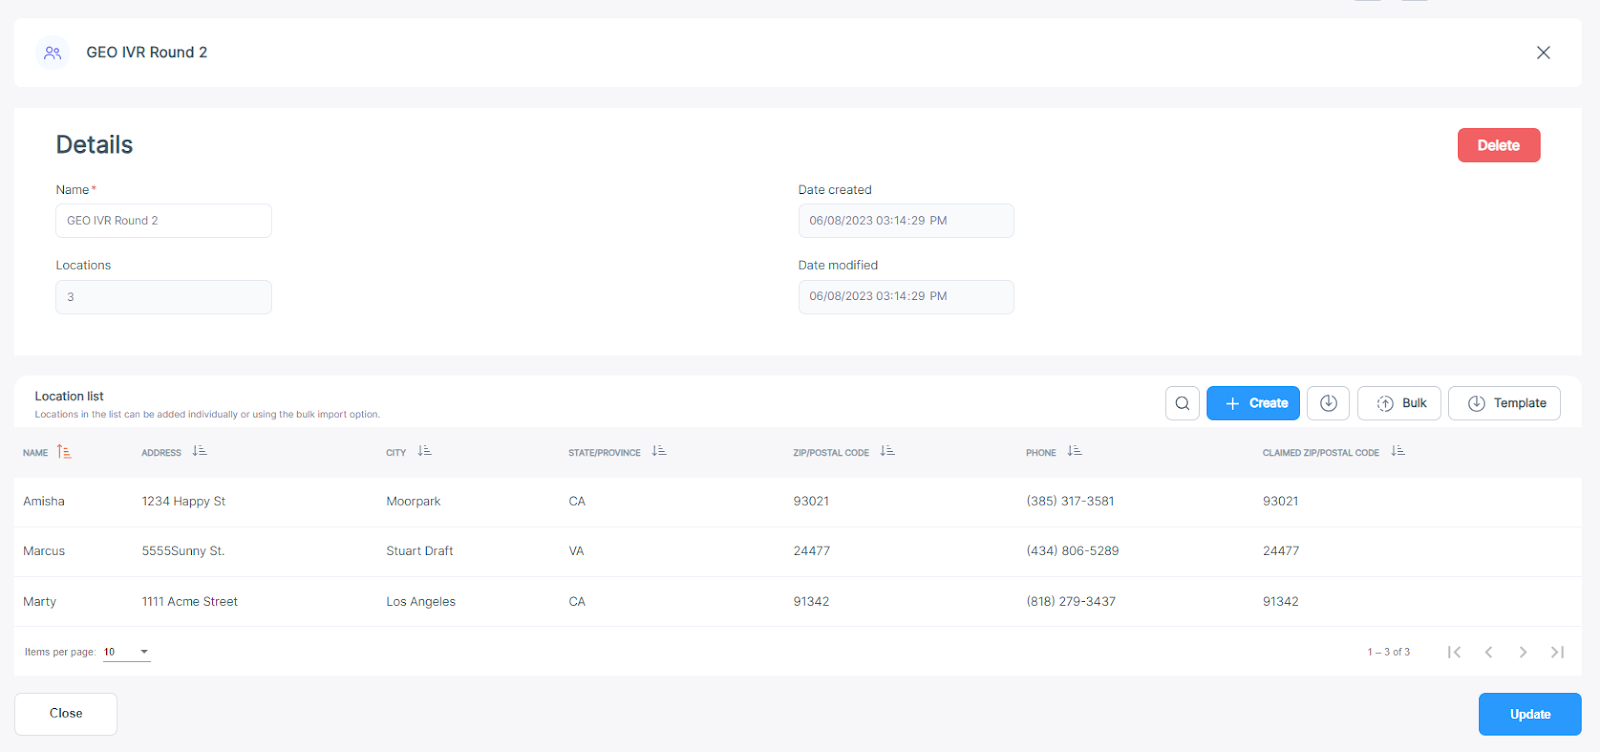
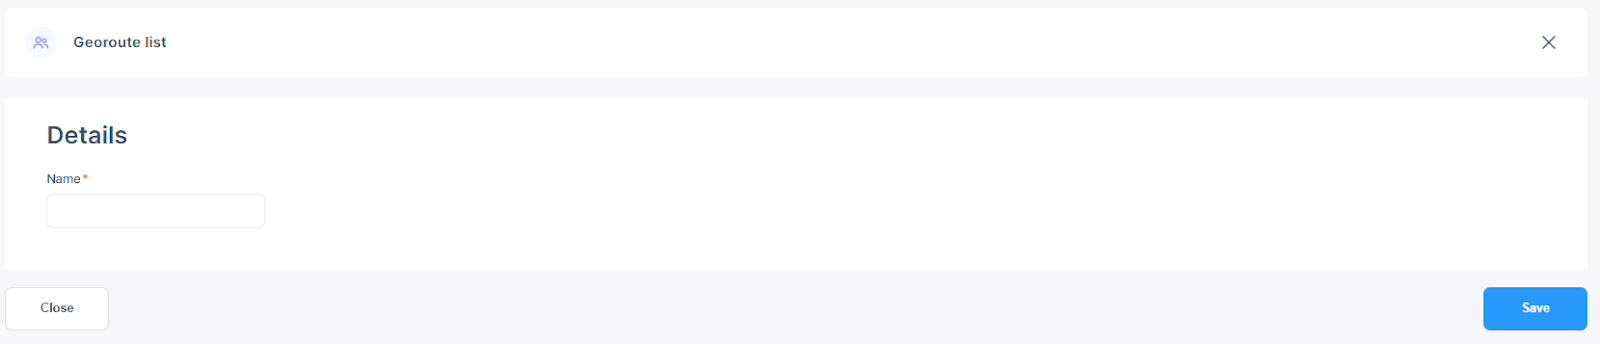
To create the new list, click on Create, add the name, and save.
Once the list is created, you can add different locations under it one by one or use the template to add the locations in bulk.
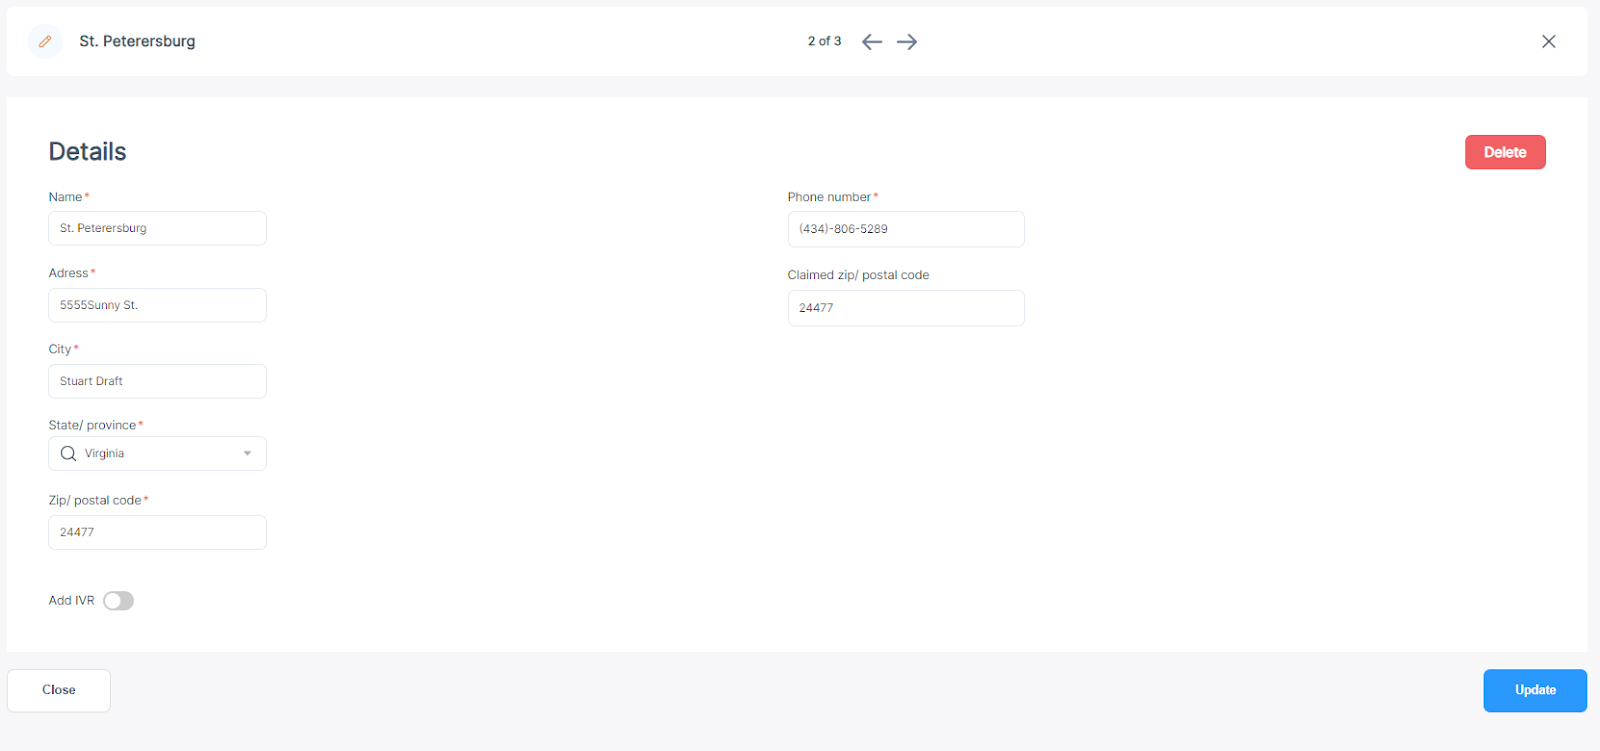
Clicking the Create button under the location list will allow you to add the location information, as shown below.
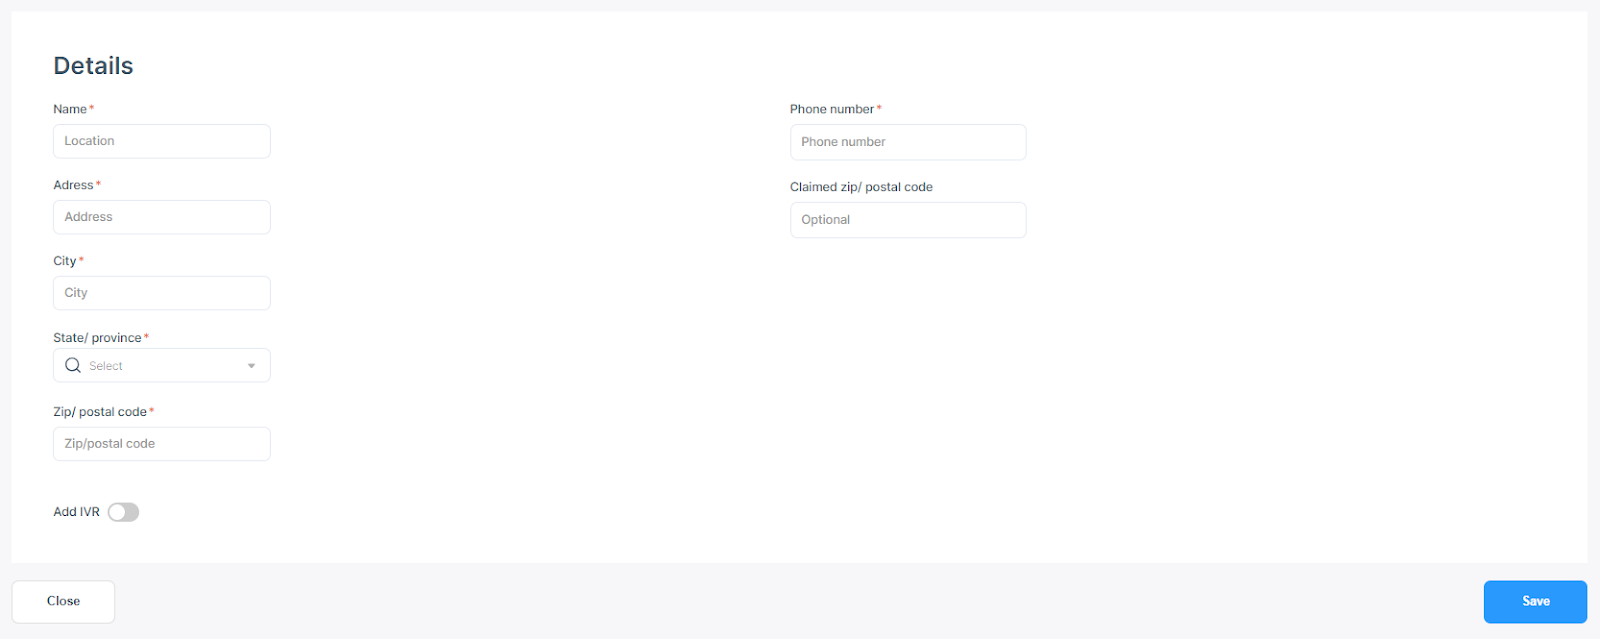
If you want to add location information in bulk, download the Template with the ‘Template’ option and save it. Upload it with the ‘Bulk’ option, and click on Update.
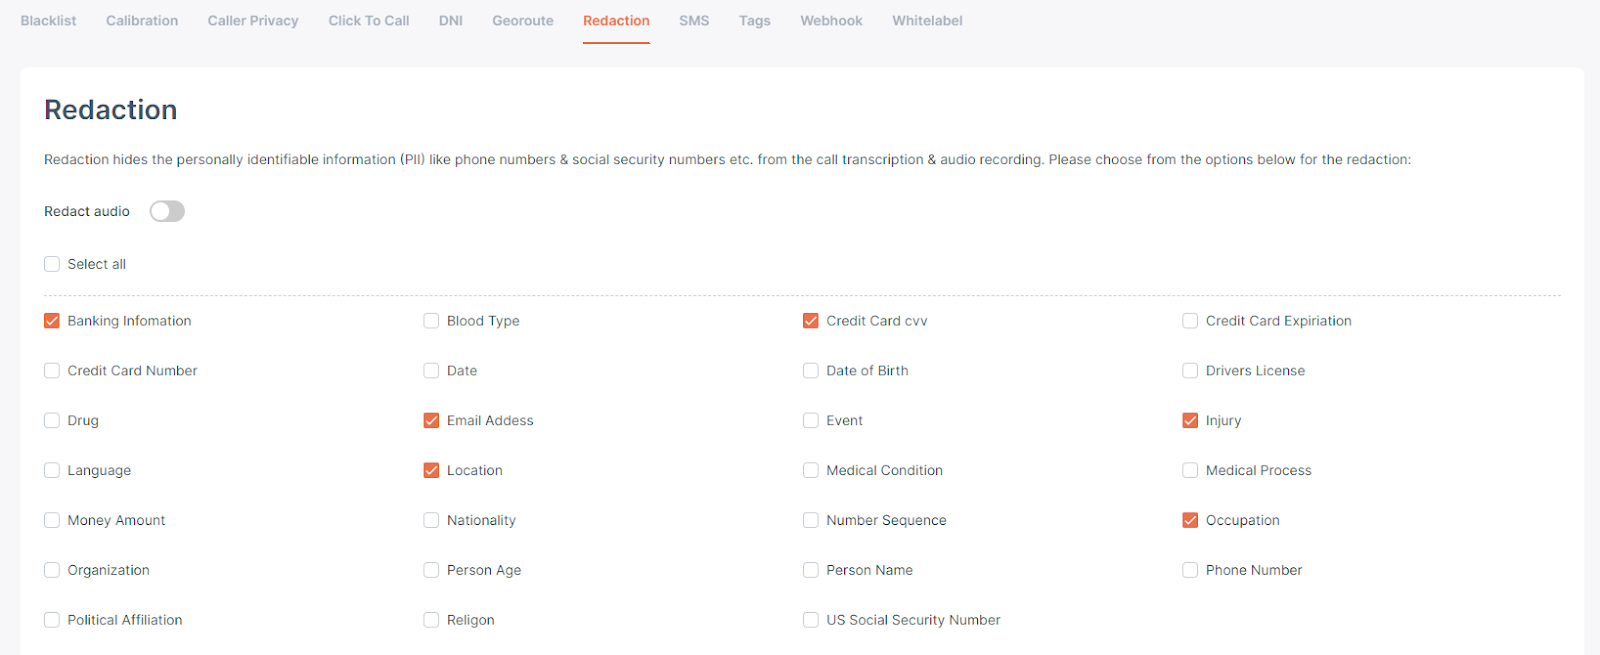
Redaction
The redaction feature helps redact specific information from the conversation recordings and the transcriptions.
You can navigate the Redaction page by clicking Settings-->Customization-->Redaction.
If the toggle for Redact audio is toggled to 'Yes,' the transcript and audio will be redacted. If it is toggled to 'No,' only the transcripts will be redacted.
The option selected with the check mark under the redaction option will be redacted from the calls. For example, If the box is checked for a credit card number, then the credit card number will be redacted.
Please note that calls won't appear in the call logs if the Audio is redacted and the call duration is less than 30 seconds.
For all the calls with a duration greater than or equal to 30 seconds, it will take 2-3 minutes to redact the data.
SMS
Note: This feature is only visible if there is a registered SMS campaign.
Click-to-text provides an easy way for customers to contact your sales and support teams on your website via SMS under customization→SMS→Details.
It is similar to the Click-to-call functionality available in CAI. You can navigate to the SMS page by clicking on
Settings-->Customization-->SMS.
You can set up the default customizable message by tracking numbers and by group.
By tracking number:
This page shows the grid for all the numbers with click-to-text enabled for the selected subgroup in the breadcrumb.
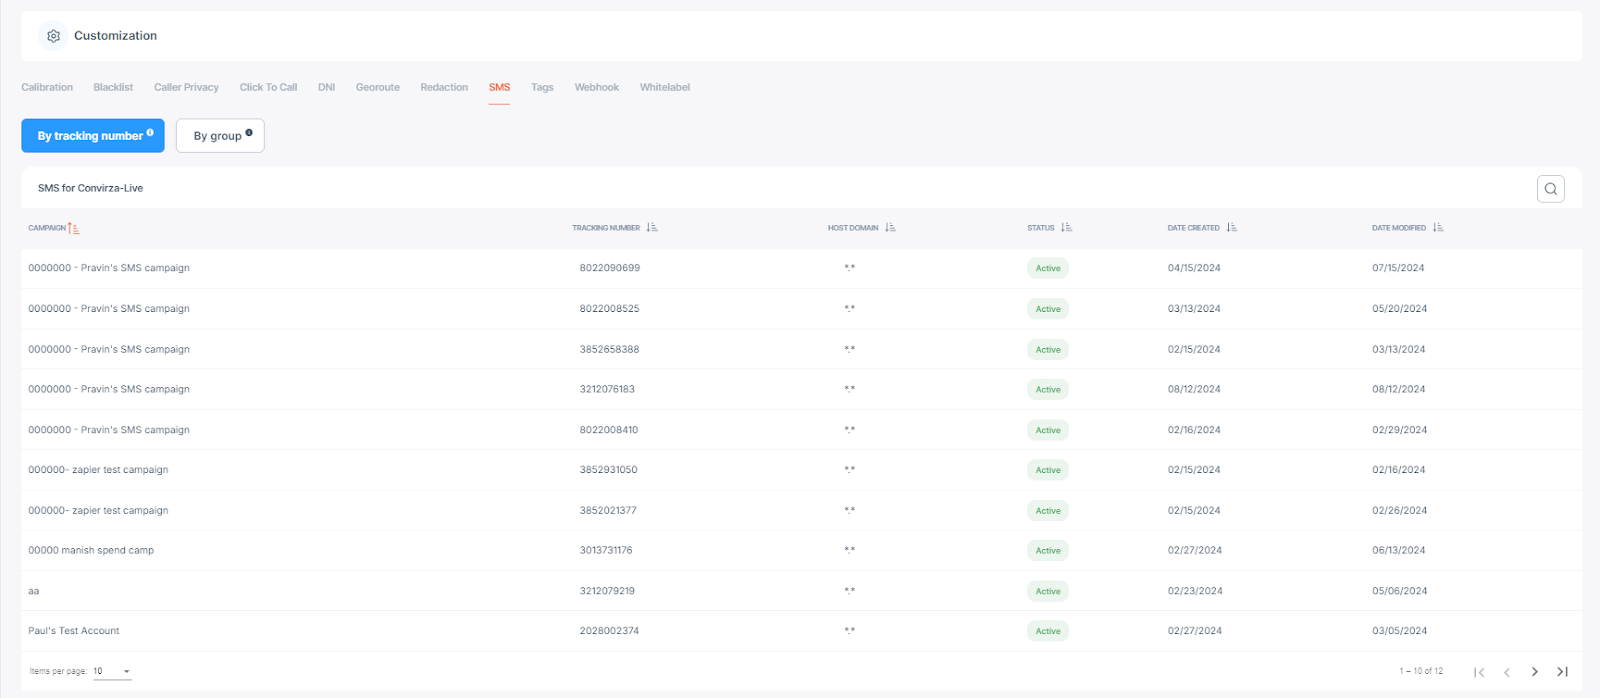
Click on any tracking number to which you wish to apply click-to-text and other settings, and it will open the settings for that number, as shown below.
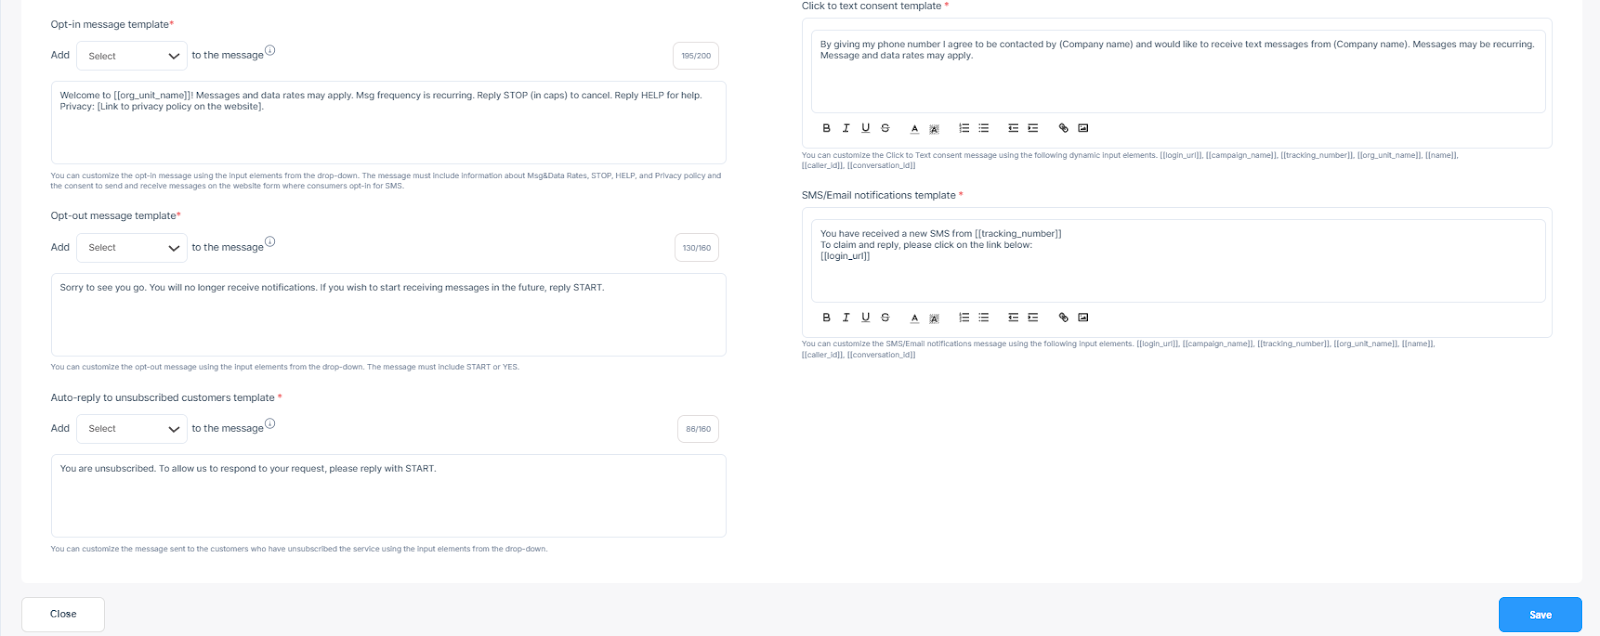
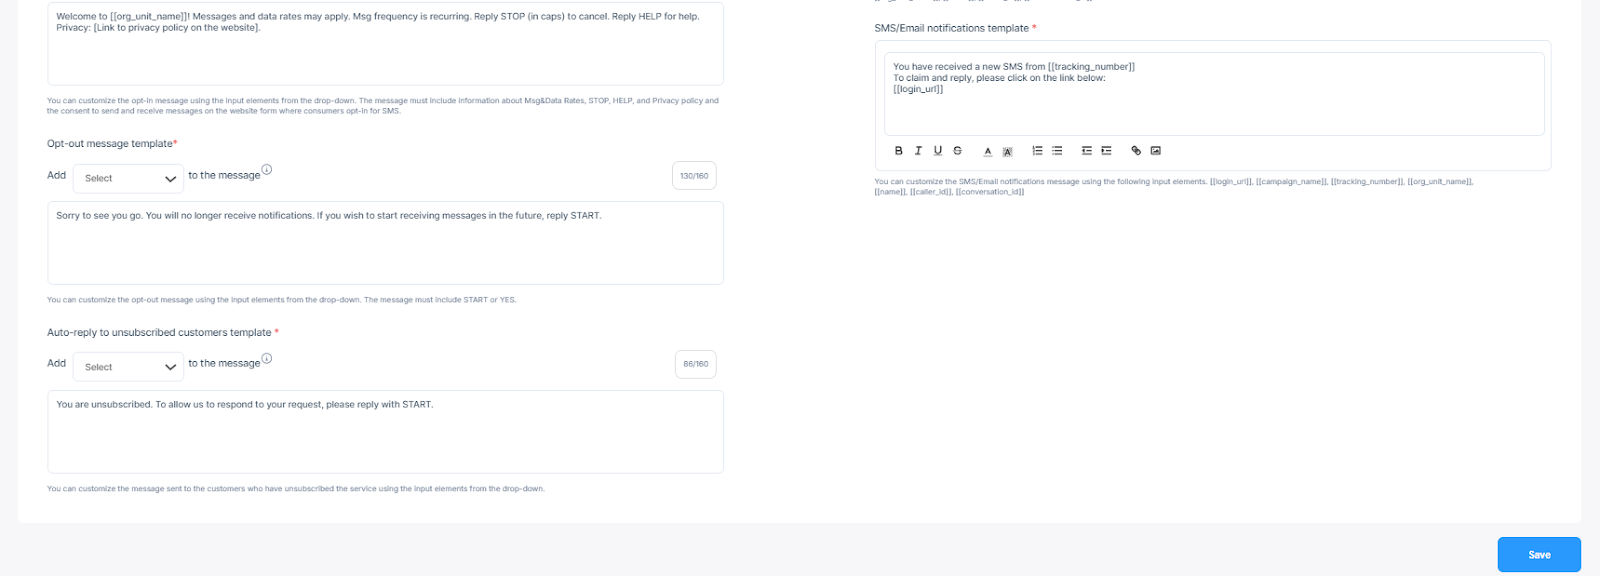
You can customize the Opt-in template, Opt-out template, Auto reply to unsubscribed customers template, Click-to-text consent template, and SMS/Email notification template here. Also, you can view and edit the SMS user settings on this page.

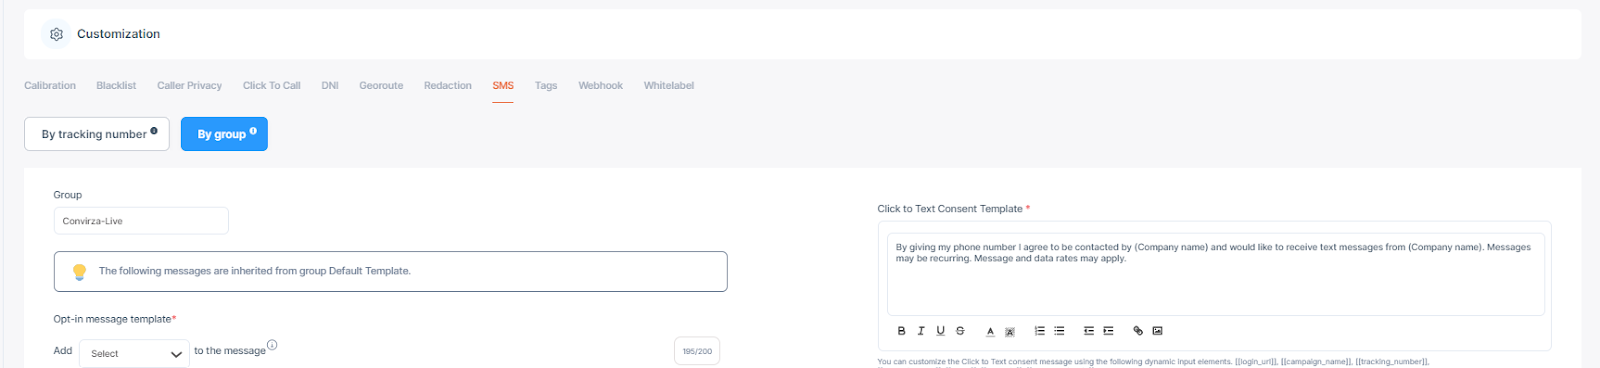
By group:
You can also set up default messages by group.
You can customize the Opt-in template, Opt-out template, Auto reply to unsubscribed customers template, Click-to-text consent template, and SMS/Email notification template here.
If the messages are customized at the group level, they will be inherited by the subgroups and all tracking numbers in the subgroups. Customizing any message for the subgroup will overwrite the settings from the parent group, and customizing any message for the tracking number will overwrite the settings from the group of the tracking number.
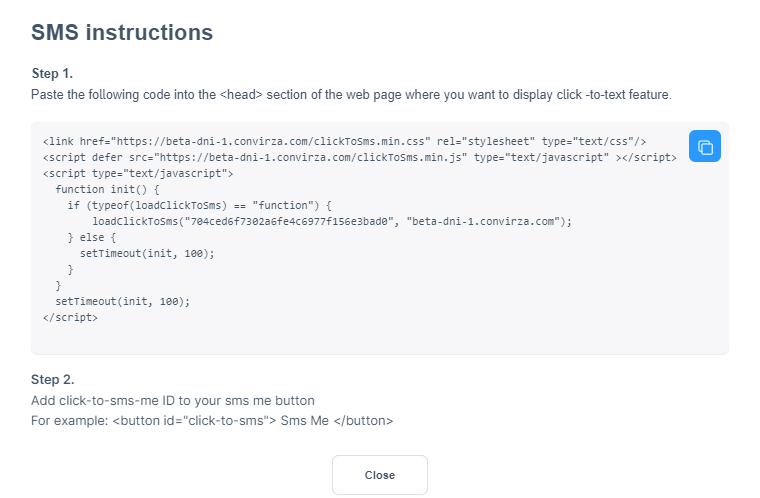
You need to copy the script and add it to the header section of your website’s HTML code. Also, copy the button code:
<button type="button" id="click-to-sms" style="visibility: visible;">
Number or text whatever you want
</button>
Paste this button code where you want to create a button on your website. When you click the button, a pop-up will appear with options for Name, Number, and Message. The message you added will be displayed under the 'click-to-text' template."
For example:
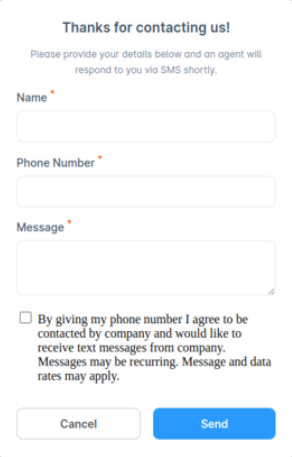
Customers can send the message directly to your support/sales team from the website when they approve the consent.
Tags
Tags help to identify the calls.
You can navigate the Tags page by clicking on Settings-->Customization-->Tags.
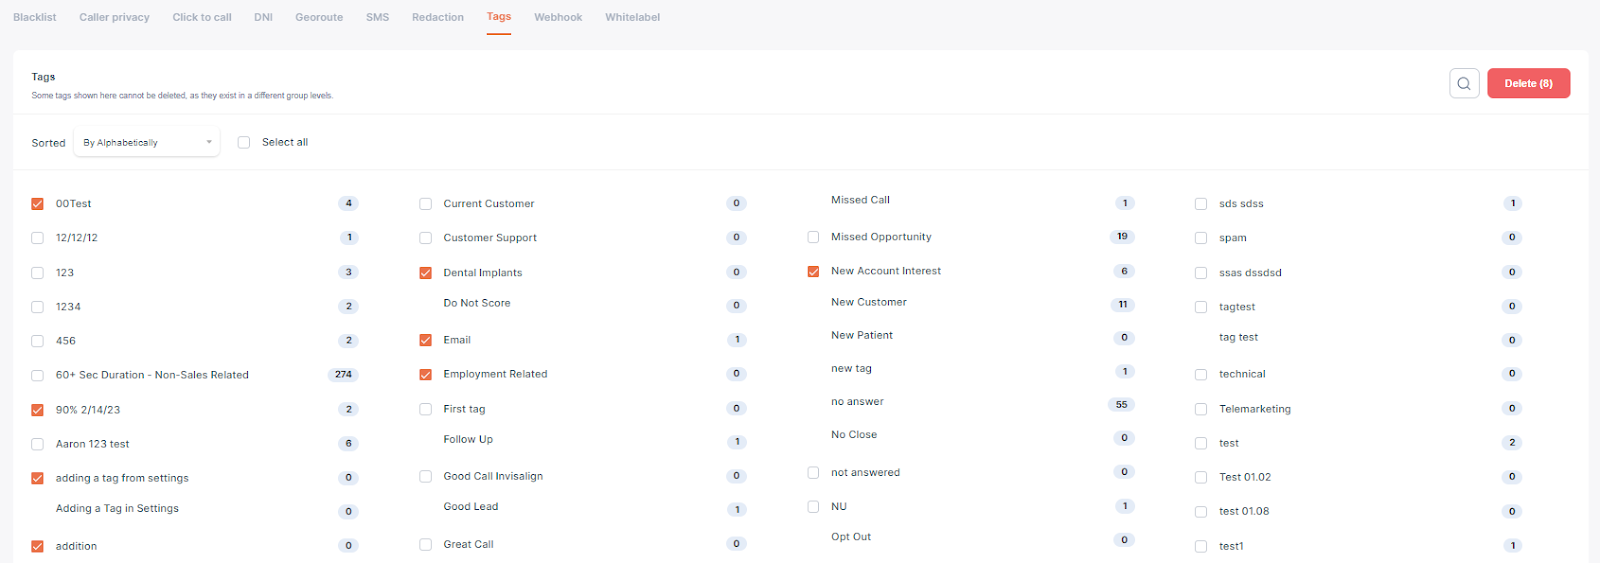
This page shows you the list of tags available for the selected group. You can sort the tags alphabetically and by Frequency. Some tags shown here cannot be deleted, as they exist at a different group level.
You can search the tags by clicking on the search option.
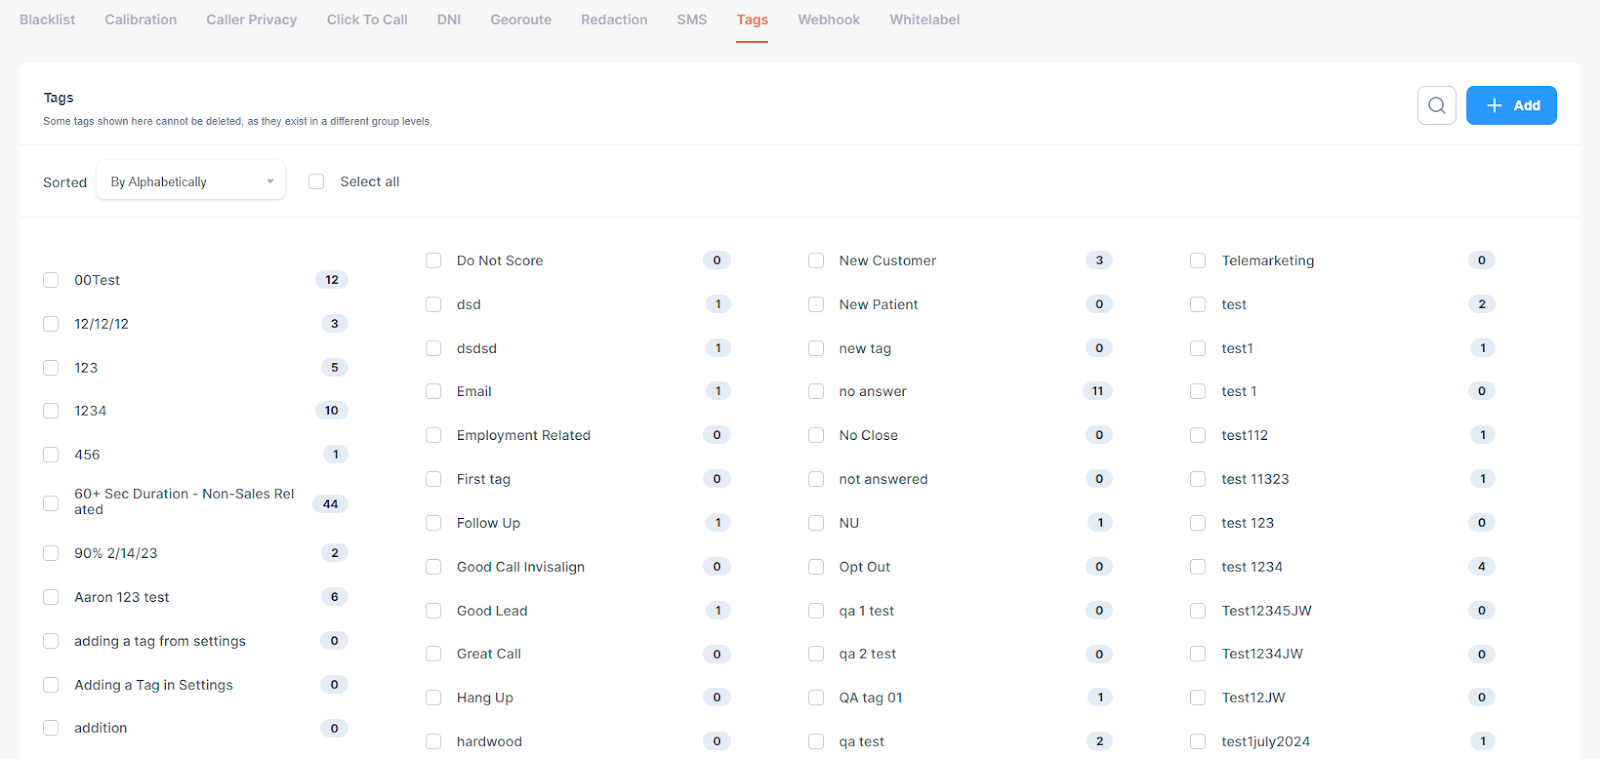
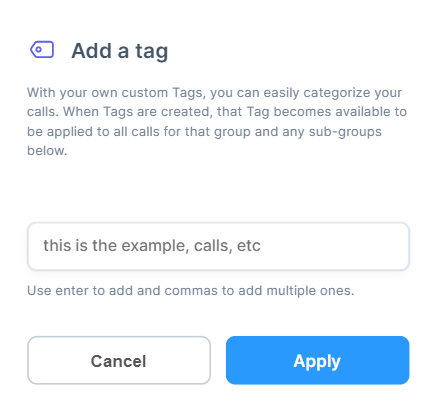
To add the tag, click on the Add button. You can add single or multiple tags from here. To add multiple tags, use commas. You can not add the same tag multiple times under the same group.
To delete the tag, select the tag with the checkbox and click on ‘Delete’. It will show you how many tags you are about to delete.
These tags shown on this page will be available to be added on the calls for the tracking numbers under the particular group.
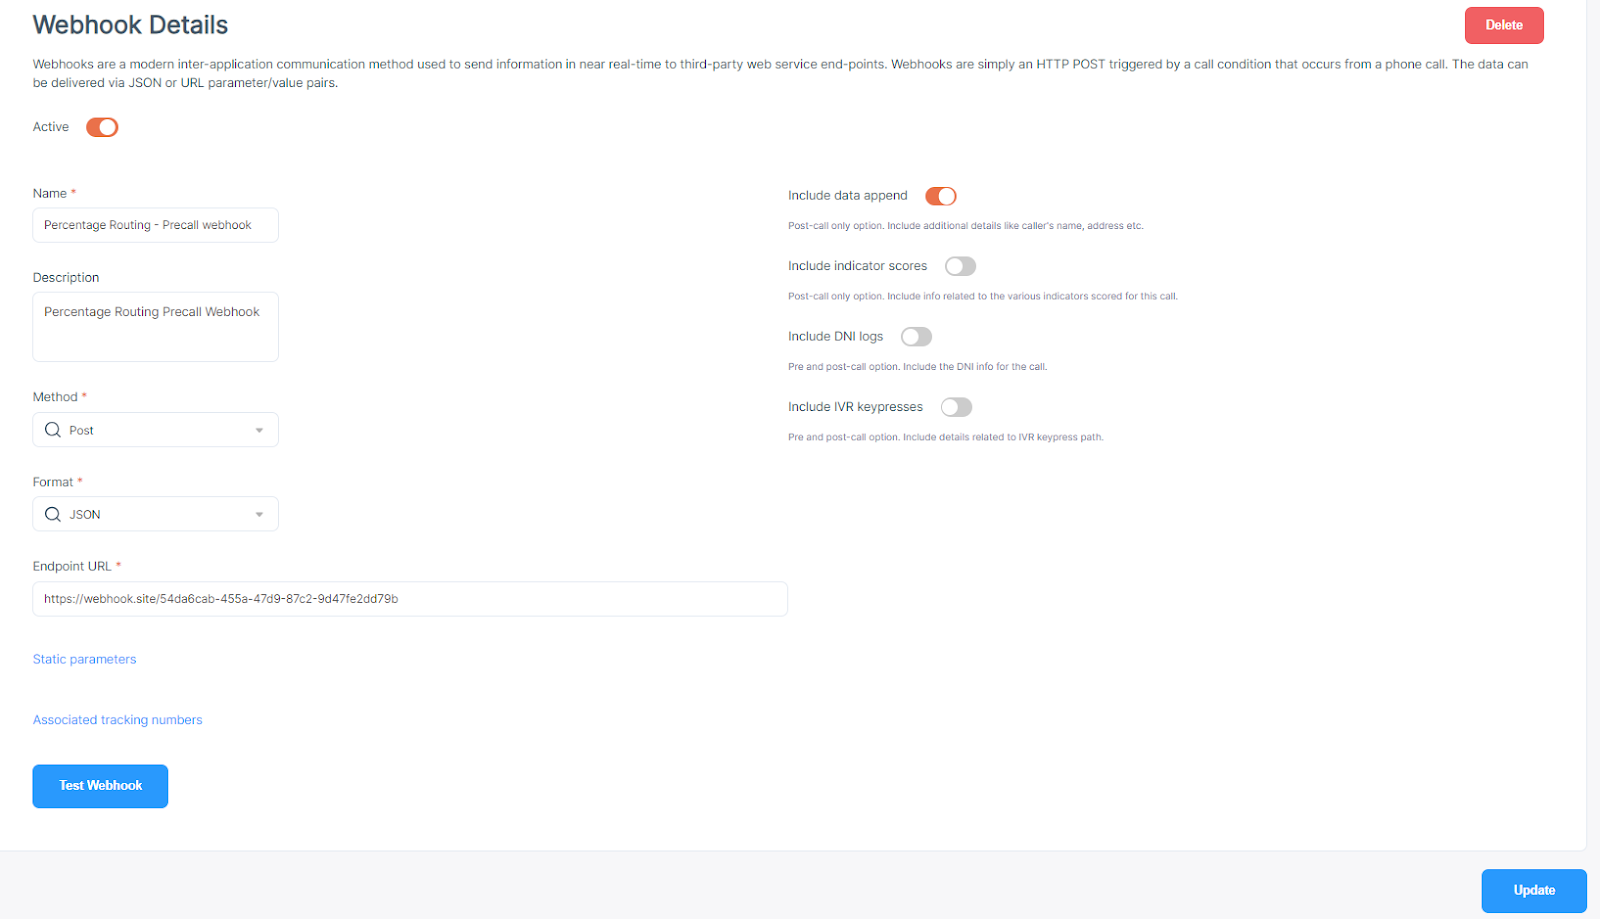
Webhooks
Webhook is an API concept that's growing in popularity. A webhook (also called a web callback or HTTP push API) is a way for an app to provide other applications with real-time information.
You can navigate to the Webhooks page by clicking on Settings-->Customization-->Webhooks.
This page has a grid with all the information related to the webhooks for the selected group. You can filter the table using different filters and download the table with all the webhooks information in CSV format.
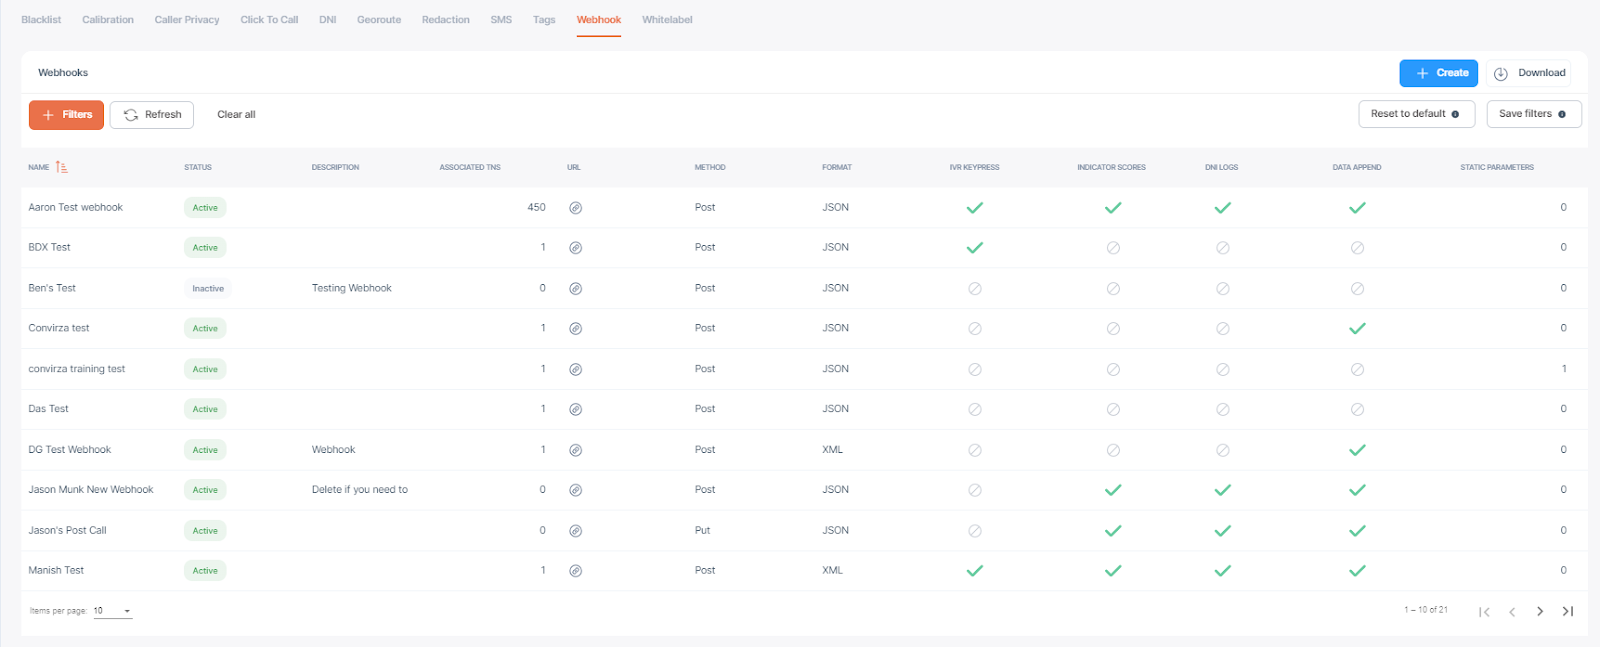
To create the webhook, click on create, and it will give you the pop-up to add all the information for the webhook and save it
.
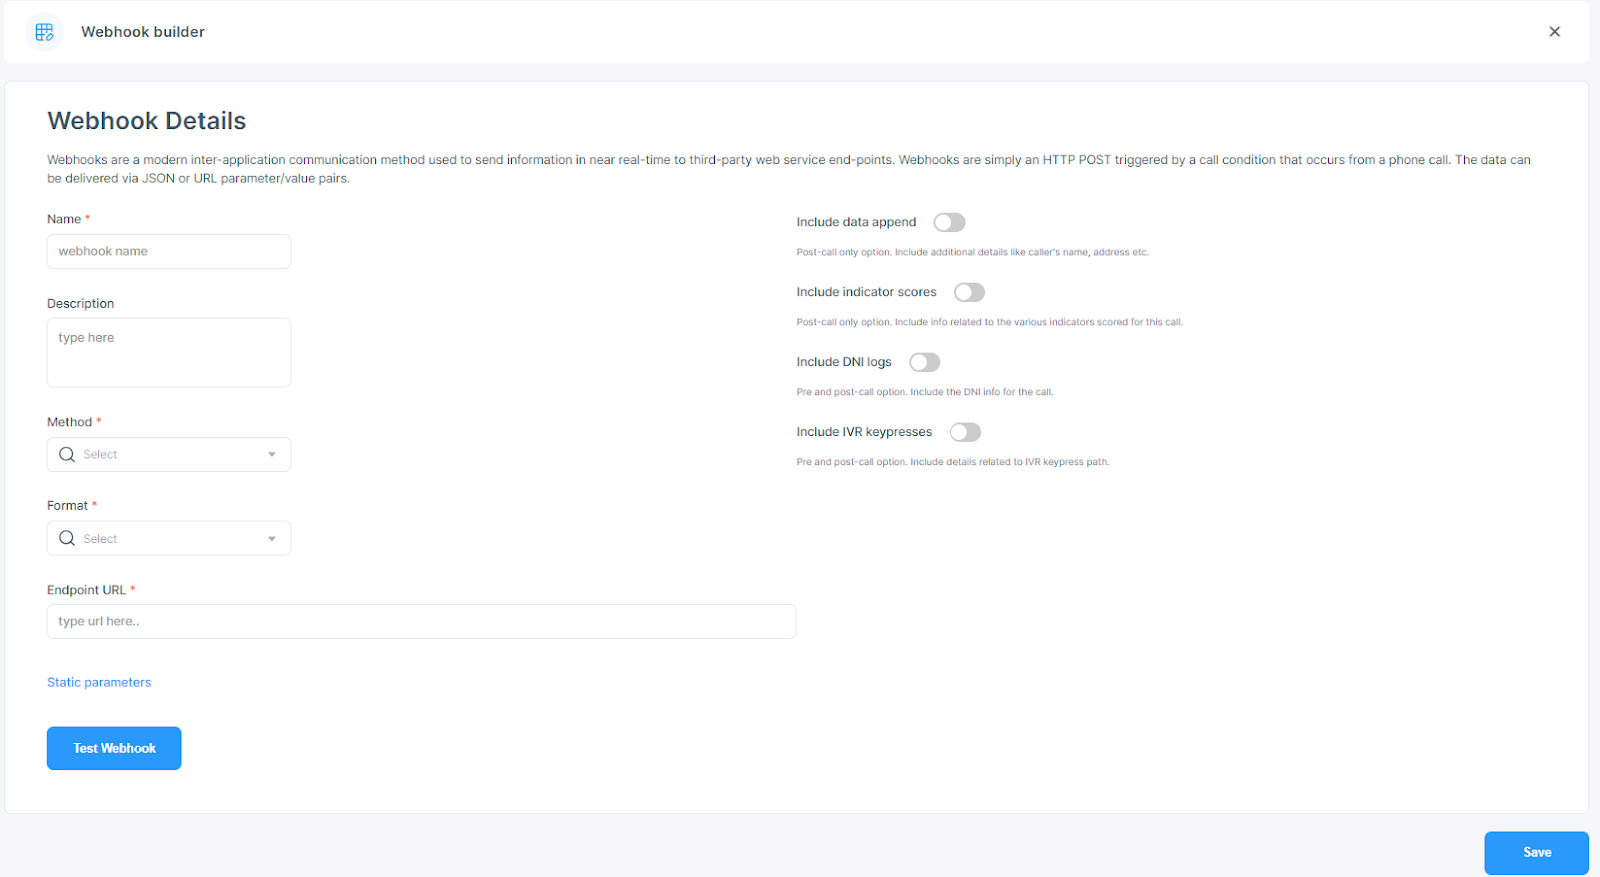
To edit the webhook, click anywhere on the row for a particular webhook in the grid, and it will give you the option to edit the webhook information. You will get the option to delete the webhook here as well.
For more information, please click here,
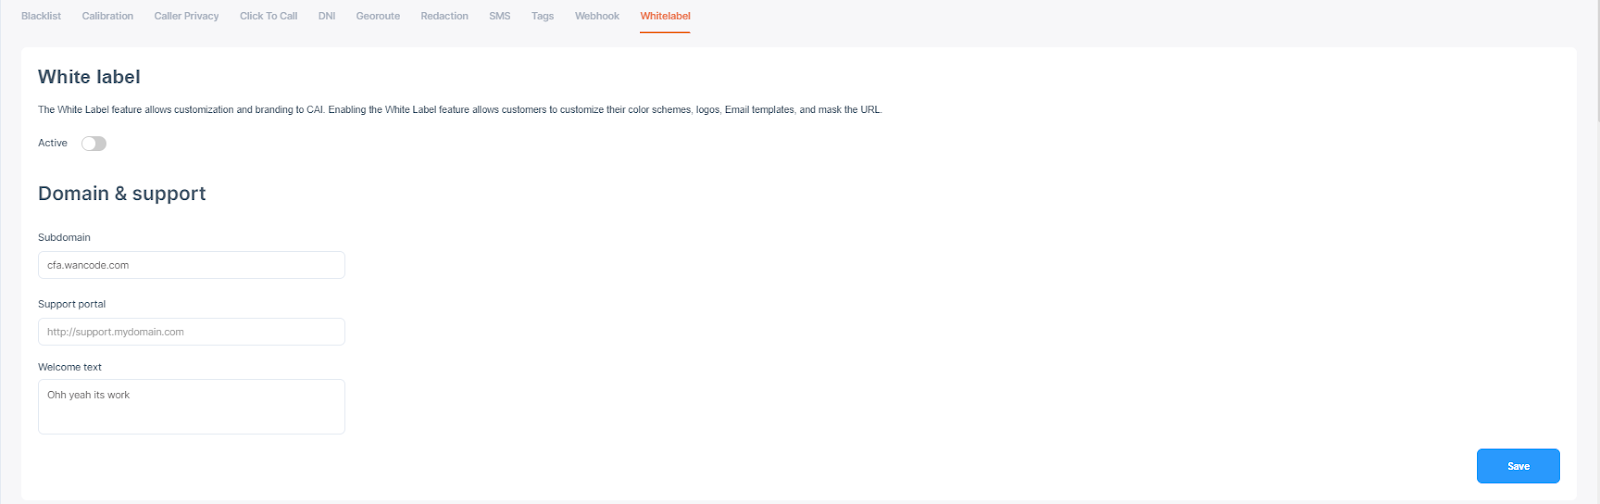
Whitelabel
The White Label feature allows customization and branding to CAI. Enabling the White Label feature allows customers to customize their color schemes, logos, and Email templates and mask the URL.
You can navigate to the Whitelabel page by clicking on
Settings-->Customization-->Whitelabel.
You can activate the Whitelabel from here.
For select-service plans, the white label feature for Convirza’s Actionable Insights allows customers to add their branding to Convirza’s Actionable Insights application. Enabling the white label feature gives the account administrator control over the logo and colors, email notification content, and even the ability to mask the app’s URL with a vanity URL. The feature can be enabled for the primary billing group or any sub-group. The settings are applied for any user logging into the application based on their group or sub-group membership.
How White Labeling Is Applied to an Account
Convirza’s Actionable Insights is a multi-tenant application allowing customers to have different settings for the primary and sub-groups. White label is no different in how settings are applied. Like other settings, white label cascades from a parent group to its children. This means that when a white label is set for a group, the settings are inherited by any sub-group that does not have its white label settings.
White Label Set up
White-label settings can only be accessed by an administrator who is a member of the top-level group. If a white label is applied for the subgroup, those settings overwrite the settings for the top group.
Domain Masking
Domain masking allows customers to create a vanity URL from their website that masks the https://portal.convirzaai.com URL, making it appear that the customer provides the application. Setting up a vanity URL will require the cooperation of your IT team and can be a complex task.
Technical requirements:
- Standard SSL certificate for the domain or subdomain you want to use as your vanity URL. Wildcard certificates are acceptable.
- Access to the DNS settings for your domain.
Steps:
- Send your SSL certificate and private key to support@convirza.com. You will need the cooperation of your webmaster or IT team to acquire this. You will be notified when your certificate is installed. Response time is usually within one business day.
- Create a CNAME record for your vanity domain within your company's DNS settings, pointing to https://portal.convirzaai.com. It may take up to 24 hours for this new record to propagate.
- Login to your Convirza’s Actionable Insights(CAI) accounts and navigate to Settings>Customization>White Label.
- In the Domains and Support section of the page, enter the fully qualified domain name from your CNAME record into the Subdomain field (ex., calltracker.mycompany.com)
- Click “Save.”
- Activate the white label feature by toggling the “Activate” button at the top of the page.
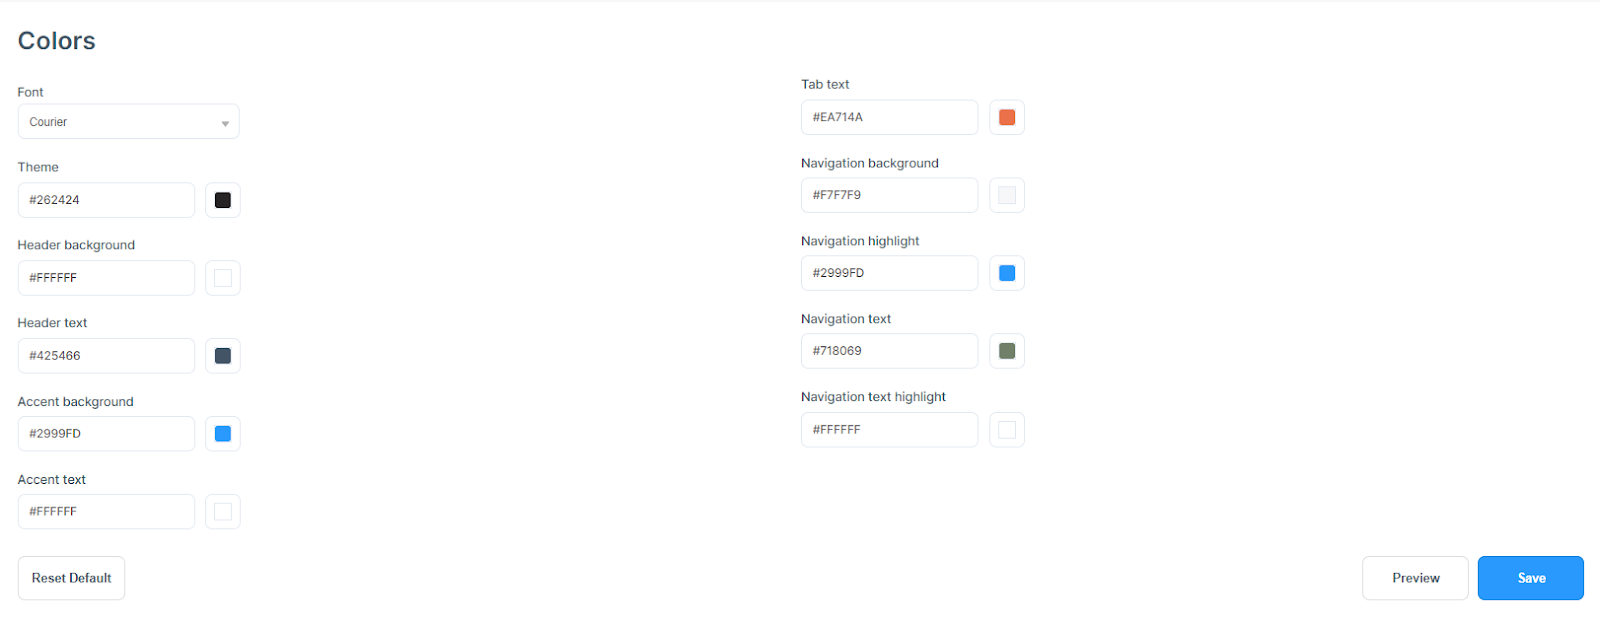
Colors and Logos
An account admin can modify the look by changing the application's colors and logo. Color and logo changes will be applied for all users who are members of the group where white label settings are applied, as well as their child groups. To change the colors and logo within your account:
- Log in and navigate to Settings>Customization>White Label
- In the Colors and Logos section of the page, modify the font used for the application if desired.
- Modify the colors of various page elements using either the color picker or hexadecimal color identifier (ex. #aaaaaa)
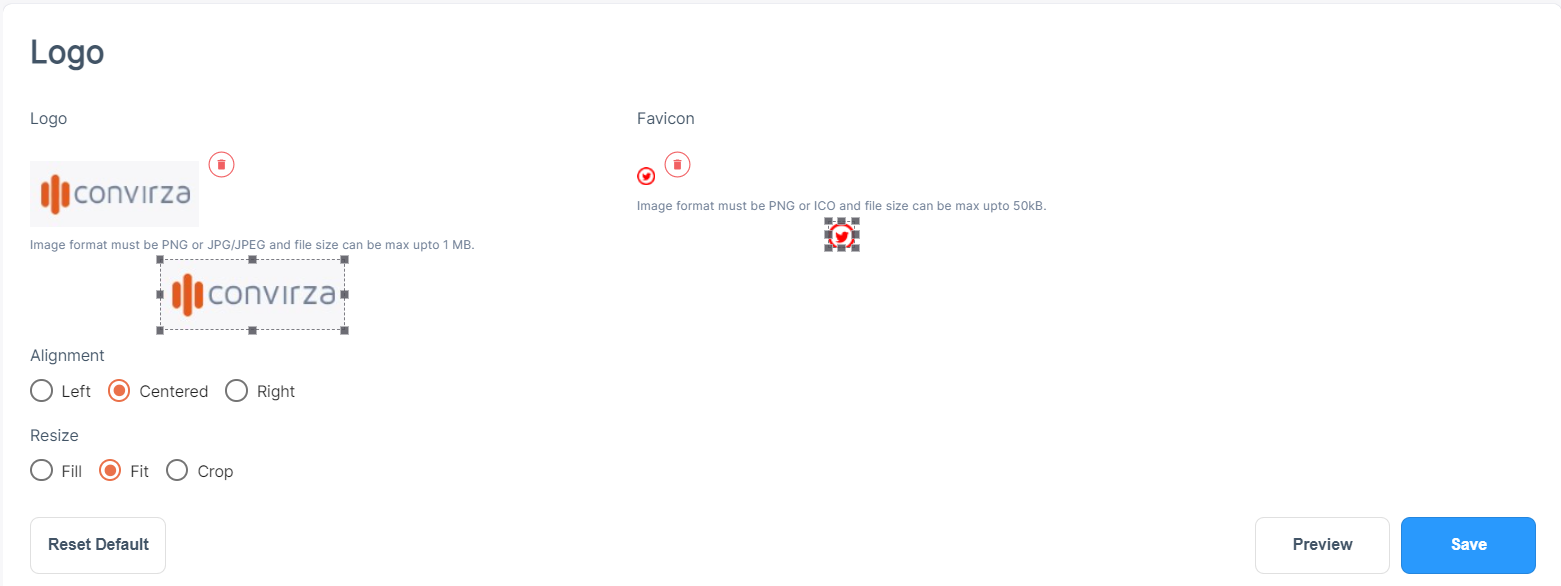
- Upload a logo image by clicking the “Select Image” button and uploading your logo. It is recommended that the logo size be 300 pixels x 100 pixels (W x H). The logo background should be transparent for the best results. Your image may be resized if needed but will maintain the same proportions.
- To preview your colors and logo, click the “Preview” button.
- If colors and logo settings are acceptable, click “Save Whitelabel Theme.” If not acceptable, modify as needed or click “Reset Default” to revert to default settings.
- If not already enabled, activate the white label feature by toggling the “Activate” button at the top of the page.
- The user can adjust the dimension of the logo or select a specific part of the uploaded image in the logo section.
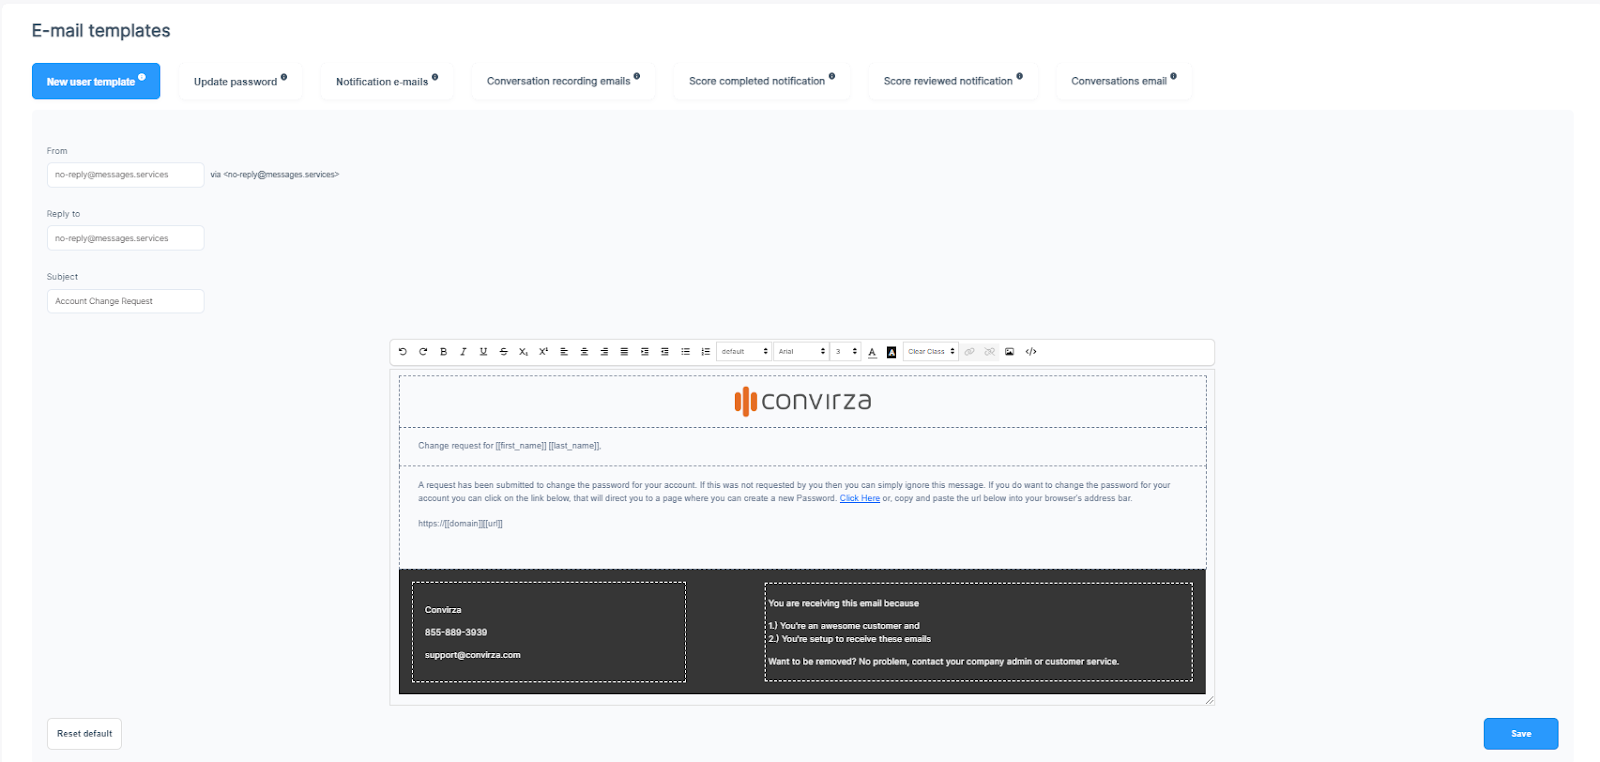
Convirza’s Actionable Insights automatically sends emails to users or other recipients under the following conditions:
- When a new user is created
- When a user password needs to be reset
- When a call is received which meets the conditions of a Call Action
- When a call recording is emailed from the Call Details page
- When the scoring of the call is completed
- When the review of the call is completed
- When the conversation is shared.
The account admin can customize these email templates to contain their logo, layout, and content. Knowledge of basic HTML helps create these email templates, although a WYSIWYG editor is provided. When creating email templates, remember that fonts, colors, and layouts should use appropriate HTML standards for display within an email client on desktop and mobile devices. In addition to the WYSIWYG editor, email templates can be created in any HTML editor and then pasted as source code into the email template by clicking the “Source” button in the editor window.
To create a custom email template:
- Login to your account and navigate to Settings>Customization>White Label
- In the Email Template section of the page, select one of the email types from the choices on the right side of the header. You can modify New User Emails, Update Password, Notification Emails, and Call Recording Emails.
- Modify the “From” name, “Reply-to” email address, email “Subject,” and email HTML content.
- You must click “Save” before switching to another email template, or changes will be lost.
Although the “From” name can be customized in an email template, the actual “From” email address will always be no-reply@messages.services. This is to maintain email delivery standards, CAN-SPAM compliance, and avoid email domain blacklisting.