
SMS Conversations is Convirza’s text messaging workspace. From a single module you can hold two-way conversations with customers, send one-off or bulk messages, maintain reusable audience lists, honour opt-outs, and measure how your messaging performs.
You will find it in the left navigation under INSIGHTS → SMS Conversation.
Note: This article replaces the previous SMS Conversations and Bulk SMS Conversations articles. The older SMS portal (Active / Team / Closed conversation tabs, the SMS Users pop-up, and the CSV-upload Bulk SMS module) has been retired.
Table of Contents
Click to quickly access specific sections
- Before You Begin
- SMS Inbox — read, reply, assign and close conversations
- Compose SMS — send a message now or schedule it
- Lists — contact lists and opt-out numbers
- Broadcasts — track bulk campaigns
- SMS Reports — delivery, replies, response time and opt-out trends
- Frequently Asked Questions
Before You Begin
SMS must be enabled on your account before any of the features below will work. Make sure the following are in place:
- Brand and campaign registration is complete. A2P 10DLC registration is required by U.S. carriers. Contact the Convirza Telecom team at telecom@convirza.com to start or check the status of your registration.
- At least one SMS-enabled tracking number. SMS is switched on per tracking number in its settings. Only SMS-enabled, 10DLC-compliant numbers appear in the Send From and Send As selectors.
- Agent ring-to numbers are configured, if you want replies routed to a specific agent.
Tip: If a number you expect to see is missing from a dropdown, it almost always means SMS is not enabled on that tracking number, or its campaign registration has not been approved yet.
The Four Tabs
Every page in the module shares the same header. Use the tabs on the top right to move between areas, and + Compose SMS to start a new message from anywhere.
- Inbox — Read and reply to incoming one-to-one conversations. Assign, note and close them.
- Broadcasts — Review outgoing bulk campaigns, their delivery status and response counts.
- List — Build and maintain contact lists, and manage the opt-out number list.
- Reports — Analyse delivery, replies, response times and opt-out trends. Schedule reports by email.
- + Compose SMS — Create and send a new message or broadcast — now or scheduled for later.
SMS Inbox
The SMS Inbox is where you manage incoming one-to-one text conversations. It is built so that a team can respond quickly, stay organised, and avoid two agents replying to the same customer at the same time.
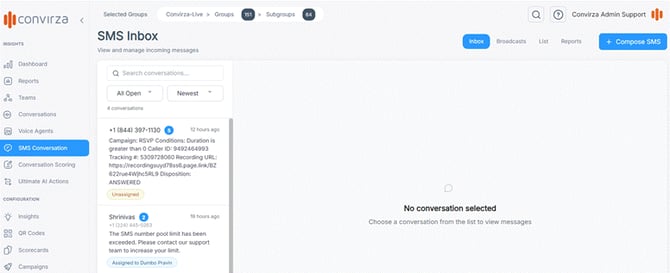
The SMS Inbox, reached from SMS Conversation in the left navigation.
Inbox Layout
The Inbox uses a three-pane layout.
1. Conversation List (left)
Lists every conversation matching your current filter. Each card shows:
- Contact name, or the phone number when no name is known
- Phone number
- Unread count — the blue badge next to the name
- Time of the last message (for example, “12 hours ago”)
- Message preview
- Ownership label — either Unassigned or Assigned to <agent name>
Above the list you also get a Search conversations… box, a status filter, a sort control, and a running count of how many conversations are currently shown.
2. Chat Window (centre)
Opens automatically when you select a conversation. Here you read the full message history, send an SMS Reply, or leave an Internal Note for your team. Messages are grouped by day, and each message is timestamped.
3. Conversation Details (right)
Holds the context for the conversation — contact, line, owner, status, campaign, broadcast, tags, message count, activity timestamps and appended data. Open or close it with View details.
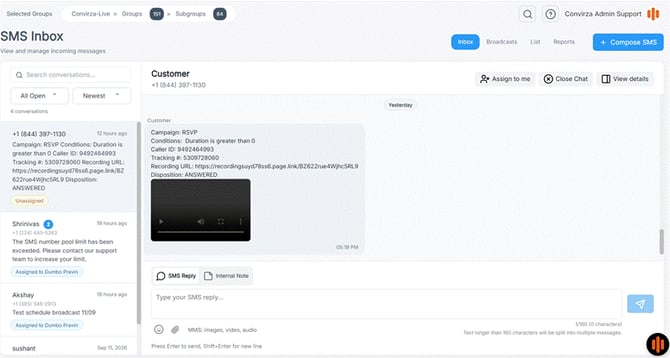
A conversation open in the chat window, with the SMS Reply and Internal Note tabs below.
Reading and Replying
Reply to a customer
- Open the conversation from the left panel.
- Select the SMS Reply tab below the chat window.
- Type your message in Type your SMS reply…
- Press Enter, or click the send (paper plane) button.
Use Shift + Enter to start a new line without sending.
Note: The counter under the reply box shows 1/160 (0 characters). Every 160 characters counts as one SMS segment — the page warns you that text longer than 160 characters will be split into multiple messages. Longer messages still arrive as one message on most handsets, but they are billed per segment.
Send images, video or audio (MMS)
Use the paperclip icon beside the reply box to attach media. The supported types are listed under the box: MMS: images, video, audio. Received media plays inline in the chat window. An emoji picker sits next to the paperclip.
Leave an internal note
Use Internal Note when you want to communicate with teammates rather than the customer.
- Open the conversation.
- Select the Internal Note tab.
- Type your note and save it.
Important: Internal notes are private to your team. The customer never receives or sees them. Always double-check which tab is selected before you type — SMS Reply goes to the customer.
Internal notes work well for asking a teammate for help, leaving context for the next agent, or recording what you have already checked.
Filtering, Searching and Sorting
As the inbox grows, use the controls above the conversation list to narrow it down.
- Search conversations… — Free text. Find a conversation by contact name, number or message content.
- Status filter — All Open, Assigned to Me, Unassigned, Closed. Focus on what needs attention. All Open is the default.
- Sort — Newest, Oldest. Answer the freshest messages first, or work through a backlog in order.
Assigning and Closing Conversations
Assign a conversation to yourself
To stop two agents replying to the same customer, Convirza uses a claiming workflow. When a conversation shows Unassigned, click Assign to me in the chat header.
Once claimed:
- You become the conversation owner.
- The card in the list shows Assigned to <your name>, so the rest of the team can see who has it.
- Teammates can still read the thread — ownership is about clarity, not access.
Tip: Make Assign to me your first click on any unassigned conversation, before you start typing.
Close a conversation
When the customer’s issue is resolved, open the conversation and click Close Chat in the chat header.
After closing, the conversation moves to Closed and no longer appears under All Open. If the customer texts again, a new message re-opens the thread.
Conversation Details Panel
Click View details in the chat header to open the right panel. It has two tabs: Details and Data Append.
Details tab
Gives you the context behind the conversation:
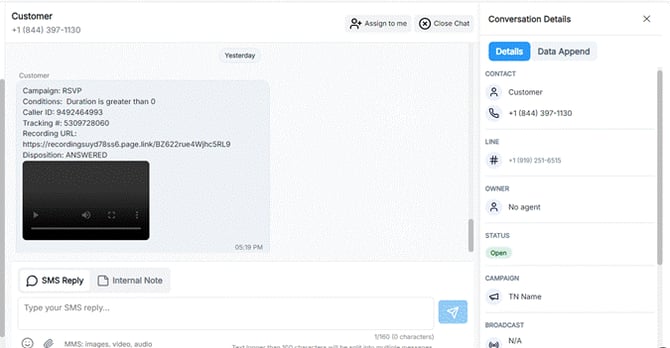
The Details tab — contact, line, owner and status.
Once claimed:
- You become the conversation owner.
- The card in the list shows Assigned to <your name>, so the rest of the team can see who has it.
- Teammates can still read the thread — ownership is about clarity, not access.
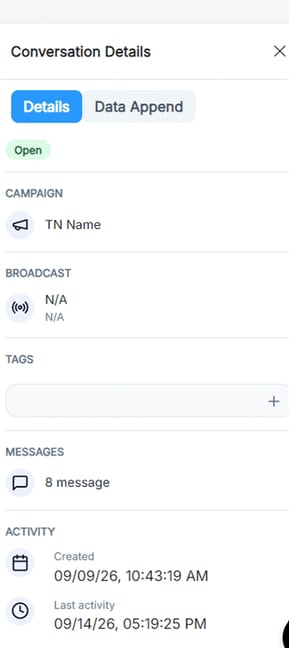
Campaign, Broadcast, Tags, Messages and Activity, further down the Details tab.
Data Append tab
Shows enriched information about the contact where Convirza is able to match the number. The fields are:
- Caller Name
- Company Name
- Address, City, State, Zip
- Line Type
- Age Range
- Gender
Anything that cannot be matched shows Not available. Enrichment runs automatically — there is nothing to trigger manually.
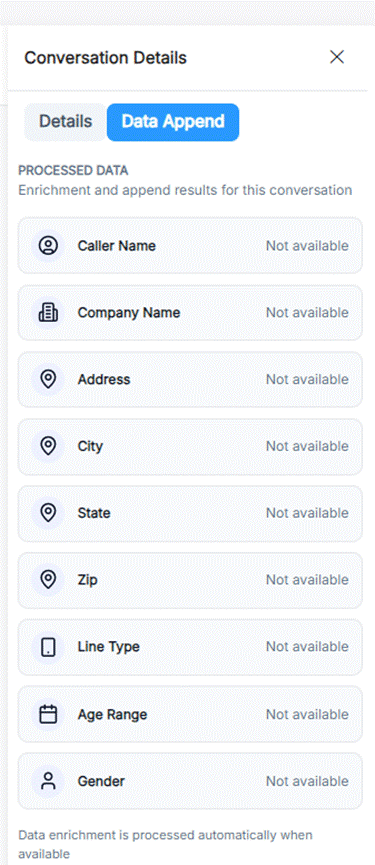
The Data Append tab. Unmatched fields show “Not available”.
Data Append is most useful when a number is unknown, when you need more context before responding, or when you want to personalise a reply.
Compose SMS
Compose SMS opens the Compose Message page, where you send a text to one person or to many recipients at once. Every send from this page — single or bulk — is recorded as a broadcast, which is how it later appears in Broadcasts and Reports.
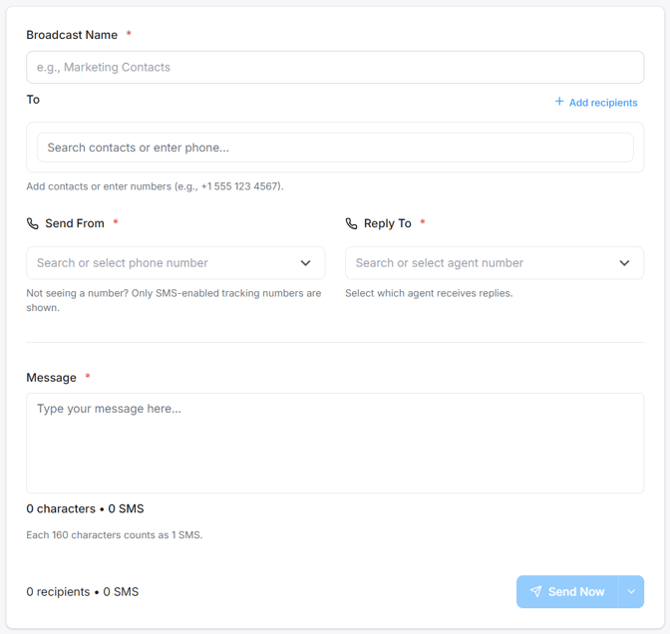
The Compose Message page — Broadcast Name, To, Send From, Reply To and Message.
Step 1 — Name the broadcast
Enter a Broadcast Name. This field is required. Choose something you will recognise later in the Broadcasts list and in reporting, for example “September Service Reminder”.
Step 2 — Add recipients
In the To field, search for a saved contact or type a phone number directly, in the format +1 555 123 4567.
For more than a handful of recipients, click + Add recipients to open the recipient picker, which offers three ways in:
- Contacts — Search by name or phone number, tick the people you want, then click Add Selected.
- Lists — Search for a saved list and click Select to use it as your audience. The fastest route for a recurring campaign.
- Upload — Upload a CSV. You will be asked for a List Name (required) and an optional Description; the upload is saved as a new list. Click Sample for a template.
Step 3 — Choose the sending number
Use Send From to pick the tracking number the message is sent from. Only SMS-enabled tracking numbers appear here — the page notes this directly under the field.
Tip: Pick the number that matches the use case, so customers recognise who is texting them. Sending a support follow-up from a marketing number is a common cause of confused replies and opt-outs.
Step 4 — Choose who receives replies
Use Reply To to select which agent number should receive responses. This matters most on bulk sends, where replies can arrive long after the message went out.
Step 5 — Write the message
Type into the Message box. Below it, a live counter shows characters and SMS segments, with the reminder that each 160 characters counts as 1 SMS. The footer of the page totals up recipients and SMS so you can see the size of the send before you commit to it.
Step 6 — Send now or schedule
Click Send Now to send immediately. Use the arrow beside the button to choose Schedule for later instead, then set the date and time.
Scheduling is useful for keeping sends inside business hours, timing reminders ahead of an appointment, or hitting the hours when your audience actually replies — which the Reply Volume by Hour heatmap in Reports can tell you.
Lists
The List tab opens the Lists page, which manages two things: your reusable Contact Lists, and your Opt-Out Numbers.
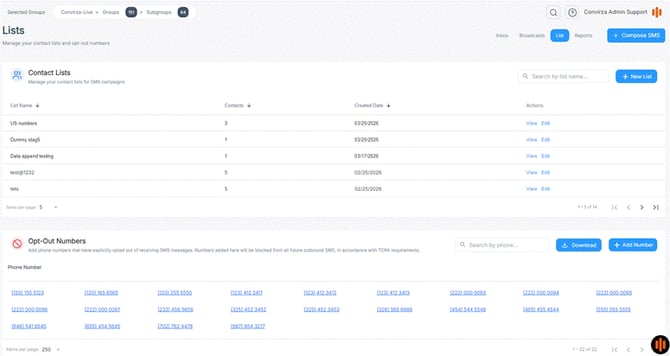
The Lists page — Contact Lists above, Opt-Out Numbers below.
Contact Lists
The Contact Lists table shows every saved list with its List Name, Contacts count, Created Date, and Actions (View and Edit). Use Search by list name… to find one quickly, and the paging controls at the bottom when you have many.
Create a list
Click + New List. In the Create New List window:
- Enter a List Name (required) and an optional Description.
- Add contacts one at a time by entering a Name (optional) and Phone (required), then clicking + Add Contact. Repeat as needed.
- Or import in bulk: under Or import from CSV (Name, Phone columns), click Choose File and select your file. Click Sample to download a correctly formatted template first.
- Click Create List.
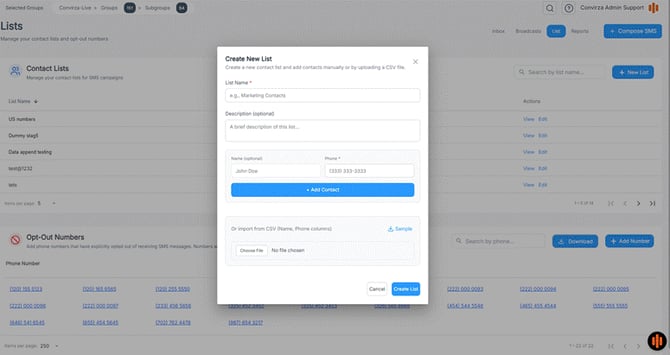
The Create New List window, with manual entry and CSV import.
Tip: Names are optional, but adding them makes the list far easier to manage later — and lets the Inbox show a name instead of a bare phone number.
View a list
Click View beside any list. The list page shows its name and status (for example, active), a searchable Contacts table with Name, Phone and Added Date, and an Export CSV button.
The Actions panel on the right offers:
- Send SMS to All — start a message to everyone on the list
- Export Contacts — download the contacts
- Edit List — change details or manage contacts
- Delete List — permanently remove the list
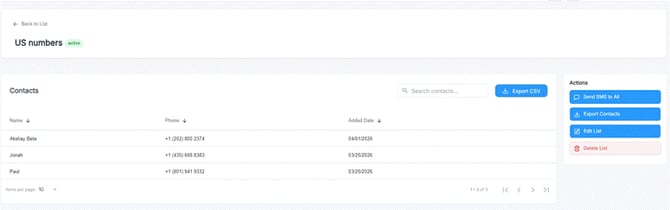
A contact list open, with the Actions panel on the right.
Important: Delete List cannot be undone. Export the contacts first if there is any chance you will need them again.
Edit a list
Click Edit List to open the edit page. Under List Details you can change the List Name and Description. Under Manage Contacts you can:
- Search the list with Search by name or phone…
- Import CSV to add contacts in bulk
- Add Contact to add one manually
- Remove a contact with the trash icon in the Actions column
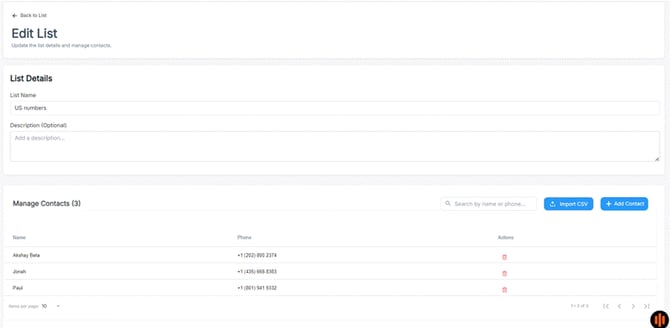
The Edit List page.
Opt-Out Numbers
The Opt-Out Numbers section holds every number that must not receive SMS from your account. Numbers listed here are blocked from all future outbound SMS, in line with TCPA requirements.
Numbers are added automatically when a customer replies STOP. You can also manage the list yourself:
- Add Number — Opens a window where you can paste one or many numbers, separated by new lines, commas or spaces, then click Add to Opt-Out List.
- Search by phone… — Check whether a specific number is already suppressed.
- Download — Export the full opt-out list for your records or for an audit.
Important: Honouring opt-outs is a legal requirement, not a preference. Never remove a number from this list because a campaign under-performed — only remove one if the customer has explicitly asked to resume messages (typically by replying START).
Broadcasts
The Broadcasts page manages your outgoing SMS campaigns. It opens with a performance snapshot, followed by a full list of what you have sent.
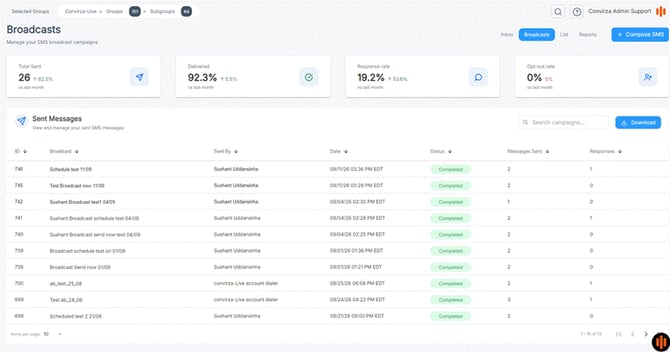
The Broadcasts page — summary cards above the Sent Messages table.
Summary Cards
Four cards across the top summarise performance for the period, each with a comparison against the previous month:
- Total Sent — Total SMS messages sent across all broadcasts.
- Delivered — Percentage of sent messages the carrier confirmed as delivered. A healthy list normally sits high; a drop points to invalid numbers or carrier filtering.
- Response rate — Percentage of recipients who replied — your engagement measure.
- Opt-out rate — Percentage who opted out. A rising figure usually means you are messaging too often, targeting the wrong audience, or the content is not matching expectations.
Sent Messages Table
Lists every broadcast you have sent. All columns are sortable.
- ID — Unique broadcast identifier.
- Broadcast — The broadcast name you entered when composing.
- Sent By — The user or account that sent it.
- Date — When it was sent or scheduled, with timezone.
- Status — Current delivery state — see below.
- Messages Sent — How many messages went out.
- Responses — How many replies came back. Click the number to jump into those conversations.
Use Search campaigns… to find a broadcast by name, Download to export the list for reporting, and the paging controls to move through your history.
Broadcast Statuses
- Scheduled — Queued to send at a future date and time.
- Pending — Created but not yet started.
- In progress — Currently sending.
- Completed — Finished sending.
- Failed — Could not be sent. Review the contact list, the sending number and the message, then try again.
Note: Completed means Convirza finished handing the messages to the carrier — it is not the same as every message being delivered. Use the Delivered card, or the Broadcast Outcomes Funnel in Reports, to see actual delivery.
SMS Reports
The Reports page gives you detailed analytics for your SMS activity, so you can measure performance over time and improve future messaging.
Report Filters
The filters at the top control every chart and table on the page. Set them, then click Apply Filters.
- Date Range — Filters all analytics by send date, for example Last 7 Days.
- Broadcasts — Narrows to a single broadcast so you can analyse one campaign on its own.
- List — Narrows to a single audience list — useful for comparing how different audiences respond.
- Send As — Narrows to a specific sending number. Only SMS-enabled, 10DLC-compliant numbers appear here.
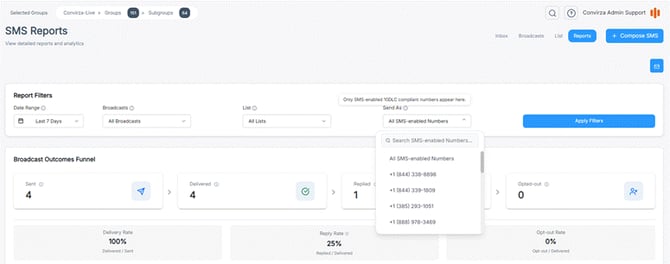
The Send As filter lists only SMS-enabled, 10DLC-compliant numbers.
Broadcast Outcomes Funnel
A snapshot of overall performance, stepping through Sent → Delivered → Replied → Opted-out, with the three key rates underneath:
- Delivery Rate = Delivered / Sent
- Reply Rate = Replied / Delivered
- Opt-out Rate = Opted-out / Delivered
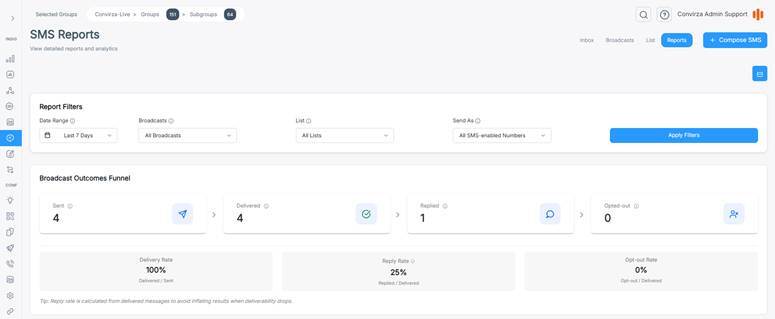
Report Filters and the Broadcast Outcomes Funnel.
Note: Reply rate is calculated from delivered messages rather than sent, so the number stays honest when deliverability drops. A campaign that reaches half as many people does not get credit for a doubled reply rate.
Reply Rate Over Time
Shows how engagement changes day by day. Use it to spot the spike after a large send, a drop that suggests message fatigue, or a trend as your messaging improves.

Reply Rate Over Time.
Time to First Reply
Shows how quickly customers respond after receiving a message, with a median figure in the corner and a breakdown across time buckets. Useful for measuring urgency, understanding customer behaviour, and setting realistic follow-up expectations for your team.
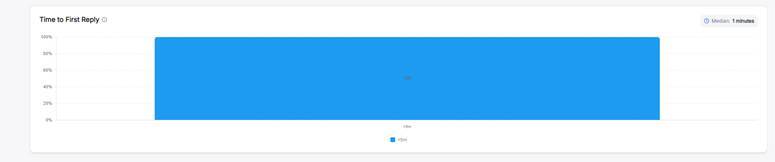
Time to First Reply, with the median shown top right.
Opt-out Trend
Plots opt-outs over time. Watch it to identify a campaign that caused a spike, a correlation between send frequency and opt-outs, or a list whose quality is slipping.

Opt-out Trend.
Reply Performance Breakdown
Compares reply performance across segments. Switch between By Broadcast, By List and By From using the buttons on the right, and use the download icon to export the table.
Columns: Sent, Delivered %, Unique Replies, Reply %, Median Time and Opt-out %.

Reply Performance Breakdown, shown By Broadcast.
This is the quickest way to answer questions like “which broadcast performed best?”, “which list replies most?” and “which sending number is generating opt-outs?”
Reply Volume by Hour
A heatmap of when recipients actually reply, by day and hour. Darker cells mean more replies. Use it to choose better send times and avoid the hours when nobody engages.
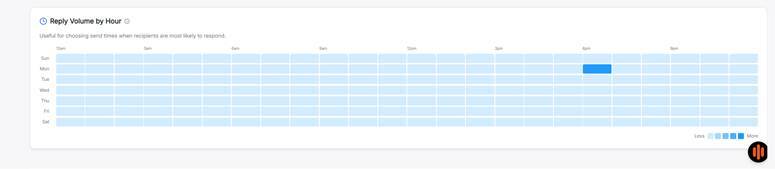
Reply Volume by Hour.
Emailing and Scheduling Reports
The mail icon at the top right of the Reports page opens three options:
- Send Now — Emails the current report immediately, using the filters you have applied.
- Schedule Report — Sets up automated delivery on a recurring schedule.
- Manage Report — Views, edits or deletes the schedules you already have.
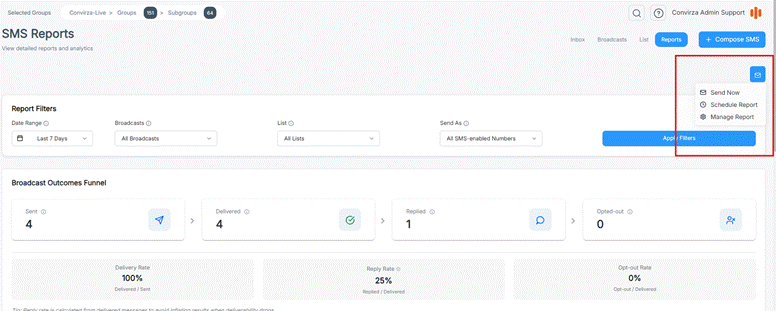
Send Now, Schedule Report and Manage Report.
Create a schedule
Choose Schedule Report and complete the Create Schedule window:
- Enter a Schedule Name.
- Add up to 10 recipients by typing an email address and clicking +. Your own address is included by default; remove it with the × on the chip if you do not want it.
- Choose a Report Format — PDF or CSV.
- Set the Frequency (for example, Daily) and the Time, together with the timezone the time should be read in.
- Under Applied filters, click Edit filters to set the Date Range, Broadcast, List and Send As the scheduled report should use, then click Done.
- Click Create Schedule.
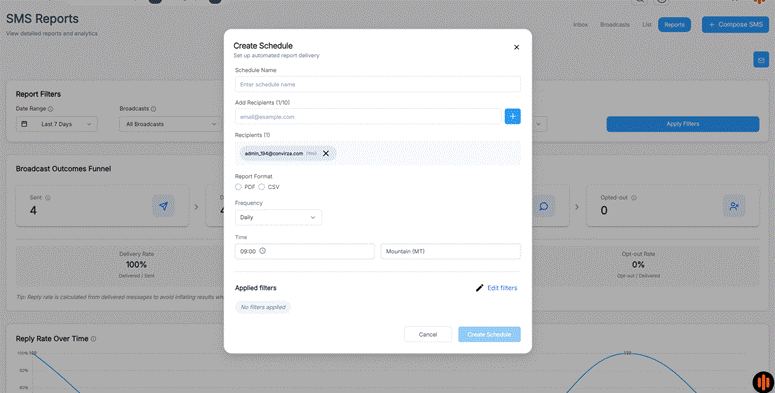
The Create Schedule window.
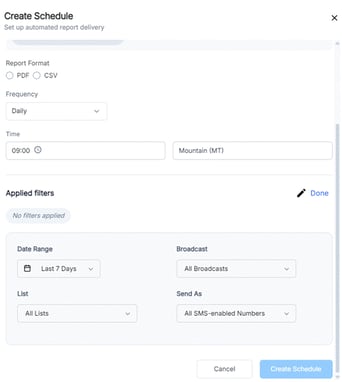
Applied filters expanded inside Create Schedule.
Note: A schedule stores its own filters. Changing the filters on the Reports page afterwards does not change what a saved schedule sends.
Manage existing schedules
Choose Manage Report from the mail icon menu. This opens the Manage Schedules window, listing every schedule you have. Each entry shows the schedule name, what it covers and its format (for example, “All SMS • Format: PDF, CSV”), the frequency and time, the timezone, whether it is active, and the recipients. Use the … menu on the right of an entry to Edit or Delete it.
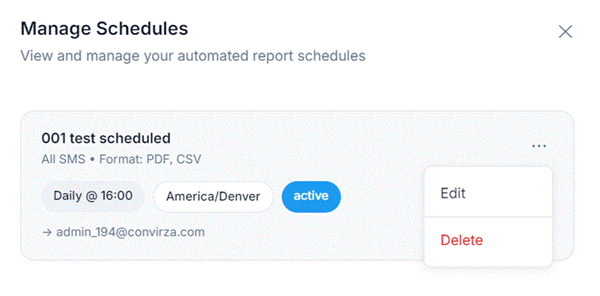
The Manage Schedules window, with the Edit / Delete menu open.
Frequently Asked Questions
What is the difference between the Inbox and Broadcasts?
Inbox is for one-to-one conversations and customer replies. Broadcasts is for bulk campaigns sent to many recipients at once. A broadcast that gets a reply creates a conversation in the Inbox, so the two work together.
What does “Unassigned” mean?
It means no agent has claimed the conversation yet. Click Assign to me to take ownership.
Why should I click “Assign to me” before replying?
It stops two agents replying to the same customer with different answers. Once claimed, the conversation shows your name to the rest of the team.
Can someone else still see a conversation I have claimed?
Yes. Claiming makes ownership clear, it does not hide the thread. Your team can read it and leave internal notes.
What is the difference between SMS Reply and Internal Note?
SMS Reply sends a text to the customer. Internal Note is private to your team and is never delivered to the customer.
What happens when I close a conversation?
It moves to Closed and drops out of All Open. If the customer texts again, the thread re-opens.
Can I send pictures or video?
Yes. Use the paperclip in the reply box. Supported types are images, video and audio (MMS).
How long can a message be?
Every 160 characters counts as one SMS segment. Longer messages are split into multiple segments and billed accordingly, although most handsets reassemble them into a single message.
Why can’t I see a number in the Send From dropdown?
Only SMS-enabled tracking numbers appear there. If a number is missing, SMS is not enabled on it, or its A2P 10DLC campaign registration is not yet approved. Contact telecom@convirza.com.
What does “Reply To” do?
It decides which agent number receives responses to the message. This matters most on bulk sends, where replies can arrive well after the send.
How do I send to a lot of people at once?
Build a contact list under List, or upload a CSV from within + Add recipients when composing. Then send to the whole list from Compose SMS, or use Send SMS to All from the list page.
What format should my CSV use?
Two columns — Name (optional) and Phone (required). Click Sample in the import window to download a correctly formatted template.
Can I schedule a bulk send?
Yes. Use the arrow beside Send Now on the Compose Message page and choose Schedule for later.
What happens if a number is on the Opt-Out list?
It is blocked from all future outbound SMS, in line with TCPA requirements. Numbers are added automatically when a customer replies STOP, and you can add them manually with + Add Number.
A broadcast says “Completed” but the delivered count is lower than the sent count. Why?
Completed means Convirza finished sending. Delivery is confirmed separately by the carrier, and some messages fail — invalid numbers, disconnected handsets or carrier filtering. Check the Broadcast Outcomes Funnel in Reports for the delivery picture.
What should I do if a broadcast shows “Failed”?
Check that the contact list contains valid numbers, that the Send From number is still SMS-enabled and registered, and that the message content is within limits. Fix the cause and send again.
How is Reply Rate calculated?
Replied / Delivered, not Replied / Sent. Basing it on delivered messages keeps the metric accurate when deliverability changes.
What does the “Opt-out %” column mean?
The percentage of delivered messages that resulted in an opt-out, usually because the recipient replied STOP.
Can I get reports by email automatically?
Yes. On the Reports page, use the mail icon → Schedule Report. You can send PDF or CSV to up to 10 recipients on a recurring schedule, and manage existing schedules with Manage Report.
Why does a scheduled report not match what I see on screen?
A schedule saves its own filters at the time you create it. Changing the filters on the Reports page afterwards has no effect on it — edit the schedule itself through Manage Report.
Where did the old Bulk SMS CSV upload go?
It has been replaced. Upload your CSV as a contact list instead — either from List → + New List or from + Add recipients → Upload while composing — then send to that list. Results appear under Broadcasts and Reports.
Why is Data Append showing “Not available”?
Convirza could not match that phone number to enrichment data. It runs automatically where data exists; there is nothing to trigger manually.
Related Articles
For registration help or SMS enablement, contact telecom@convirza.com. For anything else, contact support@convirza.com